Finally successfully built the Laravel Sail environment!
The following tutorial column from laravel will introduce to you how to successfully build a Laravel Sail environment. I hope it will be helpful to friends in need!
Preface
What is beauty?
The moment the built environment is successfully launched, if you ask me what is beauty?
I will not hesitate to throw out the following picture: 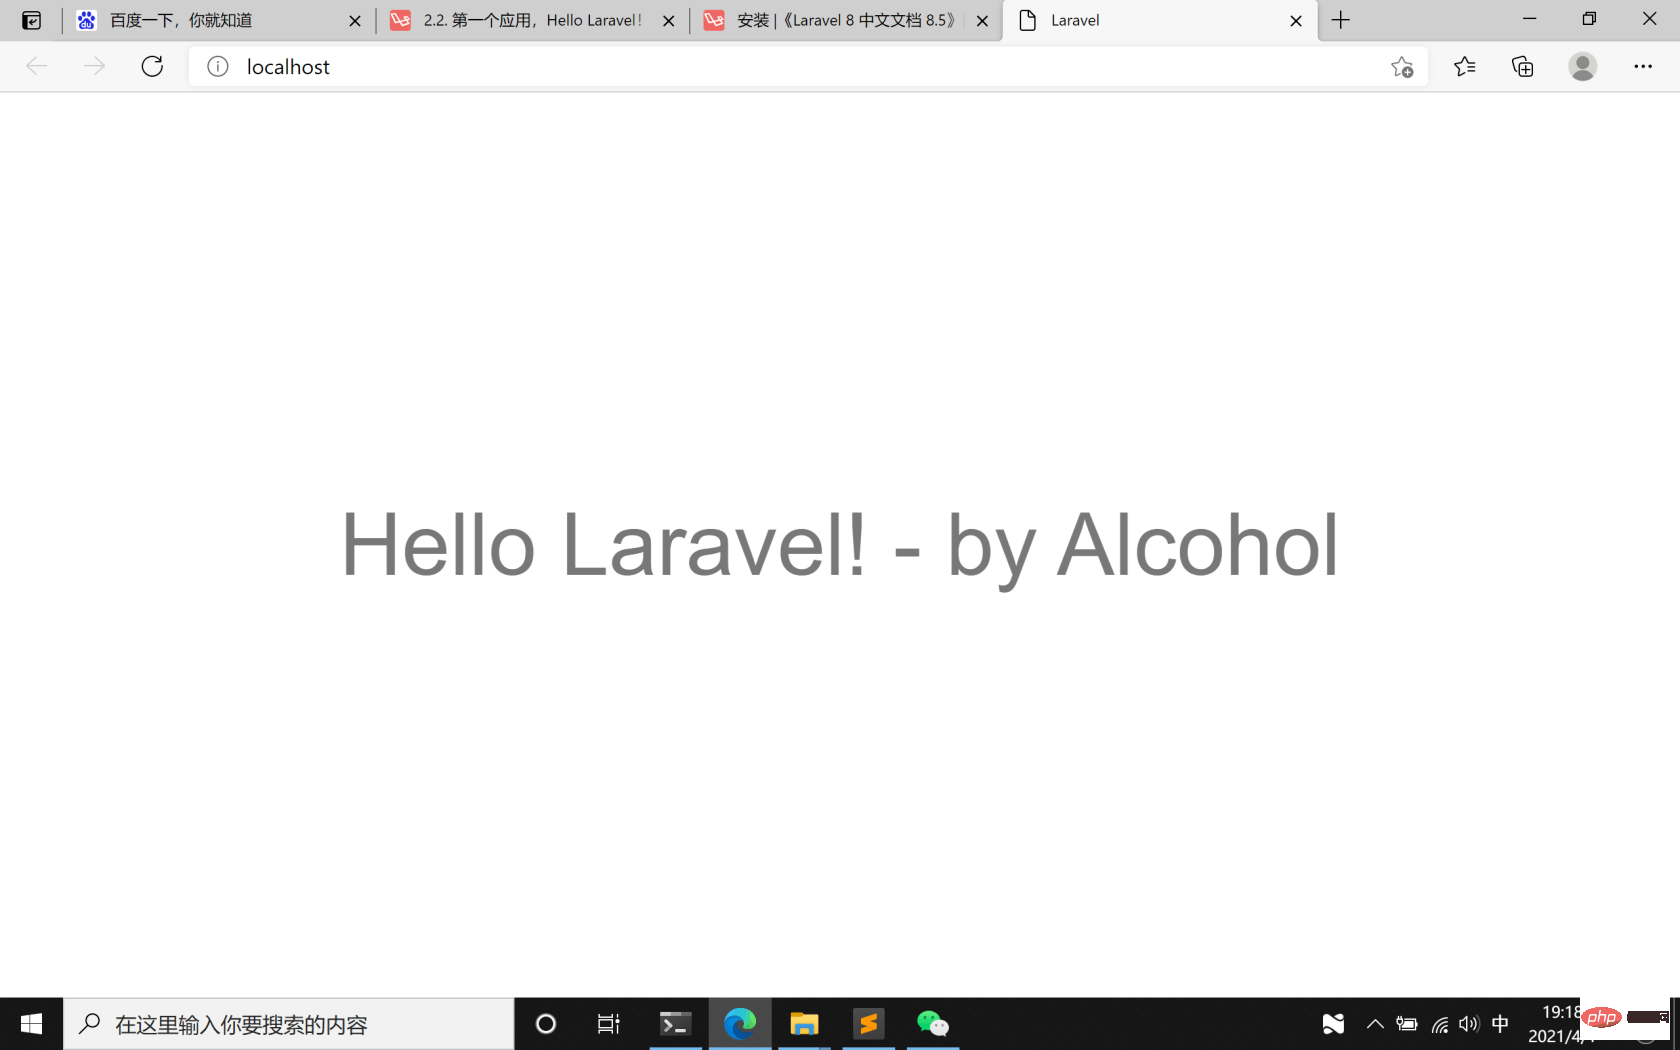
Without further ado, this article is mainly divided into three parts,
The first part, setting up Process, share your own methods and steps for successfully building a Laravel Sail environment (there are slight differences from the documents on the site);
The second part, your journey, share your mentality changes during the building process, people are not machines , so we have many ideas when doing things, some ideas will help us do things, and some will make us stagnate;
The third part, talk about the future things, and also talk about why there is this article .
Let's start.
Building process
My computer
First clarify the situation of your computer, as shown below: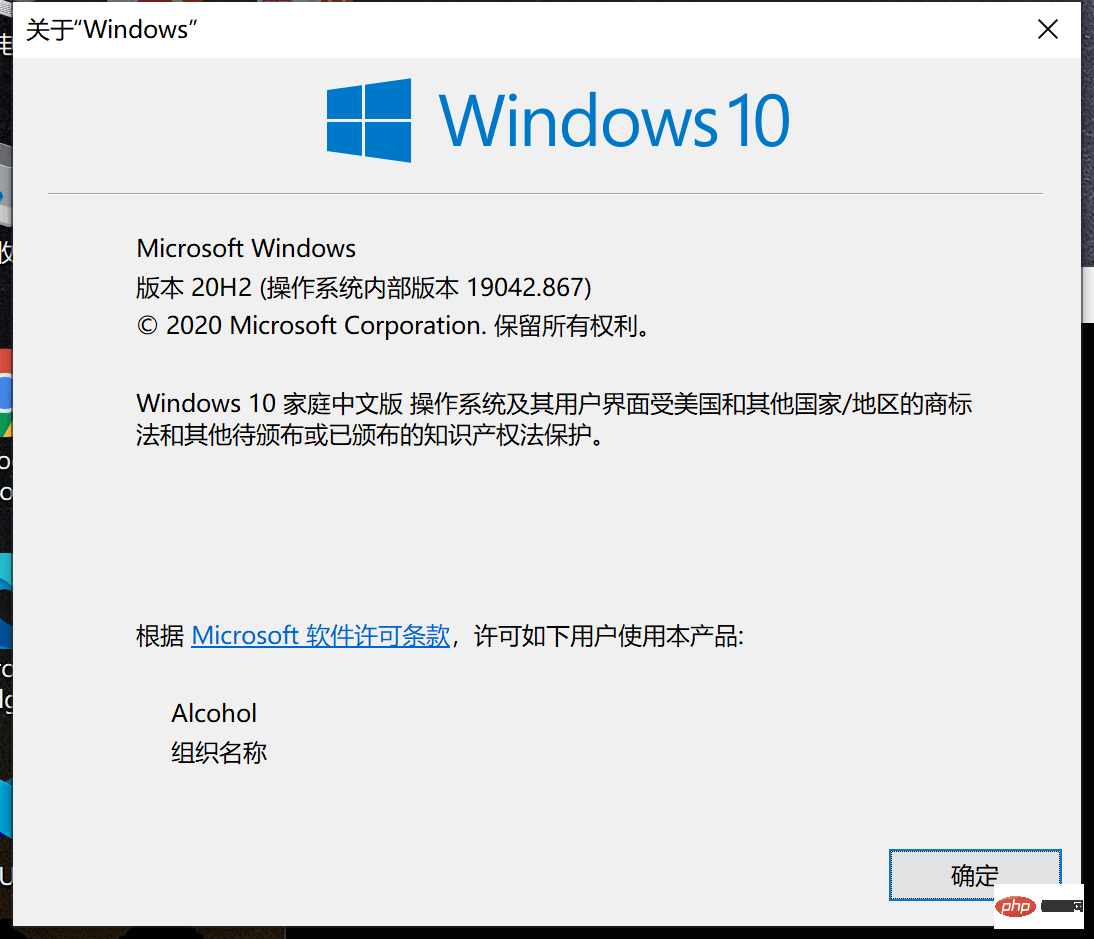
So, how to check the status of your computer?
Two steps.
1. Win R key to open the "Run" dialog box, enter cmd, and press Enter.
2. Enter winver in the cmd command line and press Enter. You will see the above picture appear on your desktop.
If your Windows system is different from mine in details, that’s okay. For details, please refer to the system part of the tutorial on the site.
This part of mine is just to clarify the details of my own system. It does not mean that your system must be the same as mine.
My steps
For those who want to build an environment, this is the most important part of the whole article.
My steps are slightly different from the tutorials given on the site. It is also in this part that I realize that details determine success or failure.
First of all, the Chinese documentation for Laravel 8 on the site says this:
Before creating a new Laravel application, please make sure that Docker Desktop is installed on your Windows computer.
After that, make sure Windows Subsystem for Linux 2 (WSL2) is installed and enabled.
WSL allows you to run Linux binaries on Windows 10.
For information on how to install and enable WSL2, please refer to Microsoft Developer Environment documentation.
Initially, my installation order was: Docker Desktop –>Windows Subsystem 2 (WSL2).
So, I didn’t succeed at first.
However, after I carefully read the two supplementary documents, I found that the installation order should be reversed: Windows Subsystem 2 (WSL2)–>Docker Desktop.
The specific steps may require several restarts, let’s take a look:
Step 1:
Run cmd as administrator;
Enter:
dism.exe /online /enable-feature /featurename:Microsoft-Windows-Subsystem-Linux /all /norestart
Press Enter, the execution is completed, and restart the computer.
Step 2:
Run cmd as administrator;
Enter:
dism.exe /online /enable-feature /featurename:VirtualMachinePlatform /all /norestart
Press Enter, execution is completed, Restart the computer.
Step 3: Download the Linux kernel update package
Update package download address
After the download is completed, run and install. This update package is very easy to install. Fast.
Step 4: Set WSL 2 as the default version
Run cmd as administrator;
Enter:
wsl --set-default-version 2
Enter.
Step 5: Install Ubuntu and Windows Terminal
Open the Microsoft Store on your computer, search for Ubuntu and Windows Terminal respectively, and install them in order.
By the way, when you run Ubuntu for the first time, you need to set an account and password. However, when you enter the password, there is no prompt in the command line. I didn't know this at first. It's a bit stupid.
Step 6: Check the results
Run cmd;
Enter:
wsl --list --verbose
Press Enter, my results are as shown below : 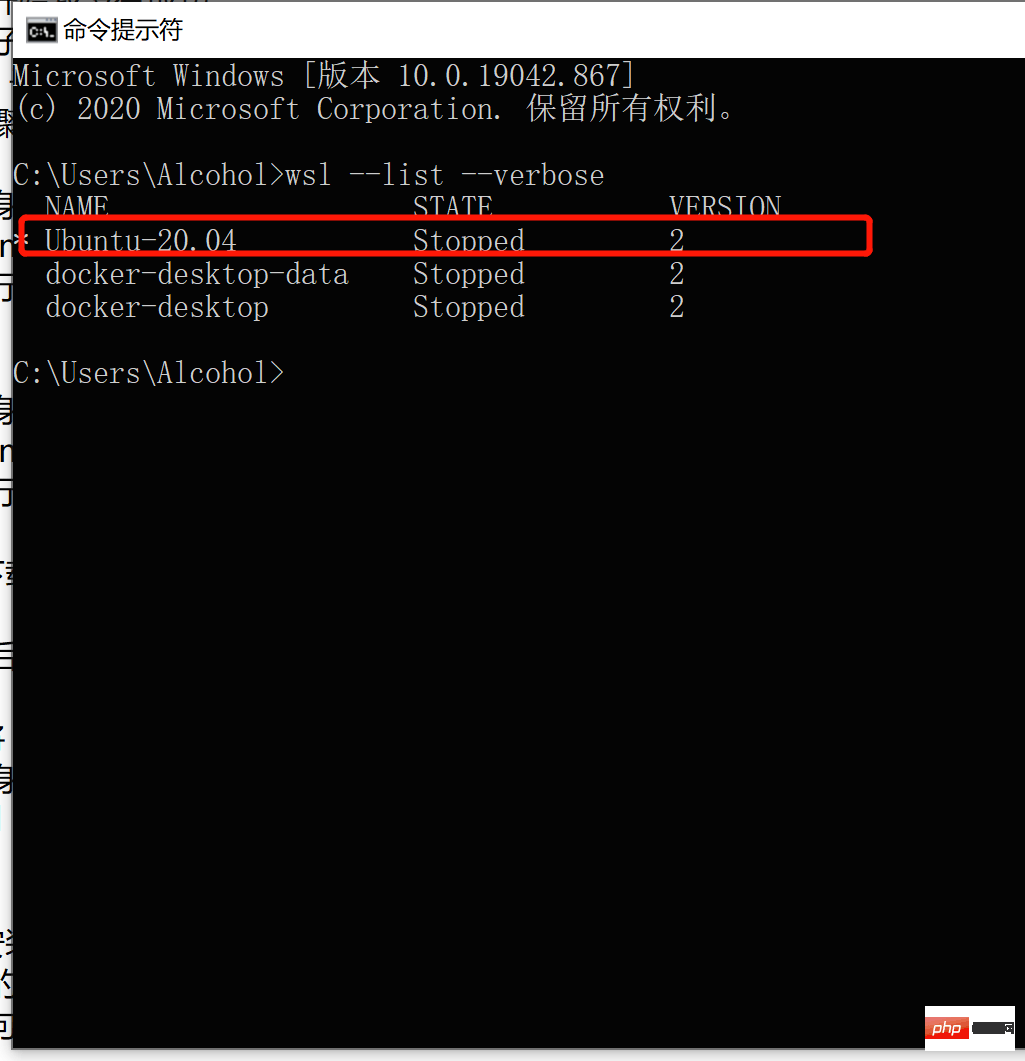
The key point is the line I marked. The last number is 2. That’s it.
At this point, you are very close to success, my friend.
Step 7: Install Docker Desktop.
Docker Desktop download address
After the download is completed, install it, don’t worry about anything, just click next until it is completed.
第8步:跟着站内的教程走。
完成了以上步骤,让我们回到站内的环境部署教程,下图中标记的内容开始,提示:点击目录可以一键直达相关内容。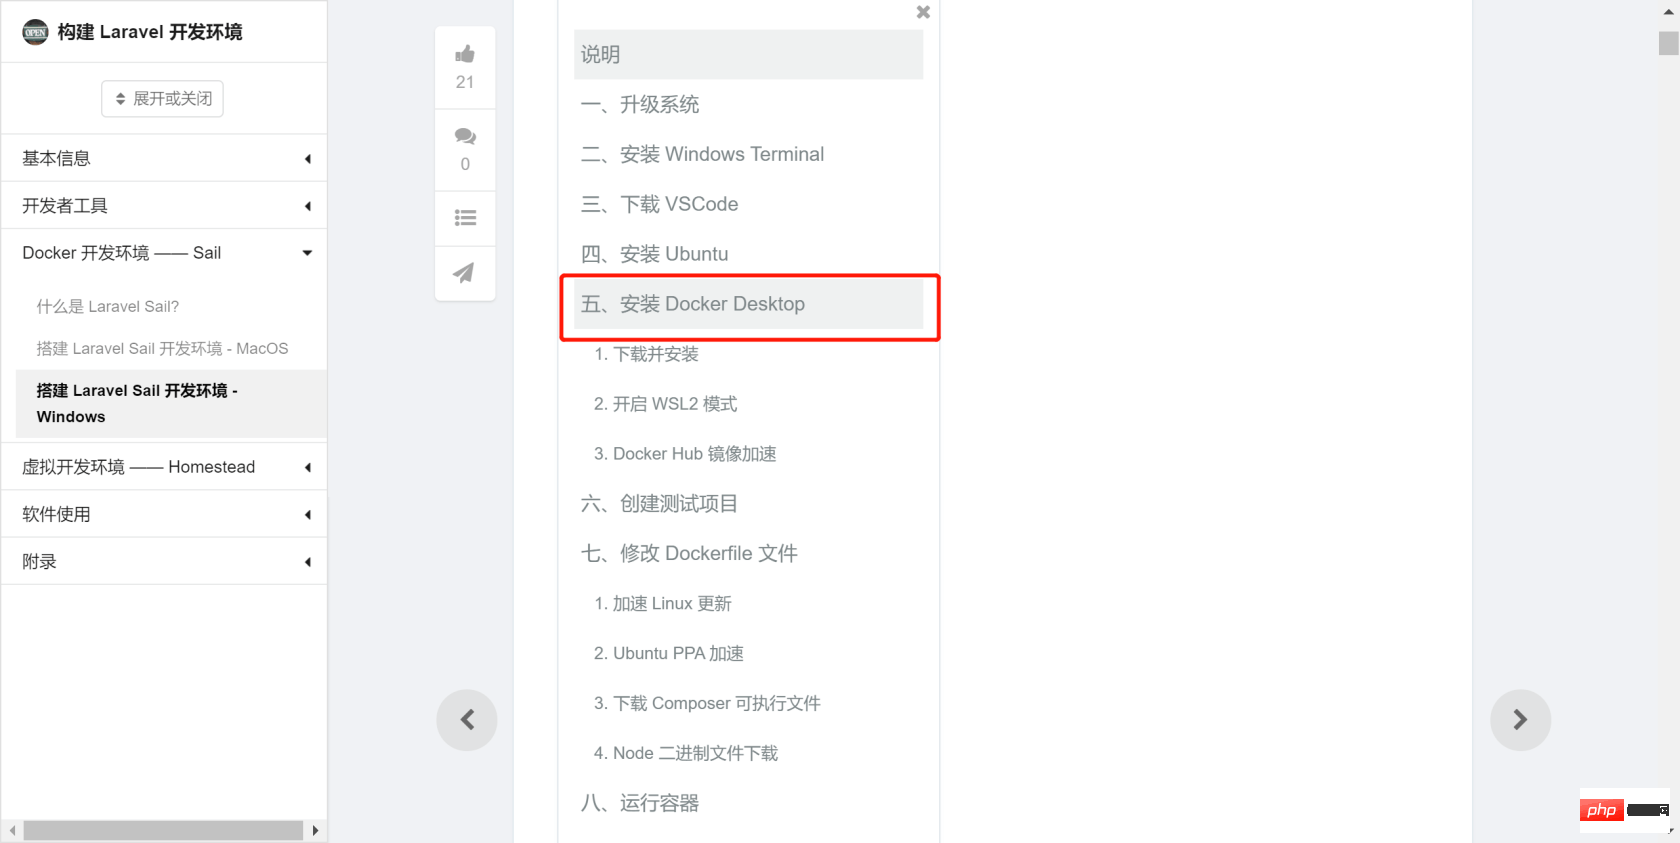
但是我的情况,与教程有一处细微的不同,那就是Docker Desktop开启 WSL2 模式的设置中,我的设置里显示如下图,是默认开启的。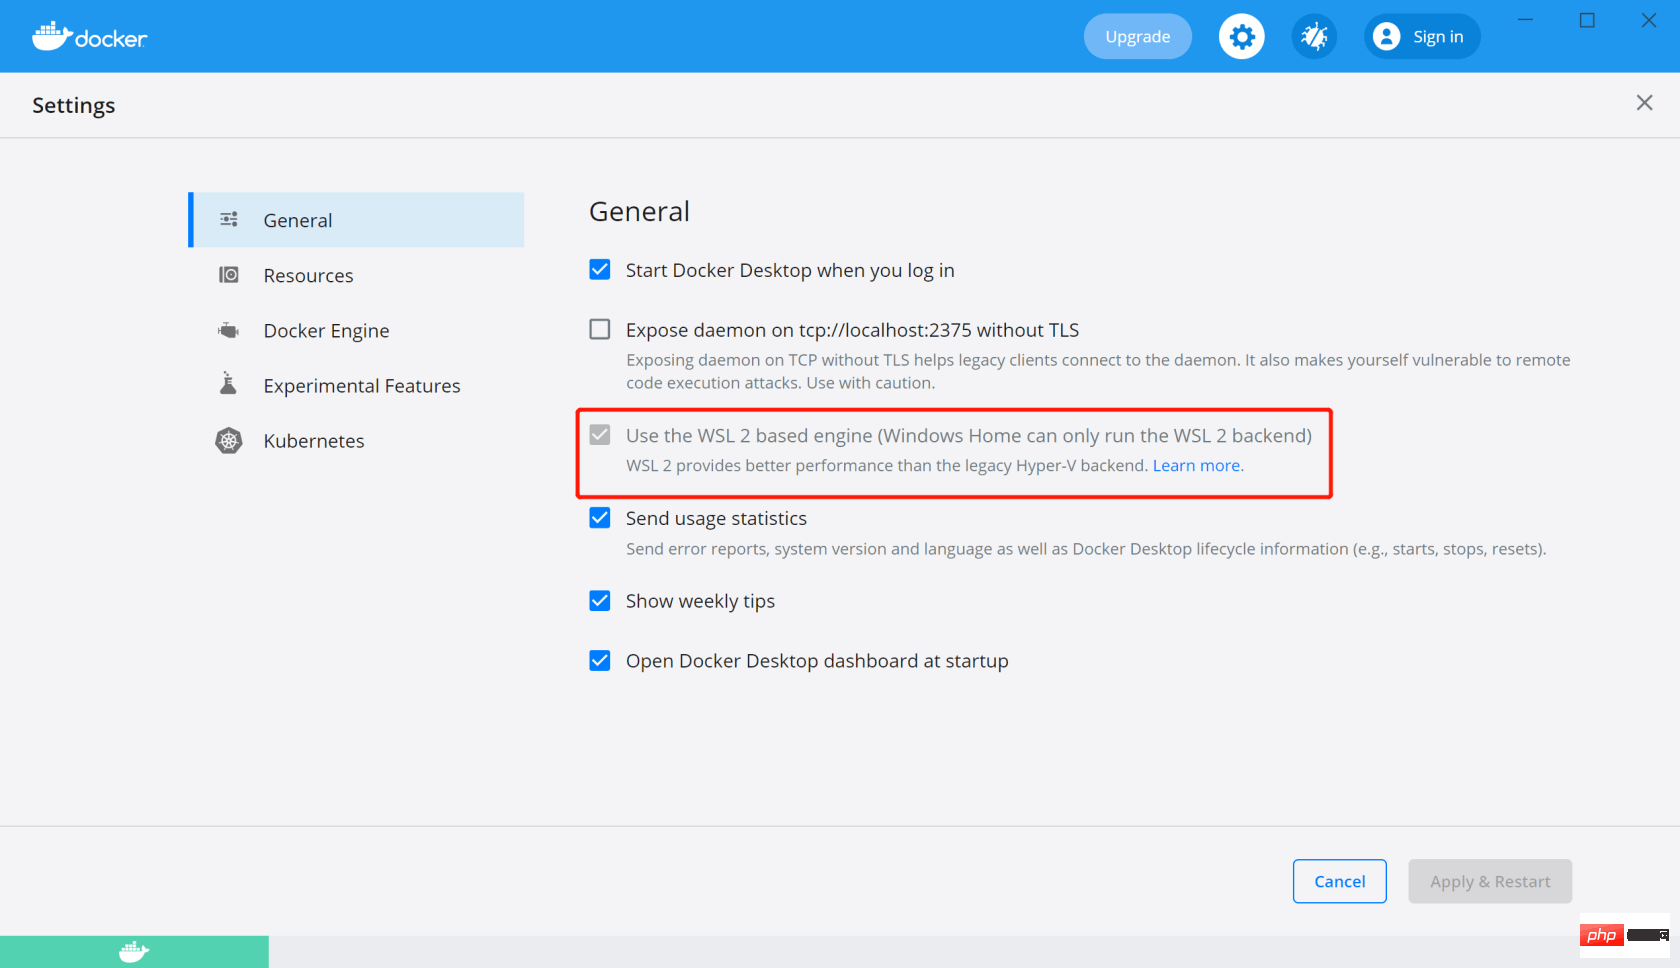
如果你也遇到这种情况,只能说,有缘啊~
第9步:礼物
这一步,请在成功创建测试项目之后,在执行。
创建测试项目之后,需要进行编译,会下载大量的东西,为了加快这一过程,需要把一部分内容修改成国内的镜像源。
站内教程的操作有两个关键:
新建
sources.list文件。修改
Dockerfile文件。
在这里,我已经把需要新增的 sources.list 和修改后的Dockerfile 准备好,朋友们可以直接下载,然后替换对应文件即可。
下载地址
提取码:
i3kn
替换目录:
你的项目位置 \ example-app \ vendor \ laravel \ sail \ runtimes \ 8.0
第10步:等待和耐心
替换完成之后,你需要根原教程一样,在项目根目录,也就是example-app内执行:
./vendor/bin/sail up
到了这一步,请给一点耐心,你会看到电脑一直在编译和执行,也许你还会听到电脑风扇的声音变大了,更有可能的情况是,你会经历几次失败。
但是没关系,只要你已经耐心的根据教程操作,并且关键画面都与教程对的上,那你就是对的。
失败的原因,也许是网络,或者其他你无法控制的东西,我在这一步,也失败了好几次,但是,我依然输入 ./vendor/bin/sail up,然后按下回车。
编译成功之后,你就可以用浏览器打开localhost/
如果你看到如下画面,恭喜你,你成功了(是的,没错)。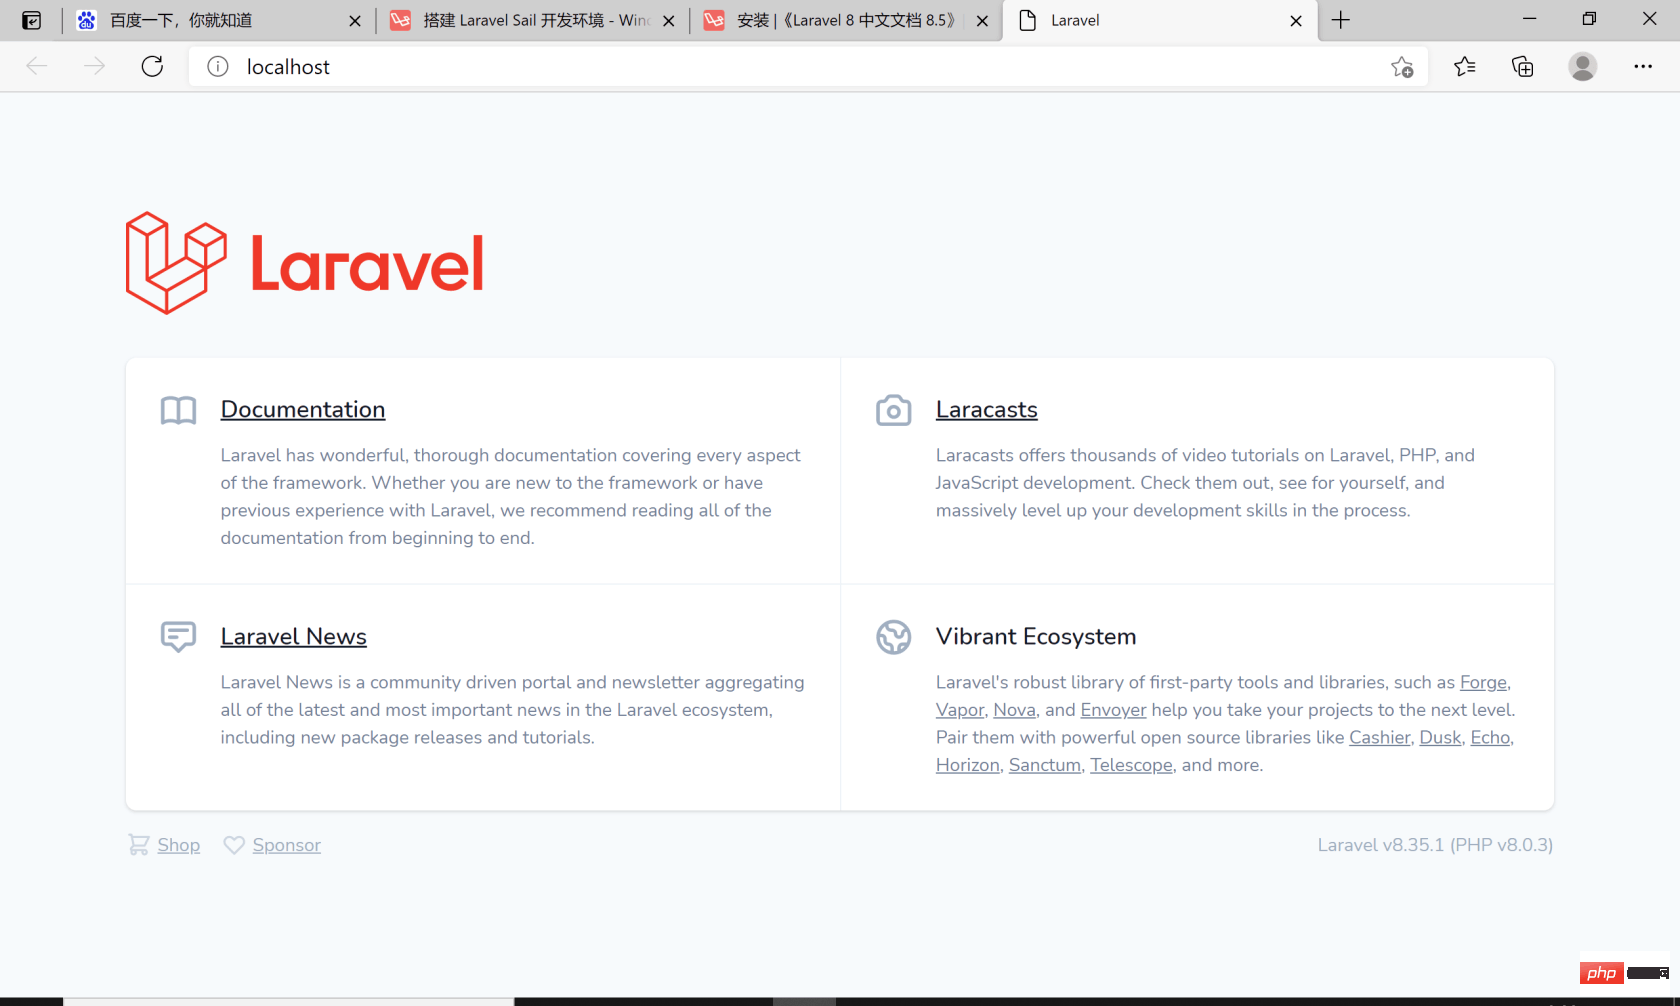
心路历程
如果你成功安装了 Laravel Sail 环境,那就来听我聊聊天吧。
其实一开始选择 Laravel 环境的时候,也是选的Laravel Sail,但是因为步骤的关系,下载回来的 Ubuntu 子系统不是wsl2模式,于是毫无意外地失败了。
这次尝试失败之后,我开始尝试搭建 Homestead 环境。
于是,真正的折磨开始了,可惜当时的我并不知道这回事,我清晰地记得,第一次按照教程往下搭建的时候,我甚至都不能运行 vagrant up 命令,无法进入虚拟机。
那是大前天的下午,我按照教程走了两遍,无果。
于是我开始翻看教程下的讨论,发现有人留言自己安装环境花了半个月时间。
看到这句话的时候,我惊讶又有一点莫名的安心——我才哪里到哪里啊?对吧。
于是我放下事情,去追番去了。
过后的第二天,也就是前天,我再次尝试安装Homestead环境,这次与前一天的不同是,我参考了b站的视频教程,并且在每一次,安装之后,都重装电脑的系统。
因为不知道谁说的,重装系统可以解决90%的问题(剩下10%是需要重装电脑的人,无法解决的)。
靠着百度搜索、B站视频、以及站内安装Homestead环境的教程,这一天,我成功运行 vagrant up和vagrant ssh 进入了虚拟机。
不停地尝试,却没有成功在虚拟机中启动Laravel,说实话我是失落的,但也有一股 我根本没在怕 的想法支持着我一直往下走。
时间来到昨天,经历前一天的失败,我最主要的问题是,Laravel为什么会安装失败?
顺着这个思路,根据系统给出的错误提示去百度(知乎,微信),去尝试,去思考。
最后,可是说是误打误撞地把 Laravel 安装成功了,然而打开测试网址,却发现是No input file specified提示。
根据讨论和百度得出的结果,是虚拟机文件映射的问题。
那就调整 Homestead.yaml 中的配置咯。经过几番尝试,我终于如愿打开了Laravel默认页面。
可是,问题来了:
我无法修改这个页面,文件在我的本机里面找不到!
The installation tutorial sets the file mapping path exactly, but the result is that Laravel installation fails, and the prompt is that the Laravel directory cannot be deleted.
After slightly adjusting the setting file mapping path, Laravel was installed successfully, but when opening the test URL, No input file specified was displayed.
Finally, after another adjustment, Laravel was installed successfully and the default page can be opened, but it cannot be modified on this machine.
In other words, I spent most of yesterday battling with the Homestead.yaml file. During this period, I did not reinstall the system after every failure.
Because I think, I dare to even reinstall the system, why don’t I dare to run the vagrant destory command and delete the relevant folders?
In fact, it is also because after many attempts and comparisons with several tutorials, I have a rough understanding of what each command does and what effect it can achieve.
Finally, yesterday evening, I opened the Laravel welcome page with a browser again, but I still couldn't modify any content on this page, for the same reason as before.
At that moment, I was tired.
So I decided to give my time to Laravel Sail and push Homestead aside first.
After two days of trying, my attitudes and habits have become more detailed. I also opened the Laravel Sail deployment tutorial, Laravel 8 Chinese documentation, documentation and several related materials, and read through the relevant content. , summarize the steps.
The journey went smoothly, and I started to use Docker to compile the Laravel sample project.
I think it will take a while to compile, so I took advantage of this time to have dinner.
I came back from dinner and turned on the computer, and found that the compilation failed. I felt no fluctuation in my heart, so I entered the command to compile again.
However, a change suddenly occurred: I still recognized the word successful. I held back my joy and opened localhost/
. At that moment, I knew that Laravel Sail was successfully installed.
Open the project folder and modify the content of index.php. Finally, the content shown in the first picture of this article appears.
Really successful.
I'm awesome.
I think.
The next thing
My major in school is design, but the web design class exposed me to the front-end (HTML CSS JavaScript ), and game design introduced me to programming (Unity3d C#).
I just scratched the surface and didn’t pay much attention at first. My programming attempt was also very simple. I wanted to obtain a second-level computer certificate through Python.
The result was of course a failure, because at that time, I did not realize the importance of "repetition" to programming.
After graduation, I worked in design. I found that I lacked interest in design work. This year, I started trying to change careers, 360, and switched to programming.
I did the same thing. And I chose the best language in the world as my entry language, hoping to successfully change careers.
Thanks to the friends of this era and community for providing a lot of learning materials, thank you very much.
The above is the detailed content of Finally successfully built the Laravel Sail environment!. For more information, please follow other related articles on the PHP Chinese website!

Hot AI Tools

Undresser.AI Undress
AI-powered app for creating realistic nude photos

AI Clothes Remover
Online AI tool for removing clothes from photos.

Undress AI Tool
Undress images for free

Clothoff.io
AI clothes remover

AI Hentai Generator
Generate AI Hentai for free.

Hot Article

Hot Tools

Notepad++7.3.1
Easy-to-use and free code editor

SublimeText3 Chinese version
Chinese version, very easy to use

Zend Studio 13.0.1
Powerful PHP integrated development environment

Dreamweaver CS6
Visual web development tools

SublimeText3 Mac version
God-level code editing software (SublimeText3)

Hot Topics
 PHP vs. Flutter: The best choice for mobile development
May 06, 2024 pm 10:45 PM
PHP and Flutter are popular technologies for mobile development. Flutter excels in cross-platform capabilities, performance and user interface, and is suitable for applications that require high performance, cross-platform and customized UI. PHP is suitable for server-side applications with lower performance and not cross-platform.
 How to use object-relational mapping (ORM) in PHP to simplify database operations?
May 07, 2024 am 08:39 AM
Database operations in PHP are simplified using ORM, which maps objects into relational databases. EloquentORM in Laravel allows you to interact with the database using object-oriented syntax. You can use ORM by defining model classes, using Eloquent methods, or building a blog system in practice.
 Analysis of the advantages and disadvantages of PHP unit testing tools
May 06, 2024 pm 10:51 PM
PHP unit testing tool analysis: PHPUnit: suitable for large projects, provides comprehensive functionality and is easy to install, but may be verbose and slow. PHPUnitWrapper: suitable for small projects, easy to use, optimized for Lumen/Laravel, but has limited functionality, does not provide code coverage analysis, and has limited community support.
 Laravel - Artisan Commands
Aug 27, 2024 am 10:51 AM
Laravel - Artisan Commands - Laravel 5.7 comes with new way of treating and testing new commands. It includes a new feature of testing artisan commands and the demonstration is mentioned below ?
 Comparison of the latest versions of Laravel and CodeIgniter
Jun 05, 2024 pm 05:29 PM
The latest versions of Laravel 9 and CodeIgniter 4 provide updated features and improvements. Laravel9 adopts MVC architecture and provides functions such as database migration, authentication and template engine. CodeIgniter4 uses HMVC architecture to provide routing, ORM and caching. In terms of performance, Laravel9's service provider-based design pattern and CodeIgniter4's lightweight framework give it excellent performance. In practical applications, Laravel9 is suitable for complex projects that require flexibility and powerful functions, while CodeIgniter4 is suitable for rapid development and small applications.
 How do the data processing capabilities in Laravel and CodeIgniter compare?
Jun 01, 2024 pm 01:34 PM
Compare the data processing capabilities of Laravel and CodeIgniter: ORM: Laravel uses EloquentORM, which provides class-object relational mapping, while CodeIgniter uses ActiveRecord to represent the database model as a subclass of PHP classes. Query builder: Laravel has a flexible chained query API, while CodeIgniter’s query builder is simpler and array-based. Data validation: Laravel provides a Validator class that supports custom validation rules, while CodeIgniter has less built-in validation functions and requires manual coding of custom rules. Practical case: User registration example shows Lar
 PHP code unit testing and integration testing
May 07, 2024 am 08:00 AM
PHP Unit and Integration Testing Guide Unit Testing: Focus on a single unit of code or function and use PHPUnit to create test case classes for verification. Integration testing: Pay attention to how multiple code units work together, and use PHPUnit's setUp() and tearDown() methods to set up and clean up the test environment. Practical case: Use PHPUnit to perform unit and integration testing in Laravel applications, including creating databases, starting servers, and writing test code.
 Laravel vs CodeIgniter: Which framework is better for large projects?
Jun 04, 2024 am 09:09 AM
When choosing a framework for large projects, Laravel and CodeIgniter each have their own advantages. Laravel is designed for enterprise-level applications, offering modular design, dependency injection, and a powerful feature set. CodeIgniter is a lightweight framework more suitable for small to medium-sized projects, emphasizing speed and ease of use. For large projects with complex requirements and a large number of users, Laravel's power and scalability are more suitable. For simple projects or situations with limited resources, CodeIgniter's lightweight and rapid development capabilities are more ideal.


