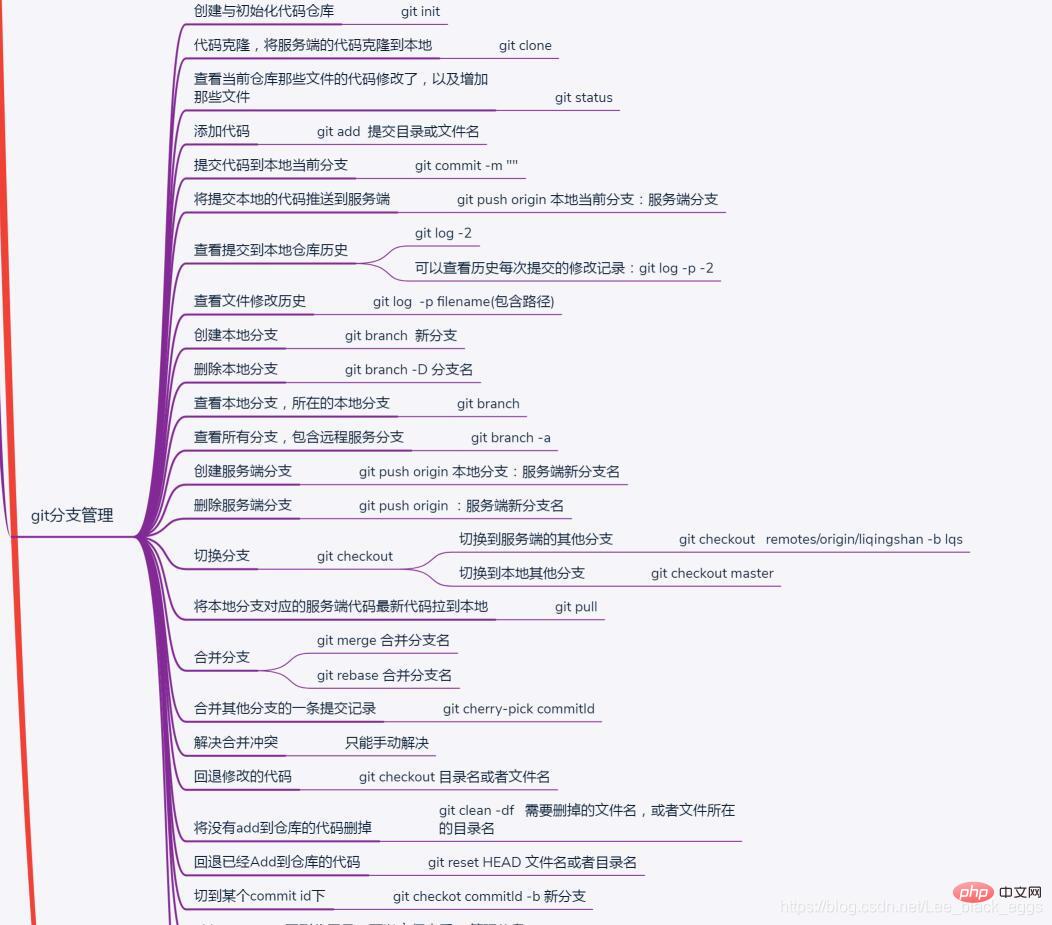


git clone pulled code addressStep one: Pull remote code

1. Right-click on the pulled project to open Git Bash Here (operate git command)Step 2: View local branches and remote branches
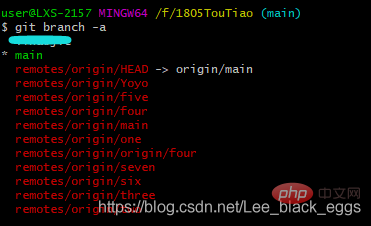
 ##2.git branch -a View all local and remote branches
 All branches are successfully seen here: main is the local branch, and the asterisk * in front indicates the branch being used
The third step is to associate the remote branch with the local branch(If you want to pull Go to the local dev branch, first git checkout -b dev, and then use git pull origin dev, thus binding the local dev branch to the remote origin/dev)1. git pull origin seven
This command is to Associate the local branch with the remote branch, and pull the remote branch origin to the local branch main
2. git branch -vv
 3. For the code that has been associated, directly enter git pull to synchronize it
The fourth step is to upload the local code to the remote On the branch2. View the modified content: git status1. View: gitk --all &
3. Add to the modified local files: git add .
4. Submit to the local: git commit -m "Add comment"
5. Pull the latest code from the server: git pull
6. Submit to the server: git push origin Name of the local branch: Server branch name
 git pull remote Code
Step one: pull the remote codegit clone pulled code address

Step 2: View local branches and remote branches1. Right-click on the pulled project to open Git Bash Here (operate git Command)
 2.git branch -a View all local and remote branches
 All branches are successfully seen here: main It is a local branch. The asterisk * in front indicates the branch being used
The third step is to associate the remote branch with the local branch
1. git pull origin seven
(If you want to pull to the local dev branch, first git checkout -b dev, and then use git pull origin dev, thus connecting the local dev branch to the remote origin /dev is bound) 
This command is to associate the local branch with the remote branch, and pull the remote branch origin to the local branch main
2. git branch - vv
indicates that the main branch has been bound to origin/seven. 
3. For the code that has been associated, directly enter git pull to synchronize it
The fourth step is to upload the local code to the remote On the branch
1. View: gitk --all &
2. View the modified content: git status
3. Add to the modified local files: git add .
4. Submit to the local: git commit -m "Add comment"
5. Pull the latest code from the server: git pull
6. Submit to the server: git push origin Name of the local branch: Server branch name
The above is the detailed content of Briefly introduce the use of git, pull code, and submit. For more information, please follow other related articles on the PHP Chinese website!
 Build your own git server
 The difference between git and svn
 git undo submitted commit
 How to undo git commit error
 How to compare the file contents of two versions in git
 Solution to failedtofetch error
 What is the mobile service password?
 What is the principle and mechanism of dubbo
 How to remove other people's TikTok watermarks from TikTok videos