

How to implement the top navigation bar with CSS+HTML

This article will introduce to you how to implement the top navigation bar with CSS HTML. It has certain reference value. Friends in need can refer to it. I hope it will be helpful to everyone.
Implementation of navigation bar, fixed top navigation bar, and secondary menu implementation
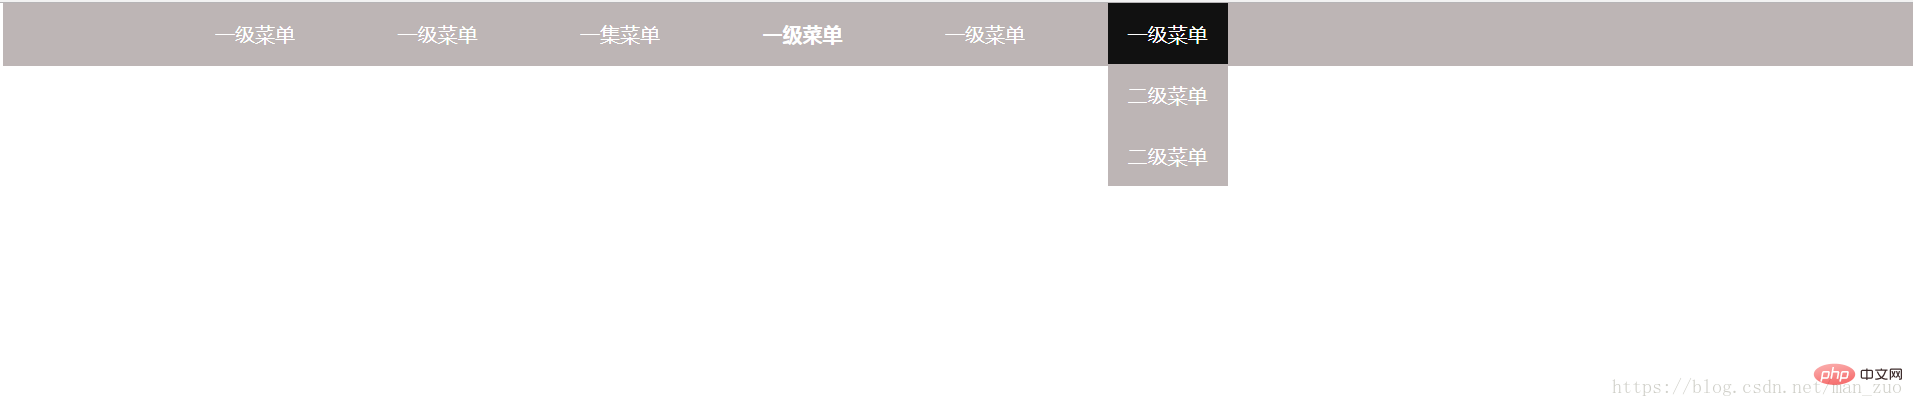
Rendering:
When I was using this navigation bar recently, I found that when the page was zoomed in and out, the layout and display of the navigation bar had some minor problems, so I changed the css part of the code and reposted it
New code implementation (optimized layout):
<html>
   <head>
       <style type="text/css">
        .top{
    /* 设置宽度高度背景颜色 */
    height: auto; /*高度改为自动高度*/
    width:100%;
    margin-left: 0;
    background:rgb(189, 181, 181);
    position: fixed; /*固定在顶部*/
    top: 0;/*离顶部的距离为0*/
    margin-bottom: 5px;
}
.top ul{
    /* 清除ul标签的默认样式 */
    width: auto;/*宽度也改为自动*/
    list-style-type: none;
    white-space:nowrap;
    overflow: hidden;
    margin-left: 5%;
    /* margin-top: 0;          */
    padding: 0;

}
.top li {
    float:left; /* 使li内容横向浮动,即横向排列  */
    margin-right:2%;  /* 两个li之间的距离*/
    position: relative;
    overflow: hidden;
}

.top li a{
   /* 设置链接内容显示的格式*/
    display: block; /* 把链接显示为块元素可使整个链接区域可点击 */
    color:white;
    text-align: center;
    padding: 3px;
    overflow: hidden;
    text-decoration: none; /* 去除下划线 */

}
.top li a:hover{
    /* 鼠标选中时背景变为黑色 */
    background-color: #111;
}
.top ul li ul{
    /* 设置二级菜单 */
    margin-left: -0.2px;
    background:rgb(189, 181, 181);
    position: relative;
    display: none; /* 默认隐藏二级菜单的内容 */

}
.top ul li ul li{
    /* 二级菜单li内容的显示 */

    float:none;
    text-align: center;
}
.top ul li:hover ul{
    /* 鼠标选中二级菜单内容时 */
    display: block;
}
body{
    background:#eff3f5;
}

       </style>
        <body>
            <div class="top">
                   <center>
                    <ul>
                    <li><a href="#">一级菜单</a></li>
                    <li><a href="#">一级菜单</a></li>
                    <li><a href="#">一级菜单</a></li>
                    <li><a href="#"><b>一级菜单</b></a></li>
                    <li><a href="#">一级菜单</a></li>
                    <li>
                        <a href="#">一级菜单</a>
                        <ul>
                            <li><a href="#">二级菜单</a></li>
                            <li><a href="#">二级菜单</a></li>
                        </ul>
                    </li>
                      </ul>
                    </center>
            </div>
        </body>
    </head>
</html>The original code implementation below (there is a problem with the navigation layout when the page is zoomed in or out):
<html>
   <head>
       <style type="text/css">
        .top{
            /* 设置宽度高度背景颜色 */
            height: 50px;
            width:100%;
            background:rgb(189, 181, 181);
            position: fixed; /*固定在顶部*/
            top: 0;/*离顶部的距离为0*/
        }
        .top ul{
            /* 清除ul标签的默认样式 */
            width: 80%;
            list-style-type: none;
            margin: 0;
            padding: 0;
            overflow: hidden;

        }
        .top li {
            float:left; /* 使li内容横向浮动,即横向排列  */
            margin-right:50px;  /* 两个li之间的距离*/
        }

        .top li a{
           /* 设置链接内容显示的格式*/
            display: block; /* 把链接显示为块元素可使整个链接区域可点击 */
            color:white;
            text-align: center;
            padding: 14px 16px;
            text-decoration: none; /* 去除下划线 */
        }
        .top li a:hover{
            /* 鼠标选中时背景变为黑色 */
            background-color: #111;
        }
        .top ul li ul{
            /* 设置二级菜单 */
            width: auto;
            background:rgb(189, 181, 181);
            position: absolute;
            display: none; /* 默认隐藏二级菜单的内容 */

        }
        .top ul li ul li{
            /* 二级菜单li内容的显示 */
            margin-right:0;
            float:none;
            text-align: center;
        }
        .top ul li:hover ul{
            /* 鼠标选中二级菜单内容时 */
            display: block;
        }
       </style>
        <body>
            <div class="top">
                   <center>
                    <ul>
                    <li><a href="#">一级菜单</a></li>
                    <li><a href="#">一级菜单</a></li>
                    <li><a href="#">一集菜单</a></li>
                    <li><a href="#"><b>一级菜单</b></a></li>
                    <li><a href="#">一级菜单</a></li>
                    <li>
                        <a href="#">一级菜单</a>
                        <ul>
                            <li><a href="#">二级菜单</a></li>
                            <li><a href="#">二级菜单</a></li>
                        </ul>
                    </li>
                      </ul>
                    </center>
            </div>
        </body>
    </head>
</html>Recommended learning: html video tutorial
The above is the detailed content of How to implement the top navigation bar with CSS+HTML. For more information, please follow other related articles on the PHP Chinese website!

Hot AI Tools

Undresser.AI Undress
AI-powered app for creating realistic nude photos

AI Clothes Remover
Online AI tool for removing clothes from photos.

Undress AI Tool
Undress images for free

Clothoff.io
AI clothes remover

AI Hentai Generator
Generate AI Hentai for free.

Hot Article
Hot Tools

Notepad++7.3.1
Easy-to-use and free code editor

SublimeText3 Chinese version
Chinese version, very easy to use

Zend Studio 13.0.1
Powerful PHP integrated development environment

Dreamweaver CS6
Visual web development tools

SublimeText3 Mac version
God-level code editing software (SublimeText3)
Hot Topics
 1382
1382
 52
52

 Table Border in HTML
Sep 04, 2024 pm 04:49 PM
Table Border in HTML
Sep 04, 2024 pm 04:49 PM
Guide to Table Border in HTML. Here we discuss multiple ways for defining table-border with examples of the Table Border in HTML.
 HTML margin-left
Sep 04, 2024 pm 04:48 PM
HTML margin-left
Sep 04, 2024 pm 04:48 PM
Guide to HTML margin-left. Here we discuss a brief overview on HTML margin-left and its Examples along with its Code Implementation.
 Nested Table in HTML
Sep 04, 2024 pm 04:49 PM
Nested Table in HTML
Sep 04, 2024 pm 04:49 PM
This is a guide to Nested Table in HTML. Here we discuss how to create a table within the table along with the respective examples.
 HTML Table Layout
Sep 04, 2024 pm 04:54 PM
HTML Table Layout
Sep 04, 2024 pm 04:54 PM
Guide to HTML Table Layout. Here we discuss the Values of HTML Table Layout along with the examples and outputs n detail.
 HTML Input Placeholder
Sep 04, 2024 pm 04:54 PM
HTML Input Placeholder
Sep 04, 2024 pm 04:54 PM
Guide to HTML Input Placeholder. Here we discuss the Examples of HTML Input Placeholder along with the codes and outputs.
 HTML Ordered List
Sep 04, 2024 pm 04:43 PM
HTML Ordered List
Sep 04, 2024 pm 04:43 PM
Guide to the HTML Ordered List. Here we also discuss introduction of HTML Ordered list and types along with their example respectively
 Moving Text in HTML
Sep 04, 2024 pm 04:45 PM
Moving Text in HTML
Sep 04, 2024 pm 04:45 PM
Guide to Moving Text in HTML. Here we discuss an introduction, how marquee tag work with syntax and examples to implement.
 HTML onclick Button
Sep 04, 2024 pm 04:49 PM
HTML onclick Button
Sep 04, 2024 pm 04:49 PM
Guide to HTML onclick Button. Here we discuss their introduction, working, examples and onclick Event in various events respectively.
