How to create an index directory
Production method: First place the cursor at the specified location, click "Reference" - "Insert Index" at the top of the page; then select "Indented" for "Type", select "Chinese" for "Language", " Select "Stroke" or "Pinyin" for "Sort by"; finally check "Align page numbers right", choose to specify the "Tab Leader" style, and click the "OK" button.

The operating environment of this tutorial: Windows 7 system, Microsoft Office word 2010 version, Dell G3 computer.
Find the Word software in the taskbar at the bottom of the computer desktop and click to open it.
After opening Word, the Word initial interface appears. Click [Open] on the left to find [This PC], then find the location of the Word document in the folder and open it.
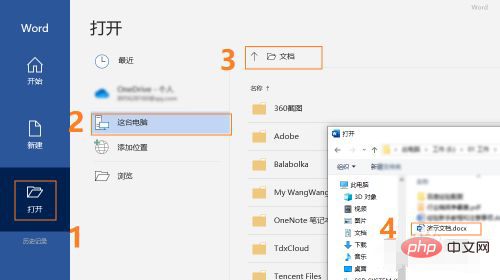
After opening the Word document, place the mouse cursor in the blank space where the index directory needs to be inserted.

Click [Reference] in the upper toolbar of Word to display the menu bar. Find and click [Insert Index] in the [Reference] menu bar, and then the [Index] dialog box will pop up. frame.
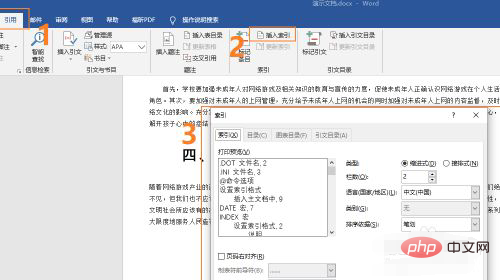
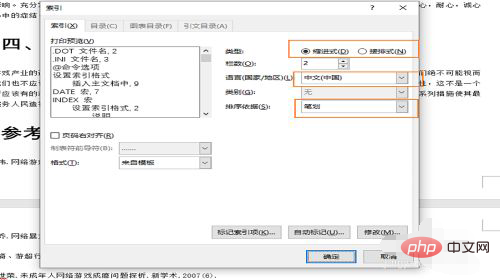
Configure basic settings on the right side of the [Index] dialog box, select "Indented" for type, "Chinese" for language, and select "Stroke" or "Pinyin" for sorting ".
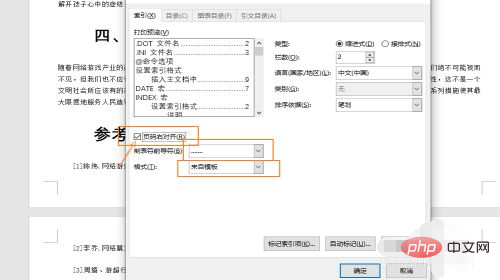
After completing the basic settings, go to the bottom of the [Index] dialog box, check "Align page numbers right" to adjust the index format, and freely select "Tab leader" Free choice of style and format.
Recommended tutorial: "Word Tutorial"
The above is the detailed content of How to create an index directory. For more information, please follow other related articles on the PHP Chinese website!

Hot AI Tools

Undresser.AI Undress
AI-powered app for creating realistic nude photos

AI Clothes Remover
Online AI tool for removing clothes from photos.

Undress AI Tool
Undress images for free

Clothoff.io
AI clothes remover

AI Hentai Generator
Generate AI Hentai for free.

Hot Article

Hot Tools

Notepad++7.3.1
Easy-to-use and free code editor

SublimeText3 Chinese version
Chinese version, very easy to use

Zend Studio 13.0.1
Powerful PHP integrated development environment

Dreamweaver CS6
Visual web development tools

SublimeText3 Mac version
God-level code editing software (SublimeText3)

Hot Topics
 1377
1377
 52
52


