

How bootstrapValidator validates maximum and minimum limits

This article will introduce to you how bootstrapValidator verifies the maximum and minimum range limits. It has certain reference value. Friends in need can refer to it. I hope it will be helpful to everyone.

[Related recommendation: "bootstrap tutorial"]
Enter the maximum and minimum values of the value bootstrapValidator for validation, so that The minimum value cannot be greater than the maximum value, and the maximum value cannot be less than the minimum value
The initial verification is still fine, and it conforms to the normal verification rules
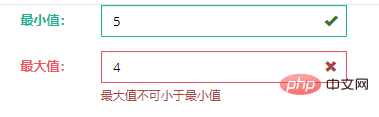
Then add the ones that do not comply with the rules The maximum value has changed. Now the minimum value is smaller than the maximum value, but the maximum value has not passed the verification. This means that the verification of the minimum value will only be performed when the content of the minimum value box changes. The content of the maximum value box has not changed and verification will not be performed.

One way is to add this method to the callback to re-validate this field, but both of the two that need to be verified need to be added, resulting in infinite Loop,
//从新验证该字段
$('#form').data('bootstrapValidator').revalidateField('nMax');
You can get the values of two fields by yourself and compare them manually. When the verification rules are met, manually modify the verification status of the field
$('#form').data('bootstrapValidator').updateStatus("nMax", "VALID", null );Compare the two value boxes
$("#form").bootstrapValidator({
message: 'This value is not valid',
feedbackIcons: {
valid: 'glyphicon glyphicon-ok',
invalid: 'glyphicon glyphicon-remove',
validating: 'glyphicon glyphicon-refresh'
},
fields: {
nMin:{
validators:{
notEmpty:{
message:'最小值不能为空'
},
regexp: {
regexp: /^[0-9._]+$/,
message: '请输入有效的值'
},
callback: {
message: '最小值不可大于最大值',
callback: function(value, validator) {
if(value != ''){
var nMax = $("#form").data("bootstrapValidator").getFieldElements('nMax');
if(nMax.val()!='' && Number(nMax.val()) < Number(value)){
return false;
}else if(nMax.val()!='' && Number(nMax.val()) > Number(value)){
//从新验证该字段
//$('#form').data('bootstrapValidator').revalidateField('nMax');
//当符合规则手动修改该字段的验证状态
/* 因为上面方法两个字段相互验证 ,会造成死循环,所以在两个字段比较之后,并且符合验证规则,就手动修改该字段的验证状态 */
$('#form').data('bootstrapValidator').updateStatus("nMax", "VALID", null );
return true;
}else if(nMax.val()==''){
return true;
}else{
return true;
}
}else{
return true;
{
}
}
}
},
nMax:{
validators:{
notEmpty:{
message:'最大值不能为空'
},
regexp: {
regexp: /^[0-9._]+$/,
message: '请输入有效的值'
},
callback: {
message: '最大值不可小于最小值',
callback: function(value, validator) {
if(value != ''){
var nMin = $("#form").data("bootstrapValidator").getFieldElements('nMin');
if(nMin.val()!='' && Number(nMin.val())>Number(value)){
return false;
}else if(nMin.val()!='' && Number(nMin.val())Copy after login Compare three values
nMin:{
validators:{
notEmpty:{
message:"最小值不能为空"
},
regexp: {
regexp: /^[0-9._]+$/,
message: '请输入有效的值'
},
callback: {
callback: function(value, validator) {
var nSetVal = $("#form").data("bootstrapValidator").getFieldElements('nSetVal');
var nMax = $("#form").data("bootstrapValidator").getFieldElements('nMax');
//最小值大于设定值
if( nSetVal.val()!='' && Number(nSetVal.val()) < Number(value) ){
return { message:'最小值不可大于设定值', flag:false };
//最小值大于最大值
}else if( nMax.val()!='' && Number(nMax.val()) < Number(value) ){
$('#form').data('bootstrapValidator').updateStatus("nSetVal", "VALID", null );
return { message:'最小值不可大于最大值', flag:false };
//最小值 小于 设定值
}else if( nSetVal.val()!='' && Number(nSetVal.val()) >= Number(value) ){
if( Number(nMax.val()) < Number(value) ){
$('#form').data('bootstrapValidator').updateStatus("nMax", "VALID", null );
return { message:'最小值不可大于最大值', flag:false };
//最小值 小于设定值 小于最大值 符合全部要求
}else if( nMax.val()!='' && Number(nMax.val()) >= Number(value) && Number(nMax.val()) >= Number(nSetVal.val()) ){
$('#form').data('bootstrapValidator').updateStatus("nSetVal", "VALID", null );
$('#form').data('bootstrapValidator').updateStatus("nMax", "VALID", null );
return true;
//最小值 小于设定值 大于最大值
}else{
return true;
}
}else{
return true;
}
}
}
}
},
nSetVal:{
validators:{
notEmpty:{
message:'设定值不能为空'
},
regexp: {
regexp: /^[0-9._]+$/,
message: '请输入有效的值'
},
callback: {
callback: function(value, validator) {
var nMin = $("#form").data("bootstrapValidator").getFieldElements('nMin');
var nMax = $("#form").data("bootstrapValidator").getFieldElements('nMax');
//设定值小于最小值
if( nMin.val()!='' && Number(nMin.val()) > Number(value) ){
return { message:'设定值不可小于最小值', flag:false };
//设定值 大于 最大值
}else if( nMax.val()!='' && Number(nMax.val()) < Number(value) ){
$('#form').data('bootstrapValidator').updateStatus("nMin", "VALID", null );
return { message:'设定值不可大于最大值', flag:false };
//设定值 小于 最大值
}else if( nMax.val()!='' && Number(nMax.val()) >= Number(value) ){
if( nMin.val()!='' && Number(nMin.val()) > Number(value)){
$('#form').data('bootstrapValidator').updateStatus("nMax", "VALID", null );
return { message:'设定值不可小于最小值', flag:false };
//设定值 大于最小值 小于最大值 符合全部要求
}else if( nMin.val()!='' && Number(nMin.val()) <= Number(value) && Number(nMax.val()) >= Number(value) ){
$('#form').data('bootstrapValidator').updateStatus("nMax", "VALID", null );
$('#form').data('bootstrapValidator').updateStatus("nMin", "VALID", null );
return true;
}else{
return true;
}
}else{
return true;
}
}
}
}
},
nMax:{
validators:{
notEmpty:{
message:"最大值不能为空"
},
regexp: {
regexp: /^[0-9._]+$/,
message: '请输入有效的值'
},
callback: {
callback: function(value, validator) {
var nMin = $("#form").data("bootstrapValidator").getFieldElements('nMin');
var nSetVal = $("#form").data("bootstrapValidator").getFieldElements('nSetVal');
//最小值大于最大值
if( nMin.val()!='' && Number(nMin.val()) > Number(value) ){
return { message:'最大值不可小于最小值', flag:false };
//设定值 大于 最大值
}else if( nSetVal.val()!='' && Number(nSetVal.val()) > Number(value) ){
$('#form').data('bootstrapValidator').updateStatus("nMin", "VALID", null );
return { message:'最大值不可小于设定值', flag:false };
//最小值 小于 最大值
}else if( nMin.val()!='' && Number(nMin.val()) <= Number(value) ){
if(nSetVal.val()!='' && Number(nSetVal.val()) > Number(value)){
$('#form').data('bootstrapValidator').updateStatus("nMin", "VALID", null );
return { message:'最大值不可小于设定值', flag:false };
//最小值 小于最大值 设定值 小于最大值 符合全部要求
}else if( nSetVal.val()!='' && Number(nSetVal.val()) <= Number(value) && Number(nSetVal.val()) >= Number(nMin.val()) ){
$('#form').data('bootstrapValidator').updateStatus("nSetVal", "VALID", null );
$('#form').data('bootstrapValidator').updateStatus("nMin", "VALID", null );
return true;
//最小值 小于最大值 设定值 大于最大值
}else{
return true;
}
}else{
return true;
}
}
}
}
}bootstrapValidator Commonly used verification
//不为空验证
notEmpty: {
     message: '必须输入或者必须选择'
}

//正整数验证
digits : {
    message : '字段必须是正整数'
}

//内容最小值验证
greaterThan: {
    value : 1,
    message : '最小输入1'
}

//内容最大值验证
lessThan: {
    value : 100
    message : '最大输入100'
}

//正则验证
regexp: {
    regexp: /^[a-zA-Z0-9_]+$/,
    message: '正则验证,这里验证只能输入大小写字母数字和下划线'
}

//内容长度验证
stringLength : {
    min : 2,
    max : 25,
    message : '长度2-25位字符'
}

//回调验证
callback: {
    message: '请输入整数',
	callback: function(value, validator) {
			//可以return   true  /  false
			//return  false;
			//也可以这样
			return { message:'最小值不可大于最大值', flag:false };
	}
}

//日期验证
date: {
  	format: 'YYYY/MM/DD',
    message: '日期无效'
}

//数字验证
digits: {
    message: '该值只能包含数字。'
}

//ajax验证
threshold :  6 , //有6字符以上才发送ajax请求,(input中输入一个字符,插件会向服务器发送一次,设置限制,6字符以上才开始)
remote: {//ajax验证。server result:{"valid",true or false} 向服务发送当前input name值,获得一个json数据。例表示正确:{"valid",true}
    url: 'exist2.do',//验证地址
    message: '用户已存在',//提示消息
    delay :  2000,//每输入一个字符,就发ajax请求,服务器压力还是太大,设置2秒发送一次ajax(默认输入一个字符,提交一次,服务器压力太大)
    type: 'POST'//请求方式
 }

//复选框验证
choice: {
  	min: 2,
    max: 4,
    message: '请选择2-4项'
}

//密码确认
identical: {
	field: 'confirmPassword',
    message: 'The password and its confirm are not the same'
}For more programming-related knowledge, please visit: Programming Video! !
The above is the detailed content of How bootstrapValidator validates maximum and minimum limits. For more information, please follow other related articles on the PHP Chinese website!

Hot AI Tools

Undresser.AI Undress
AI-powered app for creating realistic nude photos

AI Clothes Remover
Online AI tool for removing clothes from photos.

Undress AI Tool
Undress images for free

Clothoff.io
AI clothes remover

AI Hentai Generator
Generate AI Hentai for free.

Hot Article
Hot Tools

Notepad++7.3.1
Easy-to-use and free code editor

SublimeText3 Chinese version
Chinese version, very easy to use

Zend Studio 13.0.1
Powerful PHP integrated development environment

Dreamweaver CS6
Visual web development tools

SublimeText3 Mac version
God-level code editing software (SublimeText3)
Hot Topics
 1377
1377
 52
52

 How to get the bootstrap search bar
Apr 07, 2025 pm 03:33 PM
How to get the bootstrap search bar
Apr 07, 2025 pm 03:33 PM
How to use Bootstrap to get the value of the search bar: Determines the ID or name of the search bar. Use JavaScript to get DOM elements. Gets the value of the element. Perform the required actions.
 How to do vertical centering of bootstrap
Apr 07, 2025 pm 03:21 PM
How to do vertical centering of bootstrap
Apr 07, 2025 pm 03:21 PM
Use Bootstrap to implement vertical centering: flexbox method: Use the d-flex, justify-content-center, and align-items-center classes to place elements in the flexbox container. align-items-center class method: For browsers that do not support flexbox, use the align-items-center class, provided that the parent element has a defined height.
 How to insert pictures on bootstrap
Apr 07, 2025 pm 03:30 PM
How to insert pictures on bootstrap
Apr 07, 2025 pm 03:30 PM
There are several ways to insert images in Bootstrap: insert images directly, using the HTML img tag. With the Bootstrap image component, you can provide responsive images and more styles. Set the image size, use the img-fluid class to make the image adaptable. Set the border, using the img-bordered class. Set the rounded corners and use the img-rounded class. Set the shadow, use the shadow class. Resize and position the image, using CSS style. Using the background image, use the background-image CSS property.
 How to set up the framework for bootstrap
Apr 07, 2025 pm 03:27 PM
How to set up the framework for bootstrap
Apr 07, 2025 pm 03:27 PM
To set up the Bootstrap framework, you need to follow these steps: 1. Reference the Bootstrap file via CDN; 2. Download and host the file on your own server; 3. Include the Bootstrap file in HTML; 4. Compile Sass/Less as needed; 5. Import a custom file (optional). Once setup is complete, you can use Bootstrap's grid systems, components, and styles to create responsive websites and applications.
 How to use bootstrap button
Apr 07, 2025 pm 03:09 PM
How to use bootstrap button
Apr 07, 2025 pm 03:09 PM
How to use the Bootstrap button? Introduce Bootstrap CSS to create button elements and add Bootstrap button class to add button text
 How to write split lines on bootstrap
Apr 07, 2025 pm 03:12 PM
How to write split lines on bootstrap
Apr 07, 2025 pm 03:12 PM
There are two ways to create a Bootstrap split line: using the tag, which creates a horizontal split line. Use the CSS border property to create custom style split lines.
 How to resize bootstrap
Apr 07, 2025 pm 03:18 PM
How to resize bootstrap
Apr 07, 2025 pm 03:18 PM
To adjust the size of elements in Bootstrap, you can use the dimension class, which includes: adjusting width: .col-, .w-, .mw-adjust height: .h-, .min-h-, .max-h-
 How to view the date of bootstrap
Apr 07, 2025 pm 03:03 PM
How to view the date of bootstrap
Apr 07, 2025 pm 03:03 PM
Answer: You can use the date picker component of Bootstrap to view dates in the page. Steps: Introduce the Bootstrap framework. Create a date selector input box in HTML. Bootstrap will automatically add styles to the selector. Use JavaScript to get the selected date.
