How to add outer borders around PS fonts
Method: First open the software that needs to be operated and enter the specified text; then select the text layer, click the layer style button under the layer panel, and select "Stroke" in the pop-up menu; then In the pop-up window, select "Position" as "Outside", select the specified pixel size, and specify the fill type; finally click the "OK" button.

The operating environment of this tutorial: windows7 system, Adobe photoshop cc2017 version, Dell G3 computer.
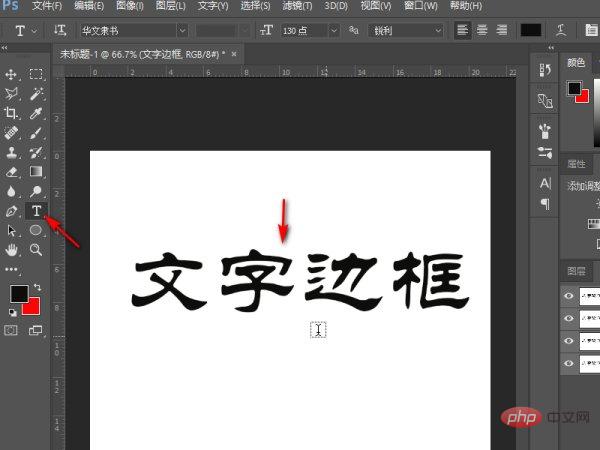
First open PS, create a new canvas, select the text tool in the left toolbar, and enter the text for presentation.

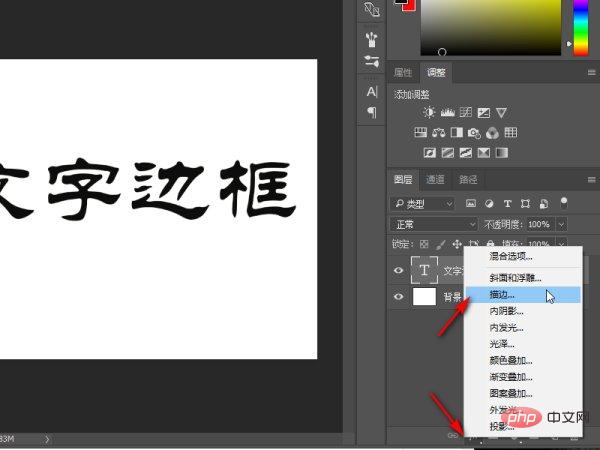
Then find the text layer in the right layer panel, click to select it, find the layer style button under the layer panel and click it, in the pop-up menu Find the Stroke option.

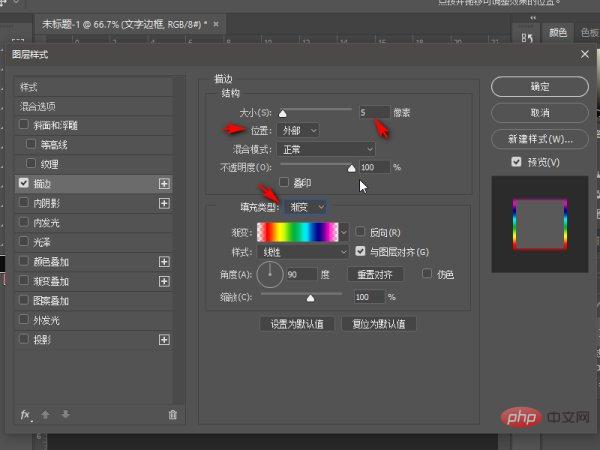
After changing the options in seconds, make some stroke settings in the pop-up window. Select the position as outside, so that you can set the outer border. In order to achieve a better demonstration effect For obviousness, we select the fill type as gradient fill rainbow color, and you can see the preview effect in the preview window on the right.

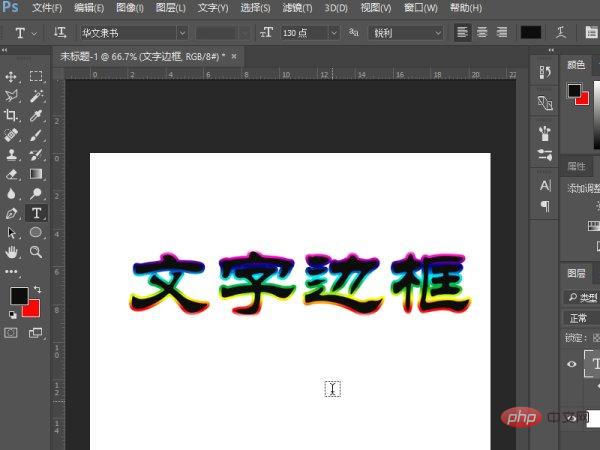
#After the settings are completed, click OK and return to the layer panel to see that the text has been set with an outer border.

Recommended tutorial: "PS Tutorial"
The above is the detailed content of How to add outer borders around PS fonts. For more information, please follow other related articles on the PHP Chinese website!

Hot AI Tools

Undresser.AI Undress
AI-powered app for creating realistic nude photos

AI Clothes Remover
Online AI tool for removing clothes from photos.

Undress AI Tool
Undress images for free

Clothoff.io
AI clothes remover

AI Hentai Generator
Generate AI Hentai for free.

Hot Article

Hot Tools

Notepad++7.3.1
Easy-to-use and free code editor

SublimeText3 Chinese version
Chinese version, very easy to use

Zend Studio 13.0.1
Powerful PHP integrated development environment

Dreamweaver CS6
Visual web development tools

SublimeText3 Mac version
God-level code editing software (SublimeText3)

Hot Topics
 win10 font folder path details
Jan 03, 2024 pm 08:37 PM
When inputting text, many friends like to add their favorite personalized fonts, but they do not know where the font folder path of the win10 system is and cannot add fonts. The following will introduce the specific folder path to you. Win10 font folder path: 1. Click "This PC" on the desktop. 2. Enter the system disk C drive. 3. Click the “windows” folder. 4. Pull down to find the "Fonts" folder. 5. You can enter the font library. Friends who have other questions can take a look to learn more about common problems with win10 fonts~
 How to change the font in Outlook on Apple mobile phone
Mar 08, 2024 pm 04:46 PM
How to change the font in Outlook on Apple mobile phone? First open the Outlook software and click on the file in the upper left corner of the interface. You can set the font according to your own preferences. After the settings are completed, click the OK button. Let’s take a look! How to change the font in Outlook on Apple mobile phone 1. Open the Outlook software and click the "File" option in the upper left corner of the interface. 2. In the list that appears, find "Options" and click to enter. 3. On the left side of the option list, click "Mail". 4. Next, select “Letter and Fonts”. 5. If you want to set the font for new emails, reply emails, or composing, click the corresponding option to enter the settings. 6. Set the font according to personal preference. After the setting is completed, click OK
 How to make vivo mobile phone font larger and where to set it
Feb 24, 2024 pm 06:16 PM
How to make the font size of vivo mobile phone larger? Where can I set it? In vivo mobile phone, you can make the font size larger, but most users don’t know how to set the font size of vivo mobile phone. Next, the editor brings you the settings of how to make the font size of vivo mobile phone larger. Method graphic tutorials, interested users come and take a look! Vivo mobile phone usage tutorial How to make the font size of vivo mobile phone larger Where to set it 1. First open the [Settings] function in the vivo mobile phone and click on it; 2. Then jump to the settings interface and find the [Display and Brightness] function; 3. Then Reach the page in the picture below and click the [Font Size and Thickness] service; 4. Finally, slide the horizontal line in the picture below to adjust the font size.
 How to solve win11 font blur problem
Jan 13, 2024 pm 09:00 PM
After updating the win11 system, some friends found that their win11 fonts were blurred and very uncomfortable to use. This may be due to a bug in the system version, or it may be that we have turned on special effects. Let’s follow the editor. Let’s see how to solve it. Win11 fonts are blurred: Method 1: 1. First, right-click this computer and open "Properties" 2. Then enter "Advanced System Settings" in the related link 3. Then click "Settings" in Performance to open it. 4. Under "Visual Effects" check "Adjust for Best Performance" and click "OK" to save. Method 2: 1. Right-click a blank space on the desktop and open "Display Settings" 2. Click "Zoom" under Zoom and Layout 3. Then click "Text Size" under relevant settings
 Detailed explanation of Win11 font installation method
Dec 27, 2023 pm 05:16 PM
Some friends cannot find where their fonts are installed after installing win11 fonts, so they raise the issue of the installation location of win11 fonts. In fact, we can enter the font management in personalization to find the location where the fonts are installed. Let’s take a look below. Win11 font installation location: 1. First, right-click a blank space on the desktop and open "Personalization" settings. 2. Then enter the "Font" installation management settings. 3. Find the font you want and enter it. 4. If you can’t find it, you can also search directly above. 5. After entering the font, you can see the installation location of the win11 font in "Font File" under metadata. 6. If we want to uninstall the font, click Uninstall here.
 How to change the font of Xiaomi 11_How to change the font of Xiaomi 11
Mar 25, 2024 pm 07:26 PM
1. Open the phone settings and click [Display]. 2. Click [Font]. 3. Select the font you like or click [More Fonts] to download the application.
 An effective way to solve the Linux font blur problem
Jan 08, 2024 pm 11:25 PM
Linux fonts are blurry. How can I make the fonts appear clearly? Let’s take a look at the detailed tutorial below. 1. Install font files 1. Download the file provided by the tool above, then drag the file to the desktop and unzip it. As shown in the picture below, because the file has been decompressed, it is in the form of a folder. 2. Then, without clicking anything on the desktop, right-click and select Open in Terminal. Enter the command in the terminal: sudodpkg-i and press space. Open the decompressed font file on the desktop, and drag the deb package into it one after the -i of this command. After pressing Enter, an error will appear, indicating that the dependency is not installed. If the dependency error is prompted, the command input is normal, otherwise it is an incorrect command. Newbies must pay attention to spaces and capitalization.
 How to automate tasks using PowerShell
Feb 20, 2024 pm 01:51 PM
If you are an IT administrator or technology expert, you must be aware of the importance of automation. Especially for Windows users, Microsoft PowerShell is one of the best automation tools. Microsoft offers a variety of tools for your automation needs, without the need to install third-party applications. This guide will detail how to leverage PowerShell to automate tasks. What is a PowerShell script? If you have experience using PowerShell, you may have used commands to configure your operating system. A script is a collection of these commands in a .ps1 file. .ps1 files contain scripts executed by PowerShell, such as basic Get-Help


