How to increase and switch PHP version
This article will introduce to you how to add and switch PHP versions. It has certain reference value. Friends in need can refer to it. I hope it will be helpful to everyone.

1. Add PHP version
1. WampServer (32-bit) has been installed. My PHP directory is A:\WampServer\wamp\bin \php\php5.4.3, that is, the default installed PHP version is 5.4.3.
Some projects require different PHP versions, so you need to add multiple PHP versions in the wamp\bin\php directory.
I have successfully installed version 7.2.8 of PHP before. The first time I installed 64-bit PHP, it was not successful. After deleting and reinstalling 32-bit PHP, it was successful.
Now when I am working on a project, I encounter an error message "count():Parameter must be an array or an object that implements Countable". It is necessary to lower the PHP version, so now I will install the PHP7.1 version.
Here, these two tutorials for adding PHP version are enough: "Add support for multiple versions of PHP (PHP5.3, PHP5.4, PHP5.5) under WAMPSERVER. 》 and "How to upgrade php version---Practice of upgrading php7.1.5 wamp from php5.5.12".
2. Download the required PHP version "*** x86 Thread Safe" from https://windows.php.net/download/. For example, I downloaded the Zip package of PHP7.1.21 version and put it in Go to the PHP directory, such as my directory A:\WampServer\wamp\bin\php, unzip and rename the folder "php7.1.21", which is the "PHP version number".
If you want to know about different download versions, you can read "How to choose the version of php under windows?" 》.
3. Copy the php.ini, phpForApache.ini, and wampserver.conf files in the existing version of php folder (such as the PHP5.4.3 folder) to the php7.1.21 folder.
4. Modify the two files php.ini and phpForApache.ini, find all php5.4.3 in the two files and replace them with php7.1.21.
5. Modify the wampserver.conf file and refer to step 6 of "How to upgrade php version --- Upgrade php7.1.5 wamp practice from php5.5.12".
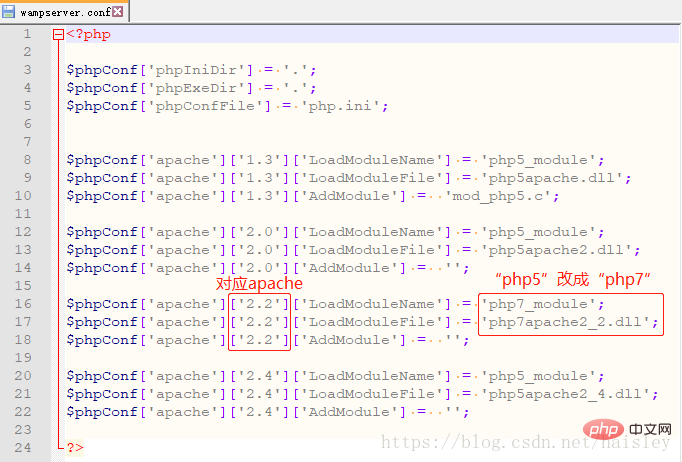
I found the "apache2.2.22" folder from the wamp\bin\apache directory, so my apache version is 2.2X, then the modifications in the wampserver.conf file are as follows:
$phpConf['apache']['2.2']['LoadModuleName'] = 'php7_module';
$phpConf['apache']['2.2']['LoadModuleFile'] = 'php7apache2_2.dll';
6. Delete the php.ini file in the wamp\bin\apache\apache2.2.22\bin directory.
7. In the wamp\bin\apache\apache2.2.22\conf directory, find the httpd.conf file, search for LoadModule, and change it to
LoadModule php7_module "A:/WampServer/wamp/bin/php/php7.1.21/php7apache2_2.dll"
8. In wamp\bin\ In the php\php7.1.21 folder, create a new folder and name it "zend_ext".
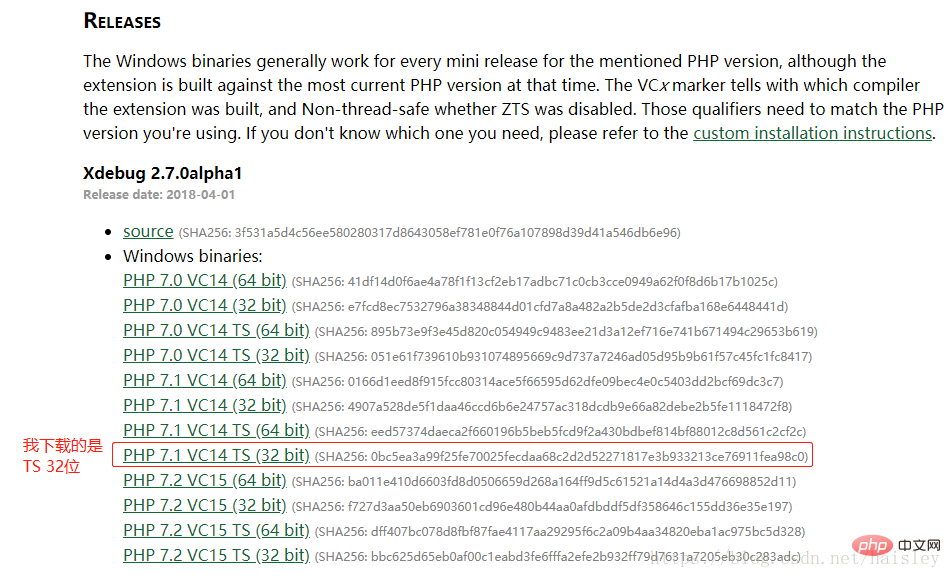
Download the corresponding dynamic link library from https://xdebug.org/download.php to the zend_ext folder. My version is 7.1, Thread Safe, 32-bit. The name of this dynamic link library is "php_xdebug-2.7.0alpha1-7.1-vc14.dll".
9. In the wamp\bin\php\php7.1.21 folder, find the php.ini file and modify it as follows:
; XDEBUG Extension

zend_extension = "A:/WampServer/wamp/bin/php/php7.1.21/zend_ext/php_xdebug-2.7.0alpha1-7.1-vc14.dll"
10. Finally , comment out this sentence
;extension=php_mysql.dll
11. Restart WampServer in the php.ini file.
Left click on the WampServer icon, select "PHP", and curiously click on the "php.ini" file (this file is actually in the wamp\bin\apache\apache2.2.22\bin folder, previous step 6 It was deleted once, and it should be automatically generated again).
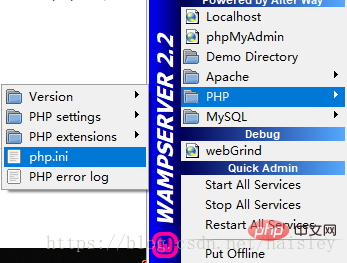
Out of curiosity, I changed the "php version number" in the "php.ini" file to "php7.1.21", and the dynamic link library was also changed according to step 9.
extension_dir = "A:/WampServer/wamp/bin/php/php7.1.21/ext/"
; XDEBUG Extension

zend_extension = "A:/WampServer/wamp/bin/php/php7.1.21/zend_ext/php_xdebug-2.7.0alpha1-7.1-vc14.dll"
12. After installing it, click to open WampServer a few times (I didn’t see the php7.1.21 version at first, so I clicked a few more times), PHP→Version “7.1.21” appears, so far Added php version successfully.
But the "√" in front of PHP→Version is still in front of "7.2.8", so I entered
php -v
in the command prompt window cmd and found that the currently used PHP version has not changed. It is still "php7.2.8", let's switch the PHP version.
Recommended learning: php video tutorial
2. Switch PHP version
Just set the PHP environment variables under Windows, refer to the tutorial "Under Windows Set PHP environment variables".
1. Under Win10, right-click "This PC" → "Properties" → "Advanced System Settings" → "Environment Variables", find "Path" in "System Variables", and double-click to edit.
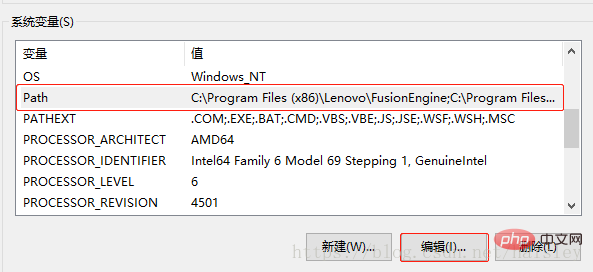
#2. Find the path to php, change the last path "php7.2.8" to the version you want, here change it to "wamp\bin\php\php7. 1.21".

3、在命令提示符窗口cmd输入
php -v

可以看到,php的版本已经切换成功了。
The above is the detailed content of How to increase and switch PHP version. For more information, please follow other related articles on the PHP Chinese website!

Hot AI Tools

Undresser.AI Undress
AI-powered app for creating realistic nude photos

AI Clothes Remover
Online AI tool for removing clothes from photos.

Undress AI Tool
Undress images for free

Clothoff.io
AI clothes remover

AI Hentai Generator
Generate AI Hentai for free.

Hot Article

Hot Tools

Notepad++7.3.1
Easy-to-use and free code editor

SublimeText3 Chinese version
Chinese version, very easy to use

Zend Studio 13.0.1
Powerful PHP integrated development environment

Dreamweaver CS6
Visual web development tools

SublimeText3 Mac version
God-level code editing software (SublimeText3)

Hot Topics
 1378
1378
 52
52
 How to switch between 4g and 5g on Xiaomi Mi 14Ultra?
Feb 23, 2024 am 11:49 AM
Xiaomi 14Ultra is one of the most popular Xiaomi models this year. Xiaomi 14Ultra not only upgrades the processor and various configurations, but also brings many new functional applications to users. This can be seen from the sales of Xiaomi 14Ultra mobile phones. It is very popular, but there are some commonly used functions that you may not know yet. So how does Xiaomi 14Ultra switch between 4g and 5g? Let me introduce the specific content to you below! How to switch between 4g and 5g on Xiaomi 14Ultra? 1. Open the settings menu of your phone. 2. Find and select the "Network" and "Mobile Network" options in the settings menu. 3. In the mobile network settings, you will see the "Preferred network type" option. 4. Click or select this option and you will see
 Operation tutorial for switching from win11 home version to professional version_Operation tutorial for switching from win11 home version to professional version
Mar 20, 2024 pm 01:58 PM
How to convert Win11 Home Edition to Win11 Professional Edition? In Win11 system, it is divided into Home Edition, Professional Edition, Enterprise Edition, etc., and most Win11 notebooks are pre-installed with Win11 Home Edition system. Today, the editor will show you the steps to switch from win11 home version to professional version! 1. First, right-click on this computer on the win11 desktop and properties. 2. Click Change Product Key or Upgrade Windows. 3. Then click Change Product Key after entering. 4. Enter the activation key: 8G7XN-V7YWC-W8RPC-V73KB-YWRDB and select Next. 5. Then it will prompt success, so you can upgrade win11 home version to win11 professional version.
 How to implement dual system switching in Win10 system
Jan 03, 2024 pm 05:41 PM
Many friends may not be used to the win system when they first come into contact with it. There are dual systems in the computer. At this time, you can actually switch between the two systems. Let's take a look at the detailed steps for switching between the two systems. How to switch between two systems in win10 system 1. Shortcut key switching 1. Press the "win" + "R" keys to open Run 2. Enter "msconfig" in the run box and click "OK" 3. In the open "System Configuration" In the interface, select the system you need and click "Set as Default". After completion, "Restart" can complete the switch. Method 2. Select switch when booting 1. When you have dual systems, a selection operation interface will appear when booting. You can use the keyboard " Up and down keys to select the system
 Switch the dual system boot mode of Apple computer
Feb 19, 2024 pm 06:50 PM
How to switch between Apple dual systems when starting up Apple computers are powerful devices. In addition to their own macOS operating system, you can also choose to install other operating systems, such as Windows, to achieve dual system switching. So how do we switch between the two systems when booting? This article will introduce to you how to switch between dual systems on Apple computers. First of all, before installing dual systems, we need to confirm whether our Apple computer supports dual system switching. Generally speaking, Apple computers are based on
 PHP version development history (1995-2022)
Jun 01, 2020 pm 01:59 PM
As a PHP learner and developer, how can I not understand its history? The following PHP Chinese website will lead PHP enthusiasts to review the various historical versions of PHP.
 How to use shortcut keys for switching workbooks in excel
Mar 20, 2024 pm 01:50 PM
In the application of excel software, we are accustomed to using shortcut keys to make some operations easier and faster. Sometimes there is related data between multiple tables in excel. When we view it, we have to constantly switch between tasks. If there is a faster switching method, it will save a lot of wasted time on switching, which will greatly help improve work efficiency. What method can be used to complete quick switching? To address this issue, the editor will talk about it today The content is: How to use the shortcut keys for switching workbooks in Excel. 1. First, you can see multiple workbooks at the bottom of the open excel table. You need to quickly switch between different workbooks, as shown in the figure below. 2. Then press the Ctrl key on the keyboard without moving, and select the job to the right if you need to
 I cannot use alt+tab to switch interfaces in win11. What is the reason?
Jan 02, 2024 am 08:35 AM
Win11 supports users to use the alt+tab shortcut key to bring up the desktop switching tool, but recently a friend encountered the problem that win11 alt+tab cannot switch the interface. I don’t know the reason or how to solve it. Why can't win11 alt+tab switch the interface? Answer: Because the shortcut key function is disabled, here is the solution: 1. First, we press "win+r" on the keyboard to open the run. 2. Then enter "regedit" and press Enter to open the group policy. 3. Then enter "HKEY_CURRENT_USER\SOFTWARE\Microsoft\Windows\CurrentVersion\Explorer"
 How to switch dual system settings on Huawei mobile phones
Feb 20, 2024 am 10:09 AM
With the rapid development of smartphones, Huawei, as a leading technology company, has launched many popular mobile phone products. Among them, Huawei dual system is a feature that makes many users excited. Through Huawei dual system, users can run two operating systems, such as Android and HarmonyOS, on the same mobile phone at the same time. This feature allows for greater flexibility and convenience. So, how to switch settings between Huawei dual systems? Let’s find out together. First, before switching to dual system setup on your Huawei phone,


