How to convert wav format to mp3
Method: First open the format converter and click "Audio Conversion" at the top of the page; then select "Add File/Add Folder" to add the specified audio; then click "Select Output Format" at the top of the page. Select "MP3" from the pop-up drop-down list; finally set the audio parameters and click the "Start Conversion" button.

The operating environment of this tutorial: Windows 7 system, Dell G3 computer, Swift audio editing software version 1.7.2.
We open the audio format converter and click the "Audio Conversion" option on the upper navigation bar to enter the audio format conversion interface.

Then, we click the "Add File" or "Add Folder" option in the conversion interface to add the audio in wav format that we need to convert.

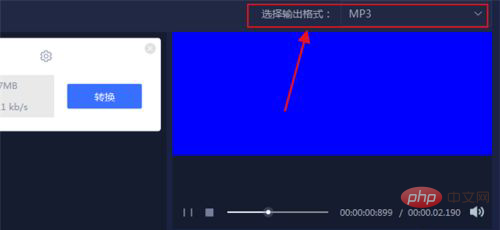
Then we need to set the "Select Output Format" section in the upper right corner and set the output format of our audio to mp3 format, so that after the conversion of our audio is successful It's in mp3 format.

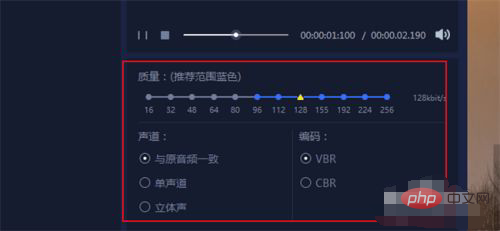
After that, we set the audio parameters and set the three sections of "Quality", "Channel" and "Encoding" according to our own needs.

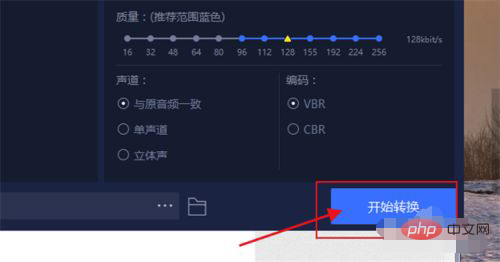
Then, we can start converting the audio format. Click "Start Conversion" in the interface to start converting our audio, and then wait patiently for the audio conversion to be successful. .

#Finally, we click the "Open" option in the interface to view our converted audio files, which is very simple.
For more computer-related knowledge, please visit the FAQ column!
The above is the detailed content of How to convert wav format to mp3. For more information, please follow other related articles on the PHP Chinese website!

Hot AI Tools

Undresser.AI Undress
AI-powered app for creating realistic nude photos

AI Clothes Remover
Online AI tool for removing clothes from photos.

Undress AI Tool
Undress images for free

Clothoff.io
AI clothes remover

Video Face Swap
Swap faces in any video effortlessly with our completely free AI face swap tool!

Hot Article

Hot Tools

Notepad++7.3.1
Easy-to-use and free code editor

SublimeText3 Chinese version
Chinese version, very easy to use

Zend Studio 13.0.1
Powerful PHP integrated development environment

Dreamweaver CS6
Visual web development tools

SublimeText3 Mac version
God-level code editing software (SublimeText3)

Hot Topics
 1389
1389
 52
52
 What is the difference between mp3 and mp4
Feb 03, 2023 pm 05:21 PM
Differences: 1. MP4 uses video as the basic carrier and is a video format; MP3 uses audio as the basic carrier and is an audio format. 2. MP3 is a device used to play mp3 format audio files, while mp4 is a device used to play mp3 format files and mp4 format files. 3. MP3 can only be used to listen to music and has a small storage capacity, while MP4 is different. It can be used to listen to music and watch movies and has a large storage capacity.
 How to convert qq music to mp3 format Convert qq music to mp3 format on mobile phone
Mar 21, 2024 pm 01:21 PM
QQ Music allows everyone to enjoy watching movies and relieve boredom. You can use this software every day to easily satisfy your needs. A large number of high-quality songs are available for everyone to listen to. You can also download and save them. The next time you listen to them, you don’t need an Internet connection. The songs downloaded here are not in MP3 format and cannot be used on other platforms. After the membership songs expire, there is no way to listen to them again. Therefore, many friends want to convert the songs into MP3 format. Here, the editor explains You provide methods so that everyone can use them! 1. Open QQ Music on your computer, click the [Main Menu] button in the upper right corner, click [Audio Transcoding], select the [Add Song] option, and add the songs that need to be converted; 2. After adding the songs, click to select Convert to [mp3]
 What is the file format of wav?
Sep 04, 2023 pm 02:46 PM
Wav is an audio file format that can save high-quality audio data and is divided into PCM format and non-PCM format. PCM format is a raw audio format that can save real audio signals. Non-PCM format is a lossy compression format that reduces file size by sacrificing some audio information. The most common non-PCM formats are WAV header and RF64. The WAV header format is an encapsulation standard developed by Microsoft for the Win operating system and can encapsulate audio data in various formats. The WAV header format of RF64 can save audio data larger than 2GB.
 Python cut mp3 segments into one every 30 seconds and reduce file bitrate
Apr 12, 2023 am 09:28 AM
MoviePy is a Python-based video editing library that provides functions for creating, editing, merging, trimming and converting videos. The following are the main functions of MoviePy: Video editing: MoviePy can edit videos, separate video and audio streams, add and delete video and audio segments, etc. Video Merging: MoviePy can merge multiple video and audio files into one. Video transcoding: MoviePy can convert video formats and encoding methods, such as converting mp4 to avi or converting H.264 encoding to H.265 encoding, etc. Video editing: MoviePy can add video special effects, animations, subtitles, etc. to make the video more vivid and creative. Video generation: using MoviePy
 How to convert xm to mp3 format
Feb 28, 2023 am 10:58 AM
Method to convert xm to mp3 format: 1. Open the "Format Factory" software and click the "Add File" button on the mp3 function interface; 2. In the opened interface, double-click the xm file in the file manager; 3. Click " Start" button to convert to mp3 format.
 How to convert Huawei music to mp3 format
Feb 24, 2024 pm 12:13 PM
Huawei Music can convert the format of songs, so how to convert them to mp3 format? Users need to download any MP3 format converter, then download the songs on Huawei Music and convert them. This introduction to the method of converting to mp3 format will tell you the specific operation method. Users who don’t know how to operate it should quickly take a look. How to convert Huawei music to mp3 format Answer: Convert in any MP3 format converter. Specific methods: 1. First, click on the song you want to download to set it as a ringtone. 2. Complete the audio progress and click Save. 3. Then find the music folder. 4. Use any MP3 format converter to convert the file into MP3 format.
 How to download mp3 format from qq music? -qq music download mp3 format method
Mar 29, 2024 am 09:36 AM
1. First open the QQ Music software and click to open the page of the song you want to download; 2. Select the song you want to download and click the small download icon on the right; 3. Select standard quality in the pop-up drop-down list. The default is MP3 format;
 What should I do if my MP3 player is plugged into the computer but only charges but not recognized?
Mar 17, 2023 am 10:55 AM
Reasons and solutions for why MP3 is only charging but not recognized when plugged into the computer: 1. The USB cable is disconnected, so you need to replace it with a good USB cable; 2. There is a problem with the compatibility or recognition of the computer motherboard, you can replace the USB cable port or replace it again Just try it on a computer.


