

What should I do if bios cannot recognize the USB disk for booting?

Solution: First restart the computer, press the "f2" key to enter the "bios" interface; then select the "boot" tab at the top of the page, select "USB Boot", and hold down the "Enter" key on the keyboard "; Finally, select "enabled" in the pop-up window. At this time, the USB boot function is successfully enabled and the USB flash drive can be recognized.

The operating environment of this tutorial: Windows 7 system, Dell G3 computer.
Restart the computer and press the F2 button while starting. The buttons will be different for different brands. You can check the details on Baidu. The main thing here is to enter the bios interface.

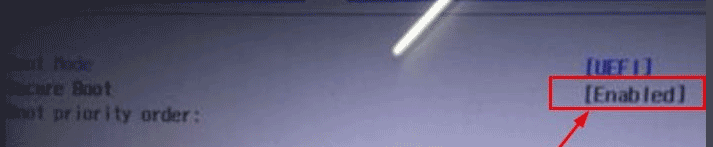
Then enter the bios interface and select the boot option in the title option, which is the boot option.

Enter the boot interface, you can see the usb boot option in the interface, the option behind is disabled, which means disabled, you need to enable it first, directly Press the Enter key.

# Then a small selection window will pop up. Select the enabled option in the options, which means enabled.

Then the usb boot option will change to the enabled option. At this time, the usb boot function will be successfully enabled and the U disk will be recognized.

For more computer-related knowledge, please visit the FAQ column!
The above is the detailed content of What should I do if bios cannot recognize the USB disk for booting?. For more information, please follow other related articles on the PHP Chinese website!

Hot AI Tools

Undresser.AI Undress
AI-powered app for creating realistic nude photos

AI Clothes Remover
Online AI tool for removing clothes from photos.

Undress AI Tool
Undress images for free

Clothoff.io
AI clothes remover

AI Hentai Generator
Generate AI Hentai for free.

Hot Article
Hot Tools

Notepad++7.3.1
Easy-to-use and free code editor

SublimeText3 Chinese version
Chinese version, very easy to use

Zend Studio 13.0.1
Powerful PHP integrated development environment

Dreamweaver CS6
Visual web development tools

SublimeText3 Mac version
God-level code editing software (SublimeText3)
Hot Topics
 1377
1377
 52
52

 Ventoy secure boot settingsSecure Boot
Jun 18, 2024 pm 09:00 PM
Ventoy secure boot settingsSecure Boot
Jun 18, 2024 pm 09:00 PM
Ventoy is a USB boot tool that can directly boot ISO/WIM/IMG/VHD(x)/EFI and other types of files in the USB flash drive. It is very easy to use. Laptops have secure boot turned on by default. If they are not turned off or cannot be turned off, they cannot be booted from a USB device. Ventoy also supports secure boot. The principle is to inject a GRUB installation certificate into the current computer. As long as your computer After being injected once, any USB disk PE booted based on grub can pass. The official description of Ventoy is a GIF image. The playback speed is too fast and you may not be able to remember it. The editor has divided the GIF image to make it easier to understand. Ventoy secure boot has EnrollKey and Enro
 Acer laptop disables secure boot and removes password in Bios
Jun 19, 2024 am 06:49 AM
Acer laptop disables secure boot and removes password in Bios
Jun 19, 2024 am 06:49 AM
I repaired an Acer laptop and had to turn off secure boot when entering PE. I recorded how to turn off secure boot and remove the password from Bios. Turn on the computer and when the screen is not on, keep pressing the F2 key to enter the BIOS. On Acer laptops, turn off Secure Boot and press the arrow keys to switch to Boot. If SecureBoot is gray and unclickable, switch to the Security page, select SetSupervisorPassword and press Enter to set the password. Then switch to Boot, SecureBoot can be selected as Disabled, and press F10 to save. Modify and clear the BIOS password on your Acer notebook. Switch to the Security menu and select SetSupervisorPasswo.
 Dell computer bios interface to set USB disk startup items
Feb 10, 2024 pm 10:09 PM
Dell computer bios interface to set USB disk startup items
Feb 10, 2024 pm 10:09 PM
How do you set up a USB drive if your computer is a Dell laptop? Many friends have found that Dell laptops will not display the USB disk option by pressing the boot hotkey, so they need to enter the BIOS to set up the USB disk boot, so what if they don't know how to operate it? Now follow the editor’s steps to demonstrate how to set up a USB flash drive on a Dell laptop. Many friends assemble Dell computers, but don't know how to use the USB boot tool after entering the USBPE interface. Many friends don't know that they need to enter the BIOS interface to set up USB boot, so pressing the boot hotkey will not appear. what should we do? Let’s see how Dell sets up USB boot! Set up Dell laptop to reinstall system bootable from USB disk
 ASUS motherboard USB boot setting method
Mar 18, 2024 pm 08:01 PM
ASUS motherboard USB boot setting method
Mar 18, 2024 pm 08:01 PM
We generally need to set up a USB flash drive when reinstalling the system, but many small partners who use ASUS motherboards don't know how to set up a USB flash drive. What should I do then? Let's take a look at the editor's solution. How to set up USB boot for ASUS motherboard 1. Restart ASUS PC and press ESC or F8 to enter BIOS settings, change BIOS to Simplified Chinese, and then press F7 to enter advanced mode. In Advanced Mode, use the → directional button to navigate to the Start option, select the Secure Boot menu, and enter the Key Management Clear key to turn off the Secure Boot feature. 3. Return to the "Safe Start Menu" option and change the operating system type to "Other Operating Systems". 4. Return to the "Start" option and change CSM Disabled to Enabled,
 How Toshiba sets USB boot options for USB boot
Feb 11, 2024 am 09:27 AM
How Toshiba sets USB boot options for USB boot
Feb 11, 2024 am 09:27 AM
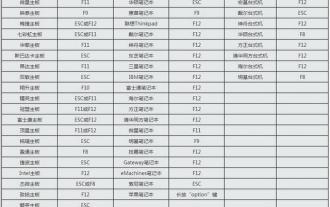
The use of CDs to install systems has become less and less common, and is now replaced by the more convenient and faster U disk installation method. To use a U disk to install the system, in addition to making a Professor U U disk boot disk, you also need to set the computer to boot from the U disk. Start to enter the system installation interface. Nowadays, most computers support U disk quick startup. You only need to press the hotkey during startup to choose to boot from the U disk. Here is a summary of the startup item setting shortcut keys for different motherboards and computers of different brands. Required tools: U disk startup disk 1. List of startup hotkeys for various brands of motherboard desktops, brands of all-in-one computers, and laptops: 2. How to use the startup hotkey to set up U disk startup with one click: 1. Put the prepared U disk Professor starts the U disk and inserts it into the computer USB interface, turns on or restarts, press
 The system has posted in safe mode ASUS motherboard
Jun 19, 2024 am 07:35 AM
The system has posted in safe mode ASUS motherboard
Jun 19, 2024 am 07:35 AM
After the computer is turned on, it prompts The system has posted in safe mode. You can set it in the BIOS to ignore the F1 error. Although it does not prompt, it directly enters the BIOS when it is turned on. Sometimes F1 is useless every time it is turned on. Then you need to restart the BIOS, and then exit the BIOS to enter the system. . thesystemhaspostedinsafemode=The system is in safe mode. This problem is relatively common on ASUS motherboards. As long as you turn off the XMP of the memory and adjust the memory frequency back to normal, you can boot normally without the thesystemhaspostedinsafemode error. Updating the latest motherboard BIOS should be OK.
![Windows PC keeps booting into BIOS [Fix]](https://img.php.cn/upload/article/000/887/227/171012121854600.jpg?x-oss-process=image/resize,m_fill,h_207,w_330) Windows PC keeps booting into BIOS [Fix]
Mar 11, 2024 am 09:40 AM
Windows PC keeps booting into BIOS [Fix]
Mar 11, 2024 am 09:40 AM
If your Windows PC frequently enters the BIOS interface, this may cause difficulty in use. I'm stuck with the BIOS screen every time I turn on my computer, and restarting doesn't help. If you are facing this problem, then the solutions provided in this article will help you. Why does my computer keep booting in BIOS? Your computer's frequent restarts in BIOS mode may be caused by a variety of reasons, such as improper boot sequence settings, damaged SATA cables, loose connections, BIOS configuration errors, or hard drive failures, etc. Fix Windows PC Keeps Booting into BIOS If your Windows PC keeps booting into BIOS, use the fix below. Check your boot order and re-plug the
 How to install the system image to a USB disk for startup
Feb 11, 2024 pm 06:00 PM
How to install the system image to a USB disk for startup
Feb 11, 2024 pm 06:00 PM
How to enter the MSI motherboard BIOS into a USB flash drive to install the system. The specific method is as follows: 1. Tool download the original Windows 10 system image, an MSI computer, an empty USB flash drive of 8g or above and download a USB boot disk creation tool 2. Operation method 1 . Download and install the Laobaicai U disk installation system tool on the computer. Insert a blank U disk of more than 8 GB. Select the U disk we inserted and click to start making the boot disk. 2. After the software has made the U disk boot disk, download a win10 Put the system image file into the USB flash drive and prompt. After the creation is successful, copy the downloaded system image file to the USB flash drive. 3. Insert the USB boot disk into the computer that needs to be installed. Turn on the computer and keep pressing the startup shortcut key [MSI The motherboard's shortcut startup key is F11] Enter the startup world