
In CSS we have auto value which can be used like margin, position, height, width and other attributes. In this article, I will first explain how auto works and the technical details of how to make the most of auto. Of course, it will be accompanied by some use cases and examples.
autoThe use of the keyword varies by attribute. For this article, I will explain the values in the context of each property.
Block-level elements (such as <div> or <code><p> </p>)'s initial width is auto, which causes them to take up the entire horizontal space of their containing block.
According to CSS specification:
'margin-left' 'border-left-width' 'padding-left' 'width' 'padding-right' 'border-right-width' 'margin-right' =
The width of the block
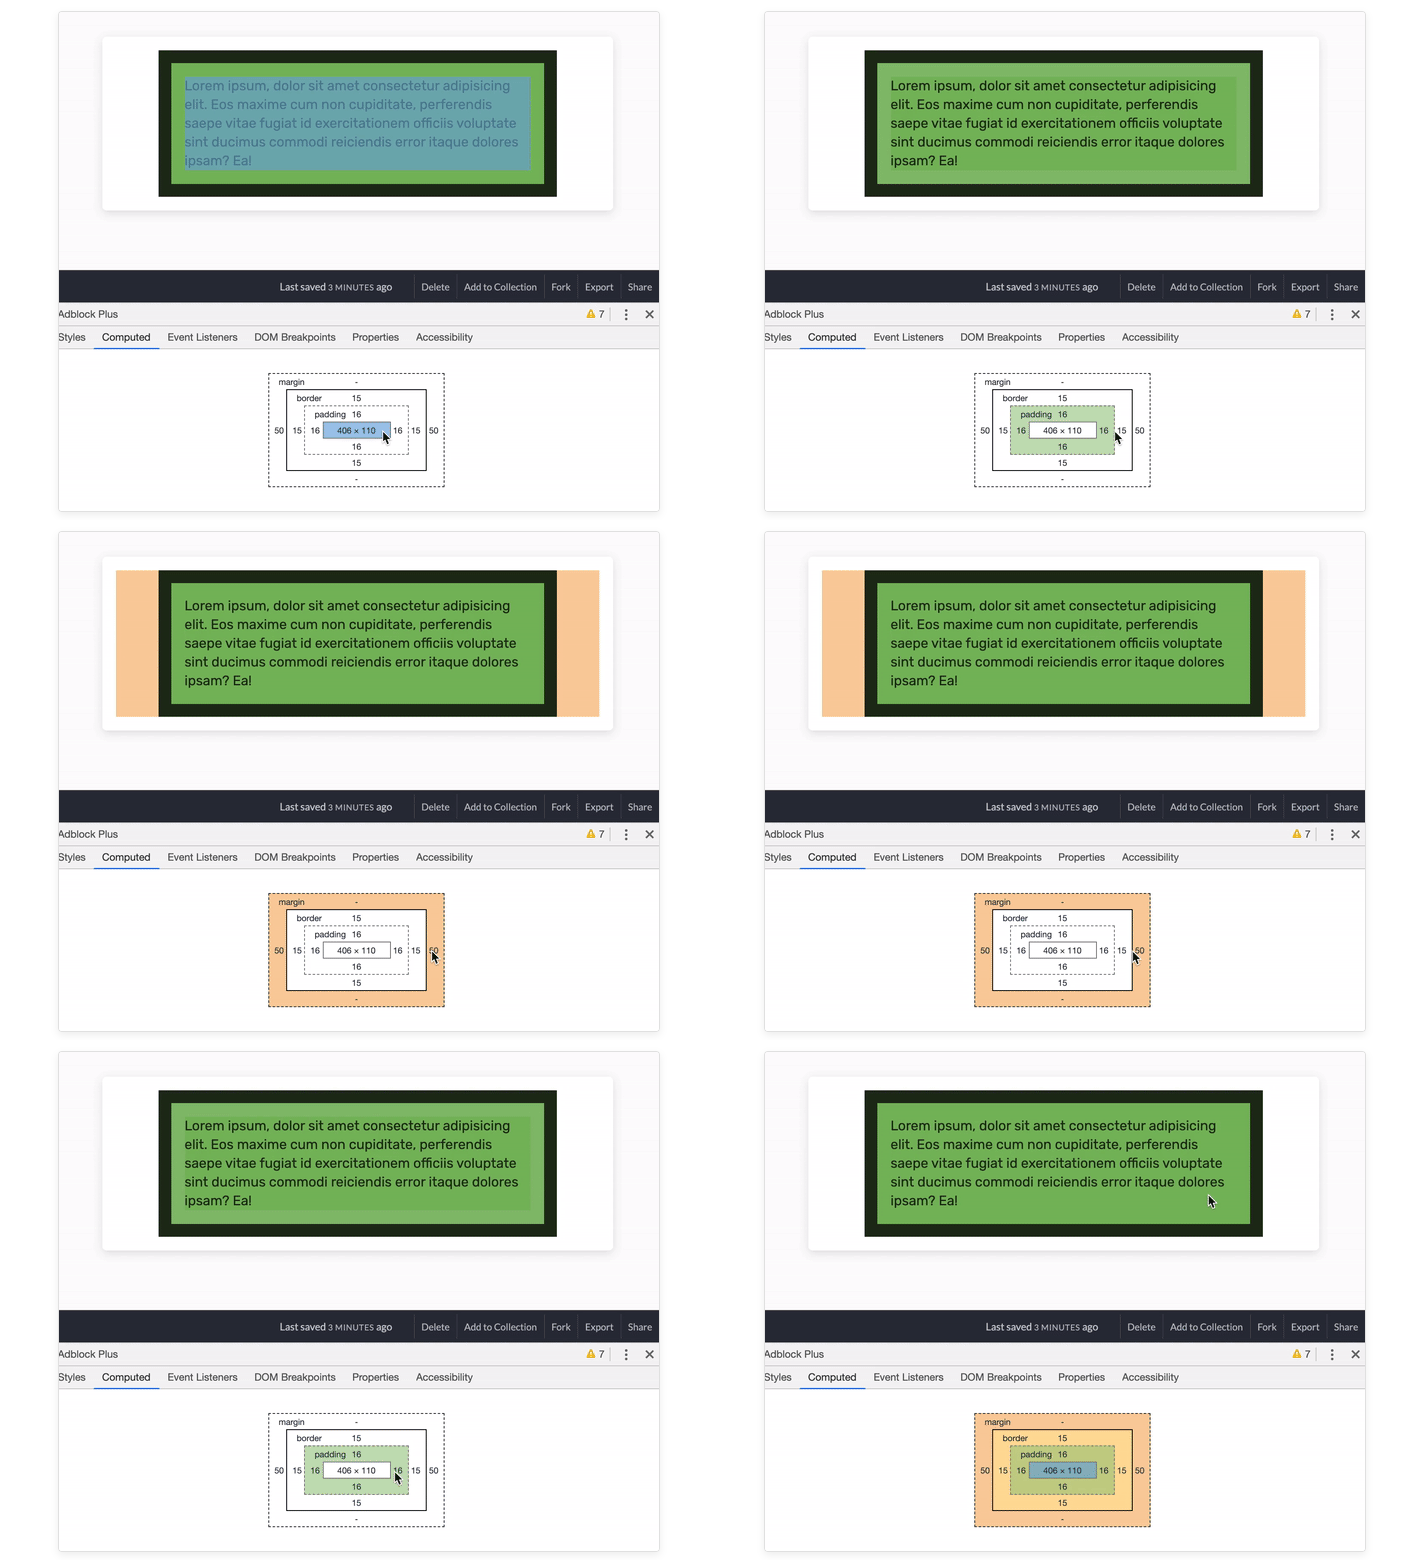
When an element has a width value of auto, it contains margin, padding, and border will not become larger than its parent element. where the width of content will be content itself minus margin, padding and border.

Let’s take the above model as an example.
html
<div class="wrapper">
  <div class="item">
    <p>Lorem ipsum, dolor sit amet consectetur adipisicing elit. Eos maxime cum non cupiditate, perferendis saepe vitae fugiat id exercitationem officiis voluptate sint ducimus commodi reiciendis error itaque dolores ipsam? Ea!</p>
  </div>
</div>css
* {
    box-sizing: border-box;
}

.wrapper {
      max-width: 600px;
      margin: 2rem auto 0;
      padding: 1rem;
}

.item {
      padding: 1rem;
      margin: 0 50px;
      border: 15px solid #1f2e17;
} Everything is fine, element item is constrained to its parent.

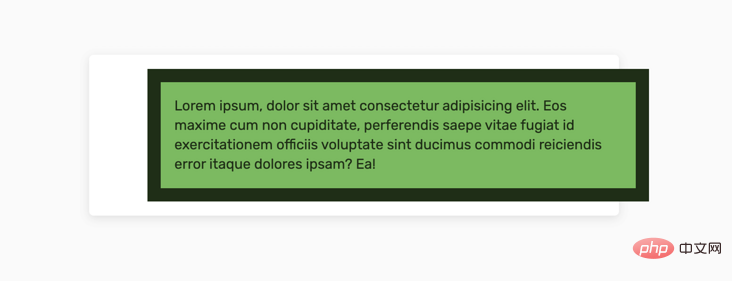
Yes, what happens if we change the width of the element item to 100% instead of auto? The element will take up 100% of its parent, plus left and right margins.
// css
.item {
      width: 100%;
      padding: 1rem;
      margin: 0 50px;
      border: 15px solid #1f2e17;
}
The width of this element is 568px, which is the sum of:
'border-left- width' 'padding-left' 'width' 'padding-right' 'border-right-width' = 15 16 506 16 15 =
568px
If the direction is ltr, then margin-right is completely ignored. In our case, this happened. However, if the layout is rtl, then margin-left will be ignored.
Case source code: https://codepen.io/shadeed/pen/f305220fbd4b444371bdef11dad014ec?editors=0100
Just explaining the basics is not enough for us to grasp this concept, so some examples are needed to illustrate.
The width differs between mobile and PC
We have a set of buttons. On mobile we want them to be next to each other (each button wrapper taking up 50% of its parent element), while on desktop each button should take up the full width of its parent element . What to do?
HTML
<div class="group">
    <div class="group__item">
        <button class="c-button">Sign In</button>
    </div>
    <div class="group__item">
        <button class="c-button c-button--ghost">Register</button>
    </div>
</div>Here we use flex layout to arrange the buttons together.
CSS
.group {
    display: flex;
}

.group__item {
    width: 50%;
}For PC, we need to take the full width of each item. In this case, you might be inclined to use width: 100%, right? Here's a better solution.
CSS
@media (min-width: 800px) {
    /* Revert the wrapper to a block element instead of flex */
    .group {
        display: block;
    }

    .group__item {
        width: auto;
    }
}Since .group is a block element, using width: auto will fill the available space of its parent element nicely .
Case source code: https://codepen.io/shadeed/pen/399de6d9d473137998f87f957cfdfa03?editors=1100
When it comes to height, the situation is different. The height of the element is equal to the content with the default value of auto.
Consider the following example
<div class="wrapper"> <div class="item">What's my height?</div> </div>
To make .item get the full height of its container, we can use one of the following methods:
Give .wrapper a fixed height, and then add height: 100%
flex layout for .wrapper, by default it will stretch the child .item
.wrapper {
    height: 200px;
}

.item {
    height: 100%;
}, the most common use case is to horizontally center an element of known width. Consider the following example:
要让上面的蓝色矩形居中,可以使用下面的方法:
.element {
    margin-left: auto;
    margin-right: auto;
}根据CSS规范:
如果
margin-left和margin-right值均为auto,则它们的使用值相等。 这使元素相对于包含块的边缘水平居中。
另一个不太常见的将绝对定位元素居中的用例是margin: auto。当我们有一个元素应该在它的父元素内部水平和垂直居中时,我们可能会倾向于使用translateX或translateY。
我们可以使用下面方法让具有绝对定位元素居中:
设置的宽度和高度。
元素应具有position: absolute
HTML
<div class="wrapper">
  <div class="item">I am centered.</div>
</div>
CSS
.wrapper {
    position: relative;
}

.item {
    width: 200px;
    height: 100px;
    position: absolute;
    left: 0;
    top: 0;
    right: 0;
    bottom: 0;
    margin: auto;
}事例源码:https://codepen.io/shadeed/pen/b086f8402be981e871ac5db15495dec8?editors=0100
在某些情况下,在flexbox中使用自动页边距非常有用。当一个子项目有一个margin是auto 时,它将被推到远的另一边。例如,如果一个flex项目的左边是margin-left: auto,那么它将被推到最右边。
考虑下面的模型,父级元素是一个 flex 布局:
我们想把第二项推到最右边,自动边距就派上用场了。
CSS
.wrapper {
    display: flex;
}

.item-2 {
    margin-left: auto;
}不仅如此,它还可以在水平或垂直方向工作。参见下面的示例
CSS
.item-2 {
    margin-top: auto;
}另外,如果只有一个子元素,则可以使用margin:auto将其水平和垂直居中。
CSS
.item-1 {
    margin: auto;
}在flexbox中,我们可以使用flex: auto作为子项目。这是什么意思?当一个子项目有flex: auto时,它等价于flex: 11 auto,与下面等价:
CSS
.item {
  flex-grow: 1;
  flex-shrink: 1;
  flex-basis: auto;
}MDN 描述
该项目根据其宽度和高度属性调整大小,但会增长以吸收flex容器中的任何额外自由空间,并会收缩到其最小尺寸以适合该容器,这等效于设置“
flex:1 1 auto”。
具有flex:auto的项目将根据其宽度和高度来调整大小,但它可以根据可用的额外空间来增大或缩小。 在研究本文之前,我不知道这一点!
HTML
<div class="wrapper">
  <div class="item item-1">Item</div>
  <div class="item">Item</div>
  <div class="item">Item</div>
</div>
CSS
.wrapper {
    display: flex;
    flex-wrap: wrap;
}

.item {
    width: 120px;
    height: 500px;
}

.item-1 {
    flex: auto;
}事例源码:https://codepen.io/shadeed/pen/4914b4517b858f0fcf0f8acd07c64b1e?editors=1100
auto 列在CSS Grid中,我们可以设置一个列为auto,这意味着它的宽度将基于它的内容长度。看看下面,你就知道我的意思了:
wrapper {
    display: grid;
    grid-template-columns: auto 1fr 1fr;
}grid 和 auto 边距
使用CSS网格时,可以使用自动页边距实现类似于 flexbox 的结果。 当我们有一个网格,并且其中的网格项目具有margin-left: auto时:该项目将被推到右边,其宽度将基于其内容长度
考虑下面的例子:
当我们希望item1的宽度基于其内容,而不是网格区域。 通过使用margin-left: auto,可以通过下面代码实实现:
.item-1 {
    margin-left: auto;
}值得一提的是,使用margin-left: auto或margin-right: auto对于从左到右的布局(例如英语)可能效果很好。 但是,在多语言网站上工作时要当心颠覆这些价值观。 更好的是,使用flexbox或grid属性,以防使用它们完成工作。 如果没有,那么请使用自动页边距作为最后的选择,而应使用CSS逻辑属性。
当我们有一个元素时,我们应该考虑它应该包含的最小和最大内容。如果内容超过了最大值,那么我们需要显示一个滚动条。
你可能想使用以下内容:
element {
  overflow-y: scroll;
}然而,这可能会显示一个滚动条,即使内容高度很短。参见下面的示例
在 Chrome 窗口中,滚动条总是显示出来,这是不正确和令人困惑的行为。
通过使用auto关键字,我们可以确保滚动条不会显示,除非内容高度大于它的容器。
根据MDN:
取决于用户代理。 如果内容适合填充框内部,则它看起来与可见内容相同,但仍会建立新的块格式化上下文。 如果内容溢出,桌面浏览器会提供滚动条。
.element {
  overflow-y: auto;
}对于CSS定位属性top,right,bottom和left,我们可以使用auto关键字作为它们的值。 接下来我要解释的是对我来说是新的,我在研究本文时学到了它。
考虑下面的模型:
我们有一个有内边距的 wrapper 元素,还有一个子项。子项目是绝对定位的,但没有任何定位属性。
.wrapper {
    position: relative;
    padding: 16px;
}

.item {
    position: absolute;
    width: 100px;
    height: 100px;
}在CSS中,每个属性都有一个初始值/默认值。 如果我检查了子项并转到computed styles,你猜下left属性的值会是什么?
left的默认值为16px,即使没有设置。为什么会发生这种情况? 好吧,原因是绝对定位的元素相对于其最接近的父元素具有position:relative。 该父项具有padding: 16px,因此子项位于顶部和左侧的16px处。 有趣,不是吗?
现在,你可能会问,这样做有什么好处?好吧,让我继续。
假设子项必须在较小的视口中位于距左侧100像素的位置,对于桌面,它应恢复为默认位置。
.wrapper {
    position: relative;
}

.item {
    position: absolute;
    left: 100px;
    width: 100px;
    height: 100px;
}如何在较大的视口中重设left? 我们不能使用left:0,因为这会将子元素粘到边缘,这不是我们想要的。 请参阅下面的模型,以了解我的意思。
要以正确的方式重置子项,我们应该使用left: auto。 根据 MDN:
如果元素是静态元素,则将定位在它应该水平定位的位置
这意味着,它会尊重padding,而不会将子条目粘贴到其父条目的边缘。
.item {
    position: absolute;
    left: 100px;
    width: 100px;
    height: 100px;
}

@media (min-width: 800px) {
    .item {
        /* This is equivalent to left: 16px */
        left: auto;
    }
}top属性也是如此。 对于right和bottom属性,其默认计算值分别等于元素的宽度和高度。
事例源码:https://codepen.io/shadeed/pen/d062539938346e5458f769cbc08833e1?editors=0100
值得一提的是,下面的用例可能还不够,但是我尝试添加一些用例,希望它们对你们有用。
提示箭头
对于提示框,我们需要一个指向箭头,以使其对用户更加清晰。 如果我们正在设计系统上,则应该考虑多个状态。 例如,提示的箭头指向左侧,另一个箭头指向右侧。
.tooltip:before {
    /* 箭头代码 */
    position: absolute;
    left: -15px;
}

/* 这是一个箭头指向右侧的版本*/
.tooltip.to-right:before {
    /* 箭头代码 */
    position: absolute;
    left: auto;
    right: -15px;
}请注意,在初始实现中,我使用left: auto来覆盖left: -15px。 供您参考,这是非常常用的,我建议改用以下内容:
.tooltip:before {
    position: absolute;
    right: 100%;
}

.tooltip.to-right:before {
    /* Arrow code */
    position: absolute;
    right: auto;
    left: 100%;
}通过使用100%,我们避免了使用硬编码的值(箭头宽度),如果我们改变箭头的大小,这个值可能会失败。这是一个更经得起时间考验的解决方案。
卡片组件
你可能有一个card组件,其左上角有一个操作,它可能仅用于装饰,也可能是一个有用的操作。不管是什么,你都应该考虑到它是双向的。
通过使用left:auto,我们可以很容易地重置它的基本实现。
.card .icon {
    position: absolute;
    left: 15px;
    top: 15px;
}

.card.is-right .icon {
    left: auto;
    right: 15px;
}Flexbox 和 自动边距
当谈到flexbox时,它有无限的可能性。 通过将其与自动边距相结合,我们可以构建功能强大的布局。
考虑下面的例子
我们在右侧包含一行标题,描述和一个操作按钮的行。 我们希望操作按钮贴在右侧。
HTML
<div class="item">
    <div class="item-group">
        <!-- Title and description -->
    </div>
    <button class="item__action">Confirm</button>
</div>CSS
.item {
  display: flex;
  flex-wrap: wrap;
  justify-content: space-between;
}

.item__action {
  margin-left: auto;
}就是这样! 通过使用margin-left: auto,将动作推到最右角。 更好的是,如果您要构建多语言网站,我们可以使用CSS逻辑属性。 CSS将如下所示:
.item__action {
    margin-inline-start: auto;
}CSS grid 和自动边距
在向网格项目添加边距时,它可以是固定值,百分比或自动值。 我对auto更感兴趣。 考虑以下:
HTML
<p class="input-group">
    <label for="">Full Name</label>
    <input type="email" name="" id="">
</p>CSS
.input-group {
  display: grid;
  grid-template-columns: 1fr;
  grid-gap: 1rem;

  @media (min-width: 700px) {
    grid-template-columns: 0.7fr 2fr;
  }
}我想将label 与input的左边缘对齐。 为此,我需要应用以下内容:
.input-group label {
    margin-left: auto;
}模态设计
在进行模态设计时,重要的是要考虑内容高度很大时会发生的情况。 对于这种情况,我们可以使用以下代码:
.modal-body {
    overflow-y: auto;
}这样,只有当内容高度足够大时,它才会显示滚动条。
英文原文地址:https://css-tricks.com/almanac/properties/o/overflow/
作者:shadeed
更多编程相关知识,请访问:编程教学!!
The above is the detailed content of Worth knowing about CSS auto! !. For more information, please follow other related articles on the PHP Chinese website!