
 Backend Development
PHP Tutorial
Teach you how to deploy php projects under Linux - Apache, php, mysql association (share)
Backend Development
PHP Tutorial
Teach you how to deploy php projects under Linux - Apache, php, mysql association (share)
Teach you how to deploy php projects under Linux - Apache, php, mysql association (share)

This article will share with you how to deploy php projects under Linux - Apache, php, mysql association (sharing), which has certain reference value. Friends in need can refer to it. I hope it will be helpful to you. Everyone helps.
MySql
1. Mysql and apache are best installed first, because When configuring php, you need to configure and test related to mysql and apacheFirst download the mysql-sever file, because the blogger's Linux environment is the CentOS version, and there seems to be no mysql-sever in the yum source when mysql is installed normally. File, you need to download it from the official website1.下载mysql-service文件
[root@tele-1 ~]# wget http://dev.mysql.com/get/mysql-community-release-el7-5.noarch.rpm
2.安装mysql-service文件
[root@tele-1 ~]# rpm -ivh mysql-community-release-el7-5.noarch.rpm
2. Install mysql
[root@tele-1 ~]# yum install mysql-community-server
3. After the installation is complete, start the mysql service
[root@tele-1 ~]# service mysqld restart
4. The initial installation of mysql does not have a password, and the default user name is root. So we need to change the password and use the mysql command line to change it
1. Enter the mysql command line
[root@tele-1 ~]# mysql -uroot
Welcome to the MySQL monitor.  Commands end with ; or \g.
Your MySQL connection id is 474801
Server version: 5.6.36 MySQL Community Server (GPL)

Copyright (c) 2000, 2017, Oracle and/or its affiliates. All rights reserved.

Oracle is a registered trademark of Oracle Corporation and/or its
affiliates. Other names may be trademarks of their respective
owners.

Type 'help;' or '\h' for help. Type '\c' to clear the current input statement.

mysql>
<strong>2.使用命令进行密码修改</strong><br/>
mysql> set password for 'root'@'localhost' = password('你要修改的密码');
Query OK, 0 rows affected (0.06 sec)
5. Because the blogger uses The local navicat software is used to connect to mysql under Linux, so if you want to access it locally, you need to change the user table in the mysql database
1.操作mysql数据库表
mysql> use mysql;
Reading table information for completion of table and column names
You can turn off this feature to get a quicker startup with -A

Database changed
mysql>
2.查看user表中的数据(在mysql命令行中可以直接进行sql语句编写)
mysql> select * from user;
mysql>
3. In the blogger's table This is the modified table. If you want remote access, you need the data marked in red above. Host refers to the IP address that can access this database, and % means that all requests can be connected.
You can modify a piece of data or add a piece of data. But it is best not to modify the data marked in blue above. The modified statement is in the format belowmysql> update user set Host = '%' where ???
4. Finally, exit or \q are the methods to exit the mysql command line
mysql> \q
Bye
Installing Apache
1. The apache installation method is relatively simple
[root@tele-2 ~]# yum install httpd
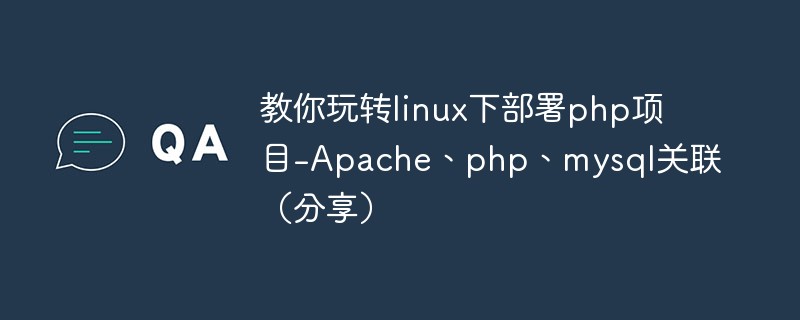
2. Access the virtual machine from the external network Address, we need to modify the apache configuration file /etc/httpd/conf/httpd.conf

Find #ServerName www.example.com :80 Change to ServerName localhost:80
As shown in the picture on the right: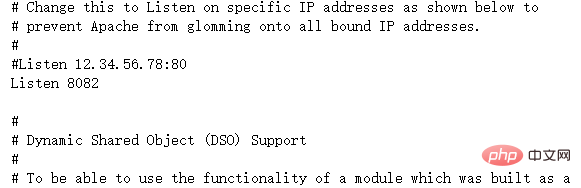
As shown in the picture on the right:
3. After the modification is completed, we need to start the httpd service again and check the startup status[root@tele-2 ~]# service httpd start
Redirecting to /bin/systemctl start httpd.service
[root@tele-2 ~]# service httpd status
Redirecting to /bin/systemctl status httpd.service
● httpd.service - The Apache HTTP Server
Loaded: loaded (/usr/lib/systemd/system/httpd.service; enabled; vendor preset: disabled)
Active: active (running) since Mon 2017-06-05 15:57:34 CST; 5s ago
Docs: man:httpd(8)
man:apachectl(8)
Process: 54532 ExecStop=/bin/kill -WINCH ${MAINPID} (code=exited, status=0/SUCCESS)
Process: 39046 ExecReload=/usr/sbin/httpd $OPTIONS -k graceful (code=exited, status=0/SUCCESS)
Main PID: 54573 (httpd)
Status: "Processing requests..."
Memory: 15.8M
CGroup: /system.slice/httpd.service
├─54573 /usr/sbin/httpd -DFOREGROUND
├─54576 /usr/sbin/httpd -DFOREGROUND
├─54577 /usr/sbin/httpd -DFOREGROUND
├─54578 /usr/sbin/httpd -DFOREGROUND
├─54579 /usr/sbin/httpd -DFOREGROUND
└─54580 /usr/sbin/httpd -DFOREGROUND
Jun 05 15:57:34 tele-2 systemd[1]: Starting The Apache HTTP Server...
Jun 05 15:57:34 tele-2 systemd[1]: Started The Apache HTTP Server.
PHP
1.php installation command
[root@tele-2 ~]# yum install php
[root@tele-2 ~]# service httpd start
Redirecting to /bin/systemctl start  httpd.service
In the apache default page path
/# Create a new test.php page under ##var/www/html and add the code
<?php
 phpinfo();
?>
4. Visit this page and enter localhost/test.php, or ip: Port number/test.php You can see the configuration information of the php environment
Associate php and mysql
1. Search module
[root@tele-2 ~]# yum search php
[root@tele-2 ~]# yum install php-mysql php-gd php-imap php-ldap php-odbc php-pear php-xml php-xmlrpc
至此,php在linux中的运行环境就已经成功配置完成了。
1.mysql yum安装默认文件夹及相关命令
数据库目录:/var/lib/mysql/

配置文件:/usr/share/mysql(mysql.server命令及配置文件)

相关命令:/usr/bin(mysqladmin mysqldump等命令)

my.cnf: /etc/my.cnf

启动脚本:/etc/rc.d/init.d/(启动脚本文件mysql的目录)
启动命令:service mysql start
停止命令:service mysql stop
运行状态:service mysql status
2.apache
配置文件路径:/etc/httpd/conf/httpd.conf
启动命令:service httpd start
停止命令:service httpd stop
运行状态:service httpd status
3.php
php默认页面路径:/var/www/html
推荐学习:《PHP视频教程》
The above is the detailed content of Teach you how to deploy php projects under Linux - Apache, php, mysql association (share). For more information, please follow other related articles on the PHP Chinese website!

Hot AI Tools

Undresser.AI Undress
AI-powered app for creating realistic nude photos

AI Clothes Remover
Online AI tool for removing clothes from photos.

Undress AI Tool
Undress images for free

Clothoff.io
AI clothes remover

AI Hentai Generator
Generate AI Hentai for free.

Hot Article
Hot Tools

Notepad++7.3.1
Easy-to-use and free code editor

SublimeText3 Chinese version
Chinese version, very easy to use

Zend Studio 13.0.1
Powerful PHP integrated development environment

Dreamweaver CS6
Visual web development tools

SublimeText3 Mac version
God-level code editing software (SublimeText3)
Hot Topics
 1378
1378
 52
52

 Alipay PHP SDK transfer error: How to solve the problem of 'Cannot declare class SignData'?
Apr 01, 2025 am 07:21 AM
Alipay PHP SDK transfer error: How to solve the problem of 'Cannot declare class SignData'?
Apr 01, 2025 am 07:21 AM
Alipay PHP...
 Explain JSON Web Tokens (JWT) and their use case in PHP APIs.
Apr 05, 2025 am 12:04 AM
Explain JSON Web Tokens (JWT) and their use case in PHP APIs.
Apr 05, 2025 am 12:04 AM
JWT is an open standard based on JSON, used to securely transmit information between parties, mainly for identity authentication and information exchange. 1. JWT consists of three parts: Header, Payload and Signature. 2. The working principle of JWT includes three steps: generating JWT, verifying JWT and parsing Payload. 3. When using JWT for authentication in PHP, JWT can be generated and verified, and user role and permission information can be included in advanced usage. 4. Common errors include signature verification failure, token expiration, and payload oversized. Debugging skills include using debugging tools and logging. 5. Performance optimization and best practices include using appropriate signature algorithms, setting validity periods reasonably,
 Explain the concept of late static binding in PHP.
Mar 21, 2025 pm 01:33 PM
Explain the concept of late static binding in PHP.
Mar 21, 2025 pm 01:33 PM
Article discusses late static binding (LSB) in PHP, introduced in PHP 5.3, allowing runtime resolution of static method calls for more flexible inheritance.Main issue: LSB vs. traditional polymorphism; LSB's practical applications and potential perfo
 Framework Security Features: Protecting against vulnerabilities.
Mar 28, 2025 pm 05:11 PM
Framework Security Features: Protecting against vulnerabilities.
Mar 28, 2025 pm 05:11 PM
Article discusses essential security features in frameworks to protect against vulnerabilities, including input validation, authentication, and regular updates.
 Customizing/Extending Frameworks: How to add custom functionality.
Mar 28, 2025 pm 05:12 PM
Customizing/Extending Frameworks: How to add custom functionality.
Mar 28, 2025 pm 05:12 PM
The article discusses adding custom functionality to frameworks, focusing on understanding architecture, identifying extension points, and best practices for integration and debugging.
 How to send a POST request containing JSON data using PHP's cURL library?
Apr 01, 2025 pm 03:12 PM
How to send a POST request containing JSON data using PHP's cURL library?
Apr 01, 2025 pm 03:12 PM
Sending JSON data using PHP's cURL library In PHP development, it is often necessary to interact with external APIs. One of the common ways is to use cURL library to send POST�...
 Describe the SOLID principles and how they apply to PHP development.
Apr 03, 2025 am 12:04 AM
Describe the SOLID principles and how they apply to PHP development.
Apr 03, 2025 am 12:04 AM
The application of SOLID principle in PHP development includes: 1. Single responsibility principle (SRP): Each class is responsible for only one function. 2. Open and close principle (OCP): Changes are achieved through extension rather than modification. 3. Lisch's Substitution Principle (LSP): Subclasses can replace base classes without affecting program accuracy. 4. Interface isolation principle (ISP): Use fine-grained interfaces to avoid dependencies and unused methods. 5. Dependency inversion principle (DIP): High and low-level modules rely on abstraction and are implemented through dependency injection.
 How does session hijacking work and how can you mitigate it in PHP?
Apr 06, 2025 am 12:02 AM
How does session hijacking work and how can you mitigate it in PHP?
Apr 06, 2025 am 12:02 AM
Session hijacking can be achieved through the following steps: 1. Obtain the session ID, 2. Use the session ID, 3. Keep the session active. The methods to prevent session hijacking in PHP include: 1. Use the session_regenerate_id() function to regenerate the session ID, 2. Store session data through the database, 3. Ensure that all session data is transmitted through HTTPS.
