 Web Front-end
 Bootstrap Tutorial
 A brief discussion on the processing of tree list conditions and query conditions by bootstrapTable+jstree plug-in
A brief discussion on the processing of tree list conditions and query conditions by bootstrapTable+jstree plug-in
This article will introduce to you how to handle tree list conditions and query conditions when using bootstrapTable table plug-in and jstree tree list plug-in in Bootstrap. It has certain reference value. Friends in need can refer to it. I hope it will be helpful to everyone.

In my Boosttrap framework, many places need to use the bootstrapTable table plug-in and the jstree tree list plug-in to jointly build a common query interface. The bootstrapTable table plug-in is mainly used To realize paging and table display of data, the jstree tree list plug-in is used to display tree lists for quick classification and query. Combining the two in many situations can achieve a better user experience.
This essay introduces the processing of tree list conditions and query conditions when using the bootstrapTable table plug-in and jstree tree list plug-in in the Bootstrap development framework. It means that when displaying data quickly, the paging condition information is also Able to pass updates. [Related recommendations: "bootstrap Tutorial"]
1. Use of bootstrapTable table plug-in and jstree tree list plug-in
bootstrapTable The interface that combines the table plug-in and the jstree tree list plug-in to display data is also often seen, as shown below.
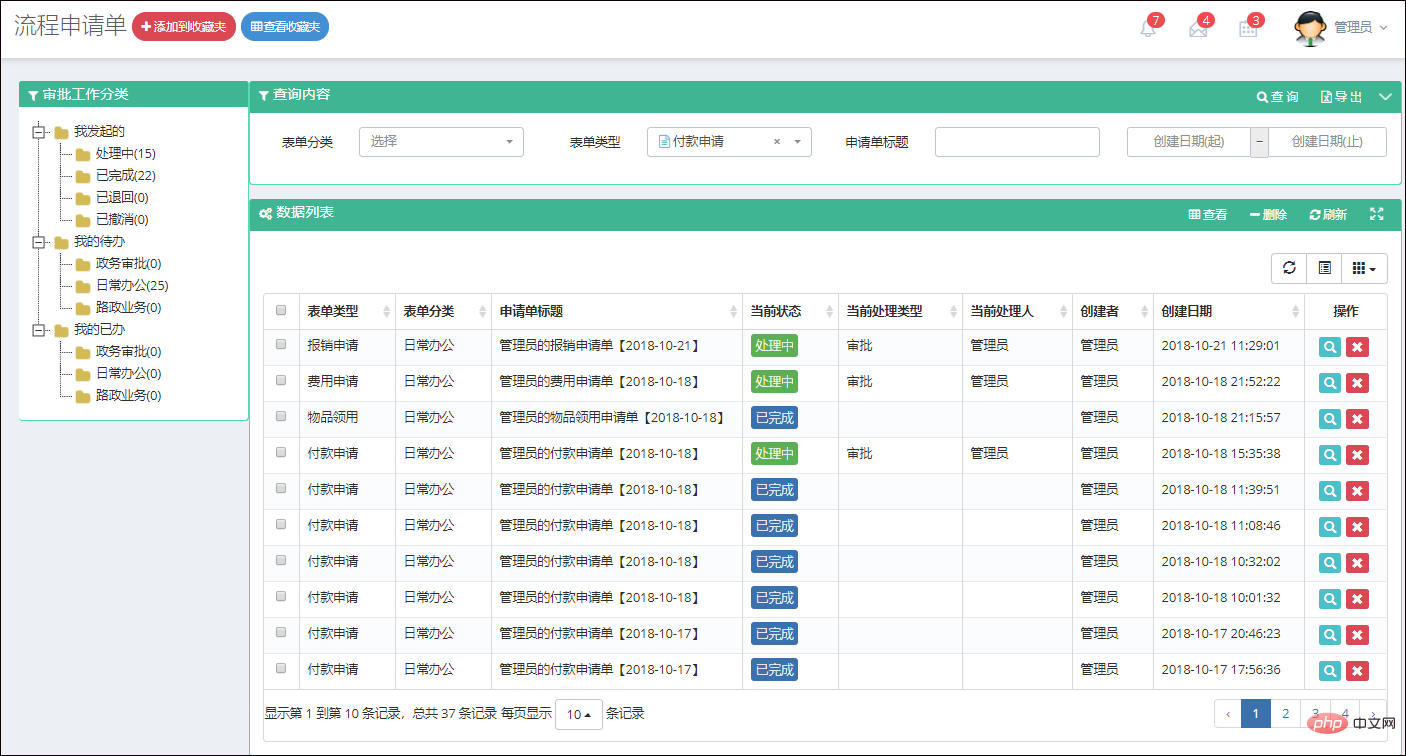
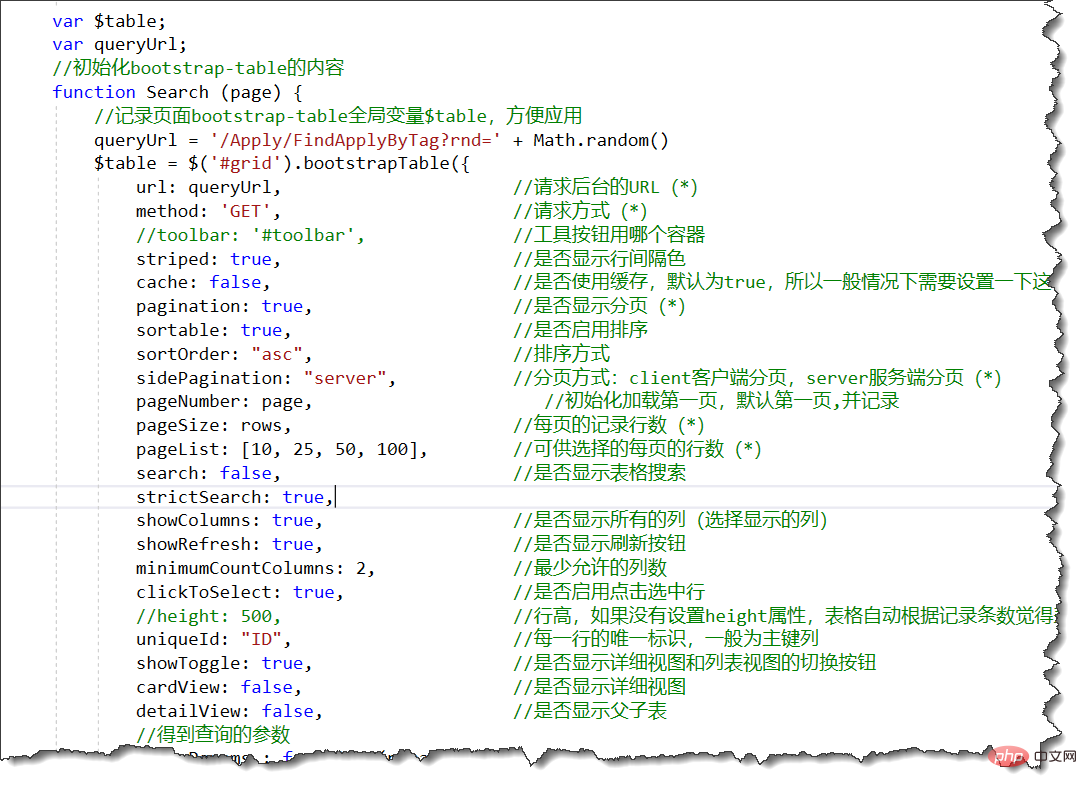
And when selecting the user information page, users also need to be filtered based on conditions.

Judging from the interface display, combining the two can indeed bring a lot of convenience, but when using it, you need to pay special attention to the processing of related attributes, otherwise paging will be displayed. All recorded.
The code for the default paging query is as follows.

The binding operation code for the default attribute list is as follows.
//绑定左侧树形列表
        //如果update为True,则重新更新缓存
        function initJsTree(update) {
            var baseUrl = "/Apply/GetMyApplyJson?r=" + Math.random();
            var url = update ? baseUrl + "&update=true" : baseUrl;
            bindJsTree("jstree_div", url);

            //树控件的变化事件处理
            $('#jstree_div').on("changed.jstree", function (e, data) {
                var icon = data.node.icon;
                loadData(data.selected);
            });
}By default, the paging query control is re-updated through the conditions triggered by the tree list, or based on the conditions, as shown below.
//加载指定的对象数据
        var clickId = "";
        function loadData(id) {
            var condition = { CustomedCondition: id + '' };

            //修改条件后需要重新刷新
            $table.bootstrapTable('refresh', { url: queryUrl, query: condition, pageNumber:1});
            clickId = id;
}However, if this is just the processing, then when the data is paging, clicking the next page will not record the tree list condition just now, then we need to record the selected tree condition, so as to When updating the conditions, add the required conditions, then modify the above code to the following code.
//加载指定的对象数据
        var clickId = "";
        var where = {};//树列表条件
        function loadData(id) {
            var condition = { CustomedCondition: id + '' };
            where = {};//清空
            where["CustomedCondition"] = id + '';//使用自定义条件

            //修改条件后需要重新刷新
            $table.bootstrapTable('refresh', { url: queryUrl, query: condition, pageNumber:1});
            clickId = id;
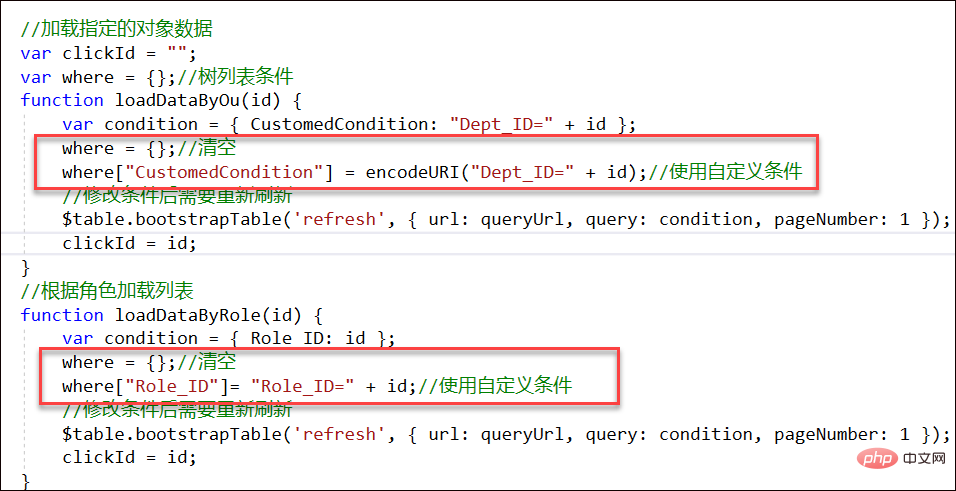
}After processing in this way, we can add processing of this condition in the condition processing part of the bootstrapTable table plug-in code.
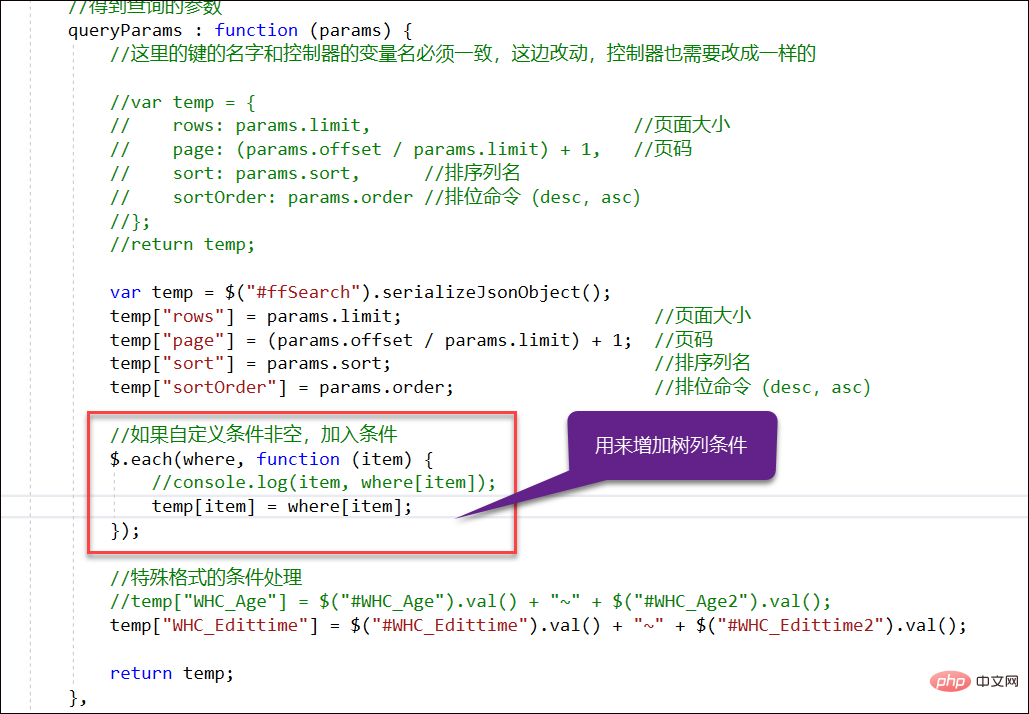
After adding the conditions in the red box, we will get the correct results by selecting paging, which will not cause the two conditions to be incompatible. At the same time, we are switching When the condition is met, the page number is restored to the first page.
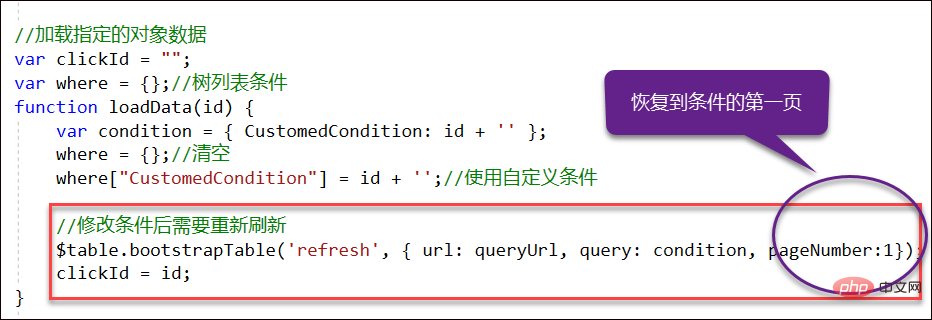
Where is stored the conditions of our attribute list, which are stored in JSON. You can add the paging conditions you need as needed, such as my other A condition for selecting the user interface can be as shown in the following code.
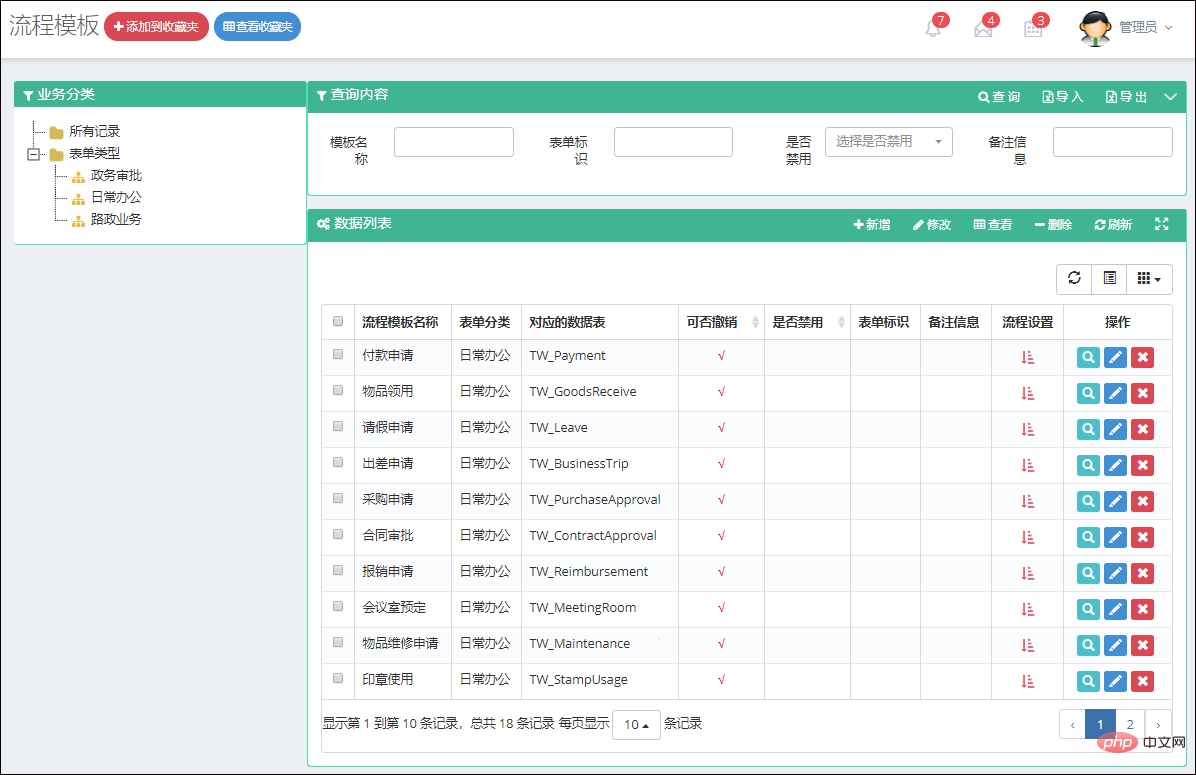
For example, the paging display and conditional classification tree display of the process template are as follows.
For example, the tree list and data display interface of one of the menus are as follows.
For more programming-related knowledge, please visit: Introduction to Programming! !
The above is the detailed content of A brief discussion on the processing of tree list conditions and query conditions by bootstrapTable+jstree plug-in. For more information, please follow other related articles on the PHP Chinese website!

Hot AI Tools

Undresser.AI Undress
AI-powered app for creating realistic nude photos

AI Clothes Remover
Online AI tool for removing clothes from photos.

Undress AI Tool
Undress images for free

Clothoff.io
AI clothes remover

AI Hentai Generator
Generate AI Hentai for free.

Hot Article

Hot Tools

Notepad++7.3.1
Easy-to-use and free code editor

SublimeText3 Chinese version
Chinese version, very easy to use

Zend Studio 13.0.1
Powerful PHP integrated development environment

Dreamweaver CS6
Visual web development tools

SublimeText3 Mac version
God-level code editing software (SublimeText3)

Hot Topics
 1378
1378
 52
52
 How to get the bootstrap search bar
Apr 07, 2025 pm 03:33 PM
How to use Bootstrap to get the value of the search bar: Determines the ID or name of the search bar. Use JavaScript to get DOM elements. Gets the value of the element. Perform the required actions.
 How to do vertical centering of bootstrap
Apr 07, 2025 pm 03:21 PM
Use Bootstrap to implement vertical centering: flexbox method: Use the d-flex, justify-content-center, and align-items-center classes to place elements in the flexbox container. align-items-center class method: For browsers that do not support flexbox, use the align-items-center class, provided that the parent element has a defined height.
 How to write split lines on bootstrap
Apr 07, 2025 pm 03:12 PM
There are two ways to create a Bootstrap split line: using the tag, which creates a horizontal split line. Use the CSS border property to create custom style split lines.
 How to insert pictures on bootstrap
Apr 07, 2025 pm 03:30 PM
There are several ways to insert images in Bootstrap: insert images directly, using the HTML img tag. With the Bootstrap image component, you can provide responsive images and more styles. Set the image size, use the img-fluid class to make the image adaptable. Set the border, using the img-bordered class. Set the rounded corners and use the img-rounded class. Set the shadow, use the shadow class. Resize and position the image, using CSS style. Using the background image, use the background-image CSS property.
 How to use bootstrap in vue
Apr 07, 2025 pm 11:33 PM
Using Bootstrap in Vue.js is divided into five steps: Install Bootstrap. Import Bootstrap in main.js. Use the Bootstrap component directly in the template. Optional: Custom style. Optional: Use plug-ins.
 How to resize bootstrap
Apr 07, 2025 pm 03:18 PM
To adjust the size of elements in Bootstrap, you can use the dimension class, which includes: adjusting width: .col-, .w-, .mw-adjust height: .h-, .min-h-, .max-h-
 How to set up the framework for bootstrap
Apr 07, 2025 pm 03:27 PM
To set up the Bootstrap framework, you need to follow these steps: 1. Reference the Bootstrap file via CDN; 2. Download and host the file on your own server; 3. Include the Bootstrap file in HTML; 4. Compile Sass/Less as needed; 5. Import a custom file (optional). Once setup is complete, you can use Bootstrap's grid systems, components, and styles to create responsive websites and applications.
 How to use bootstrap button
Apr 07, 2025 pm 03:09 PM
How to use the Bootstrap button? Introduce Bootstrap CSS to create button elements and add Bootstrap button class to add button text


