What is the nginx startup command?
The command to start nginx is "/usr/local/nginx/sbin/nginx". Nginx is a lightweight web server/reverse proxy server and email proxy server. Its characteristics are that it occupies less memory and has strong concurrency capabilities. Its concurrency capabilities perform better among web servers of the same type.

The operating environment of this tutorial: windows7 system, nginx-1.21.0 version, Dell G3 computer.
Enter the sbin directory and execute the following command:
启动nginx的命令为     /usr/local/nginx/sbin/nginx

停止nginx的命令为    /usr/local/nginx/sbin/nginx -s stop
重启nginx的命令为    /usr/local/nginx/sbin/nginx -s reload
2. The startup method after configuring systemctl
systemctl status nginx

systemctl start nginx

systemctl stop nginx

systemctl restart nginx
3. Configuration method
1. Create a nginx.service
Create a new nginx.service file under the /usr/lib/systemd/system/ directory. And grant executable permissions
vim /usr/lib/systemd/system/nginx.service
chmod x /usr/lib/systemd/system/nginx.service
2. Edit the service content
[Unit]                                                                                      //对服务的说明
Description=nginx - high performance web server              //描述服务
After=network.target remote-fs.target nss-lookup.target   //描述服务类别

[Service]                                                                                 //服务的一些具体运行参数的设置
Type=forking                                                                         //后台运行的形式
PIDFile=/usr/local/nginx/logs/nginx.pid                               //PID文件的路径
ExecStartPre=/usr/local/nginx/sbin/nginx -t -c /usr/local/nginx/conf/nginx.conf   //启动准备
ExecStart=/usr/local/nginx/sbin/nginx -c /usr/local/nginx/conf/nginx.conf           //启动命令
ExecReload=/usr/local/nginx/sbin/nginx -s reload                                                 //重启命令
ExecStop=/usr/local/nginx/sbin/nginx -s stop                                                       //停止命令
ExecQuit=/usr/local/nginx/sbin/nginx -s quit                                                        //快速停止
PrivateTmp=true                                                                  //给服务分配临时空间

[Install]
WantedBy=multi-user.target                                               //服务用户的模式
3. Start the service
在启动服务之前,需要先重载systemctl命令
systemctl daemon-reload
systemctl start nginx.service
4. If the port is occupied
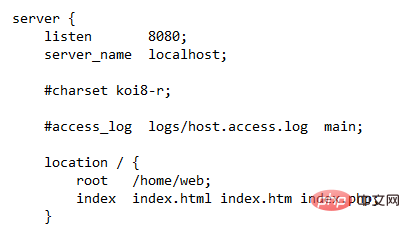
in the nginx configuration file /usr/local/nginx/ conf/nginx.conf

#Change the number after listen to 8080 or 81. Then restart the service.
(Recommended tutorial: nginx tutorial)
The above is the detailed content of What is the nginx startup command?. For more information, please follow other related articles on the PHP Chinese website!

Hot AI Tools

Undresser.AI Undress
AI-powered app for creating realistic nude photos

AI Clothes Remover
Online AI tool for removing clothes from photos.

Undress AI Tool
Undress images for free

Clothoff.io
AI clothes remover

AI Hentai Generator
Generate AI Hentai for free.

Hot Article

Hot Tools

Notepad++7.3.1
Easy-to-use and free code editor

SublimeText3 Chinese version
Chinese version, very easy to use

Zend Studio 13.0.1
Powerful PHP integrated development environment

Dreamweaver CS6
Visual web development tools

SublimeText3 Mac version
God-level code editing software (SublimeText3)

Hot Topics
 How do I configure Nginx for server-side includes (SSI)?
Mar 17, 2025 pm 05:06 PM
The article discusses configuring Nginx for server-side includes (SSI), performance implications, using SSI for dynamic content, and troubleshooting common SSI issues in Nginx.Word count: 159
 What is the standard monitoring port of nginx
Mar 05, 2025 pm 03:18 PM
This article explains that Nginx lacks a standard monitoring port. Monitoring relies on methods like the stub_status module (accessed via existing HTTP ports) or external tools (Prometheus, Nagios, etc.) using various techniques including HTTP APIs
 nginx listens to different port configurations to access different projects
Mar 05, 2025 pm 03:22 PM
This article details configuring Nginx to serve multiple projects from different ports on a single server using multiple server blocks. It emphasizes efficiency over running multiple Nginx instances and provides best practices for managing configura
 How to specify configuration file for nginx restart command
Mar 05, 2025 pm 03:08 PM
This article explains how to restart Nginx using a specific configuration file via the -c flag, contrasting this with restarting using the default configuration. It highlights the benefits of using custom configuration files for testing, managing m
 Solution to reload error report by nginx restart command
Mar 05, 2025 pm 03:09 PM
Nginx reload failures stem from configuration file errors. Troubleshooting involves examining the error log for syntax issues, conflicts, permission problems, or resource exhaustion. Solutions include correcting syntax, resolving conflicts, and ens
 How to monitor nginx service status
Mar 05, 2025 pm 03:17 PM
This article details methods for monitoring Nginx service status and performance. It covers using systemctl, ps, the Nginx status page, and various monitoring tools (Nagios, Zabbix, Prometheus, commercial options). Troubleshooting techniques using
 What contents of zabbix monitor nginx
Mar 05, 2025 pm 03:19 PM
This article details Zabbix's Nginx monitoring capabilities. It discusses key performance indicators (KPIs) like connection, request, and caching metrics, worker process status, and upstream server health. The article emphasizes effective alert co
 nginx monitoring tool free
Mar 05, 2025 pm 03:21 PM
This article explores free Nginx monitoring tools, comparing options like Prometheus/Grafana, Nagios, Zabbix, and StatsD/Graphite. It emphasizes tool selection based on technical expertise and highlights key metrics (RPS, request time, CPU/memory u


