 Web Front-end
 JS Tutorial
 A brief discussion on the writable stream write and implementation methods in Nodejs
A brief discussion on the writable stream write and implementation methods in Nodejs
This article will take you to understand the writable stream write in Nodejs, and introduce the implementation of Node's writable stream write. It has certain reference value. Friends in need can refer to it. I hope it will be helpful to everyone.

[Recommended learning: "nodejs tutorial"]
Writable stream-Writable
fs.createWriteStream calling example
- The data read for the first time will actually be written to the target file
- The data read for the remaining times will be read according to the Whether the data exceeds highWaterMark, if so, it is stored in the buffer area and waits to be written to the target file
const fs = require("fs");
const path = require("path");
const bPath = path.join(__dirname, "b.txt");
let ws = fs.createWriteStream(bPath, {
  flags: "w",
  encoding: "utf-8",
  autoClose: true,
  start: 0,
  highWaterMark: 3,
});
ws.on("open", function (fd) {
  console.log("open", fd);
});
ws.on("close", function () {
  console.log("close");
});
 //string 或者buffer,ws.write 还有一个boolea的返回值
ws.write("1");
//flag 表示 当前要写的值是直接是否直接写入文件,不能超出了单次最大写入值highWaterMark
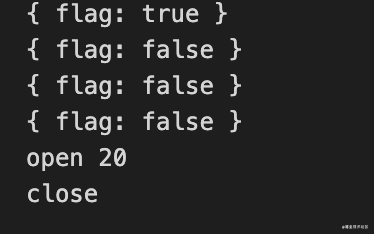
let flag = ws.write("1");
console.log({ flag });//true
flag = ws.write("1");
console.log({ flag });//false
flag = ws.write("1");
console.log({ flag });//false
flag = ws.write("14444444");
console.log({ flag });//false
ws.end(); //write+close,没有调用 end 是不会调用 触发close的,看到这里的小伙伴可以尝试注释end() 看看close的console是否有打印- Effect

Customized writable stream initWriteStream
Inherit EventEmitter publishing and subscription
const EventEmitter = require("events");
const fs = require("fs");
class WriteStream extends EventEmitter {}
module.exports = WriteStream;Linked list generation queue for file reading caching
Implementation of linked list & queue
https://juejin.cn/post/6973847774752145445
// 用链表 生成队列 对 文件缓存区的读取 进行优化
const Queue = require("./queue");Initialize instance default data constructor()
 constructor(path, options = {}) {
    super();
    this.path = path;
    this.flags = options.flags || "w";
    this.encoding = options.encoding || "utf8";
    this.mode = options.mode || 0o666; //默认8进制 ,6 6 6  三组分别的权限是 可读可写
    this.autoClose = options.start || 0;
    this.highWaterMark = options.highWaterMark || 16 * 1024; //默认一次读取16个字节的数据
    this.len = 0; //用于维持有多少数据还没有被写入文件中
    //是否根据等待当前读取的最大文数据 排空后再写入
    this.needDrain = false; //
    // 缓存队列 用于存放 非第一次的文件读取 到的数据,因为第一次读取 直接塞入目标文件中
    // 除第一次 的文件读取数据的都存放再缓存中
    // this.cache = [];
    // 队列做缓存
    this.cache = new Queue();
    // 标记是否是第一次写入目标文件的标识
    this.writing = false;
    this.start = options.start || 0;
    this.offset = this.start; //偏移量
    this.open();
}This.mode file operation permission defaults to 0o666 (0o represents octal)
The positions occupied by the three 6s are respectively Corresponding to: the permissions of the user to whom the file belongs; the permissions of the user group to which the file belongs; indicating the permissions of other users on it
Permissions are represented by: r--readable (corresponding value 4), w--writable (corresponding to value 2), x--executable (corresponding to value 1, for example, if there is an .exe mark under the folder, it means that clicking can be executed directly) to form
-
So by default, the operating permissions of the three groups of users on the file are readable and writable
open()
- Call fs.open()
- Call back the emit instance open method, and the return value fd of fs.open is passed in as a parameter
 open() {
    fs.open(this.path, this.flags, this.mode, (err, fd) => {
      this.fd = fd;
      this.emit("open", fd);
    });
}write ()
- The format of the file data that needs to be written passed in by the conversion instance is buffer
- Determine whether the length of the written data is greater than highWaterMark. If it reaches the expectation, the file read The obtained data is stored in the cache and is not directly written to the target file (excluding whether it is the first time to read the file)
- Execute the instance write to the incoming cb and call clearBuffer to clear the cache
- Determine whether it is the first time to read. The first time to read is to write directly and call _write (to be implemented)
- The cache queue tail offer currently reads the data waiting to be written to the target file
 write(chunk, encoding = this.encoding, cb = () => {}) {
    //  将数据全部转换成buffer
    chunk = Buffer.isBuffer(chunk) ? chunk : Buffer.from(chunk);

    this.len += chunk.length;
    // console.log({chunk},this.len )
    let returnValue = this.len < this.highWaterMark;
    //当数据写入后,需要在手动的将this.len--
    this.needDrain = !returnValue; //如果达到预期 后 的文件读取 到数据存放再缓存里 不直接写入目标文件
    //清空缓存 对用户传入的回调 进行二次包装
    let userCb = cb;
    cb = () => {
      userCb();
      //清空buffer
      this.clearBuffer();//马上实现
    };

    //此时需要判断 是否是第一次读取,第一次读取 直接写入调用 _write
    if (!this.writing) {
      // 第一次||缓存队列已清空完毕
      this.writing = true;
      // console.log("first write");
      this._write(chunk, encoding, cb);//马上实现
    } else {
    //缓存队列尾部offer 当前读取到的数据等待写入目标文件
      this.cache.offer({
        chunk,
        encoding,
        cb,
      });
    }
    return returnValue;
}clearBuffer() clears the cache queue in sequence
- queue execution order, first in, first out principle
- this.cache.poll() in sequence Get the header data and execute this._write to write to the target file
- If the data polled by the cache queue does not exist, it means that it is the first write ||The cache queue has been emptied. this.writing = false; The next file read can be written directly to the target file
- If this.needDrain meets expectations again, the file is read and the data is stored in the cache without being directly written to the target file
clearBuffer() {
    //写入成功后 调用 clearBuffer--》写入缓存第一个,第一个完成后,再继续 第二个
    let data = this.cache.poll();
    // console.log('this.cache',this.cache)
    if (data) {
      //有值 写入文件
      this._write(data.chunk, data.encoding, data.cb);
    } else {
      this.writing = false;
      if (this.needDrain) {
        // 如果是缓存,触发drain
        this.emit("drain");
      }
    }
}_write()
- fs.open() is asynchronous. After successful reading, fd will be a number type
- Determine whether to subscribe to an open based on the type of fd, and call back yourself (until the fd type is number)
- The fd type is number: call fs.write to write the current chunk,
 _write(chunk, encoding, cb) {
    if (typeof this.fd !== "number") {
      return this.once("open", () => this._write(chunk, encoding, cb));
    }
    fs.write(this.fd, chunk, 0, chunk.length, this.offset, (err, written) => {
      this.offset += written; //维护偏移量
      this.len -= written; //把缓存的个数减少
      cb(); //写入成功
      // console.log(this.cache);
    });
}Test the custom Writable
const WriteStream = require("./initWriteStream");

let ws = new WriteStream(bPath, {
  highWaterMark: 3,
});

let i = 0;
function write() {
  //写入0-9个
  let flag = true;
  while (i < 10 && flag) {
    flag = ws.write(i++ + "");
     console.log(flag);
  }
}
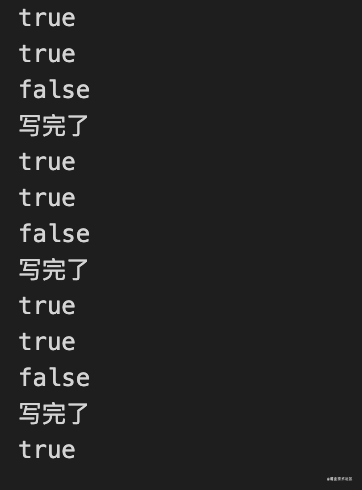
ws.on("drain", function () {
  // 只有当我们写入的数据达到预期,并且数据被清空后才会触发drain ⌚️
  console.log("写完了");
  write();
});

write();- 10 numbers were written in sequence, reaching the maximum expected value 3 times, and then cleared the cache 3 times in sequence. The result is in line with expectations

- Check whether the expected values are correctly written in the target file

For more programming-related knowledge, please visit: programming video! !
The above is the detailed content of A brief discussion on the writable stream write and implementation methods in Nodejs. For more information, please follow other related articles on the PHP Chinese website!

Hot AI Tools

Undresser.AI Undress
AI-powered app for creating realistic nude photos

AI Clothes Remover
Online AI tool for removing clothes from photos.

Undress AI Tool
Undress images for free

Clothoff.io
AI clothes remover

Video Face Swap
Swap faces in any video effortlessly with our completely free AI face swap tool!

Hot Article

Hot Tools

Notepad++7.3.1
Easy-to-use and free code editor

SublimeText3 Chinese version
Chinese version, very easy to use

Zend Studio 13.0.1
Powerful PHP integrated development environment

Dreamweaver CS6
Visual web development tools

SublimeText3 Mac version
God-level code editing software (SublimeText3)

Hot Topics
 1386
1386
 52
52
 The difference between nodejs and vuejs
Apr 21, 2024 am 04:17 AM
Node.js is a server-side JavaScript runtime, while Vue.js is a client-side JavaScript framework for creating interactive user interfaces. Node.js is used for server-side development, such as back-end service API development and data processing, while Vue.js is used for client-side development, such as single-page applications and responsive user interfaces.
 Is nodejs a backend framework?
Apr 21, 2024 am 05:09 AM
Node.js can be used as a backend framework as it offers features such as high performance, scalability, cross-platform support, rich ecosystem, and ease of development.
 How to connect nodejs to mysql database
Apr 21, 2024 am 06:13 AM
To connect to a MySQL database, you need to follow these steps: Install the mysql2 driver. Use mysql2.createConnection() to create a connection object that contains the host address, port, username, password, and database name. Use connection.query() to perform queries. Finally use connection.end() to end the connection.
 What is the difference between npm and npm.cmd files in the nodejs installation directory?
Apr 21, 2024 am 05:18 AM
There are two npm-related files in the Node.js installation directory: npm and npm.cmd. The differences are as follows: different extensions: npm is an executable file, and npm.cmd is a command window shortcut. Windows users: npm.cmd can be used from the command prompt, npm can only be run from the command line. Compatibility: npm.cmd is specific to Windows systems, npm is available cross-platform. Usage recommendations: Windows users use npm.cmd, other operating systems use npm.
 What are the global variables in nodejs
Apr 21, 2024 am 04:54 AM
The following global variables exist in Node.js: Global object: global Core module: process, console, require Runtime environment variables: __dirname, __filename, __line, __column Constants: undefined, null, NaN, Infinity, -Infinity
 Is there a big difference between nodejs and java?
Apr 21, 2024 am 06:12 AM
The main differences between Node.js and Java are design and features: Event-driven vs. thread-driven: Node.js is event-driven and Java is thread-driven. Single-threaded vs. multi-threaded: Node.js uses a single-threaded event loop, and Java uses a multi-threaded architecture. Runtime environment: Node.js runs on the V8 JavaScript engine, while Java runs on the JVM. Syntax: Node.js uses JavaScript syntax, while Java uses Java syntax. Purpose: Node.js is suitable for I/O-intensive tasks, while Java is suitable for large enterprise applications.
 Is nodejs a back-end development language?
Apr 21, 2024 am 05:09 AM
Yes, Node.js is a backend development language. It is used for back-end development, including handling server-side business logic, managing database connections, and providing APIs.
 How to deploy nodejs project to server
Apr 21, 2024 am 04:40 AM
Server deployment steps for a Node.js project: Prepare the deployment environment: obtain server access, install Node.js, set up a Git repository. Build the application: Use npm run build to generate deployable code and dependencies. Upload code to the server: via Git or File Transfer Protocol. Install dependencies: SSH into the server and use npm install to install application dependencies. Start the application: Use a command such as node index.js to start the application, or use a process manager such as pm2. Configure a reverse proxy (optional): Use a reverse proxy such as Nginx or Apache to route traffic to your application


