

How to configure php7 on iis7.5 under win7

The company’s business needs. I have been doing PHP development recently. I have never been exposed to this aspect before. My colleagues configured the environment and started typing code. Personally, I prefer to get to the bottom of things, otherwise I will always be confused, so While the project was coming to an end, I reinstalled the computer and found an opportunity to configure the PHP development environment under Windows.

First install PHPMangerForIIS-1.2.0-x64.msi and rewrite_x64_zh-CN.msi. My system is 64-bit, so here is the 64-bit installation. After PHPManagerForIIS is installed, there will be a PHPManager in IIS. However, I have not used this PHPManager in the entire configuration. The latter is probably used for URL rewriting. I don’t quite understand its mechanism, but I don’t need to understand so much for the time being during project development.
Although the native system is 64-bit, in actual development, we found that there were certain problems in writing long strings to mysql in 64-bit php, so we switched to it. 32-bit PHP solves this problem, so I chose to configure 32-bit PHP7 on my computer. Before formally configuring php, you must install another vc_redist.x86.exe. Note that the vc_redist version and the php version must be consistent, otherwise the "fastcgi process unexpectedly exited error" will be reported later.
After the first three installations are packaged, decompress php-7.0.3-win32-VC14-X86.zip to any disk. I decompressed it to the c drive and renamed it to a simpler name. Please note that the path name after decompression should not contain spaces. After unzipping, copy php.ini-development, rename it to php.ini, open php.ini, uncomment php_mysqli.dll, find extension_dir, uncomment it, and set its value to the absolute value of ext in your php path. For example, my path is extension_dir = "C:\php-7.0.3-x86\ext". After modification, save php.ini and copy it to the root directory of php7. Here I copy it to "C:\php- 7.0.3-x86\".
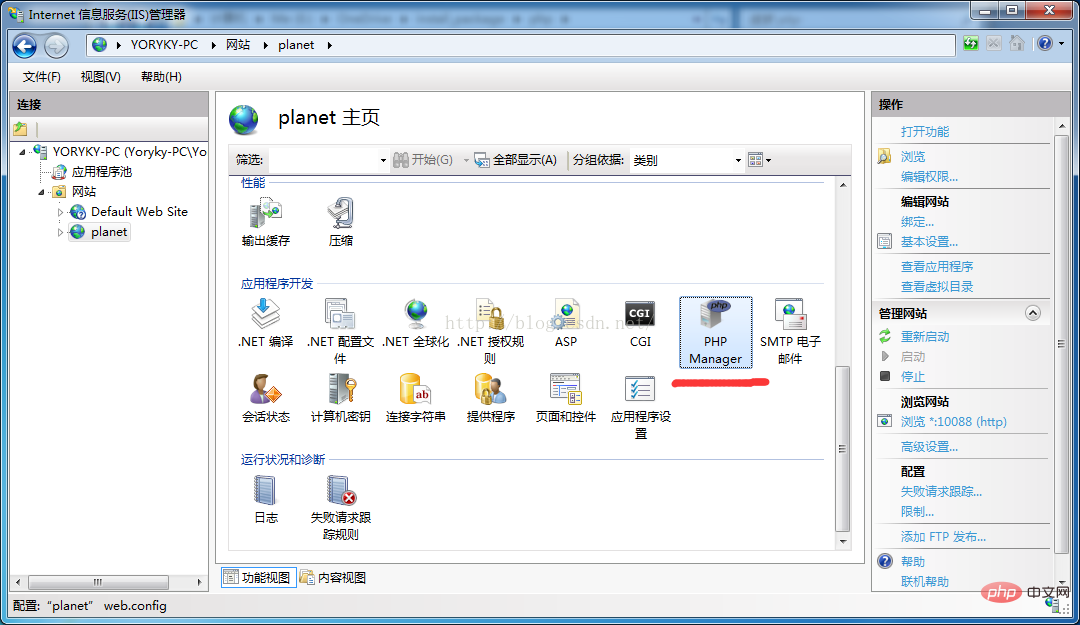
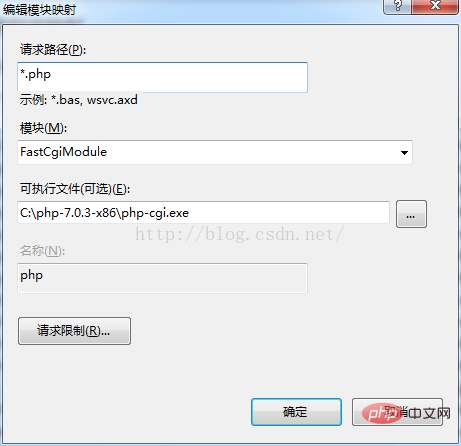
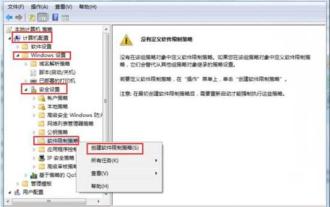
After completing the PHP series, it is time to create IIS. Open IIS and add the PHP website myweb (as a test, you can simply create a phpinfo.php under the website). Open the application pool corresponding to myweb, change it to unmanaged code, and also change ".NET Framework" to "unmanaged code" in "Set application pool default settings". Open "Processing Mapping Program" -> "Add Module Mapping" and fill in the information as shown below.
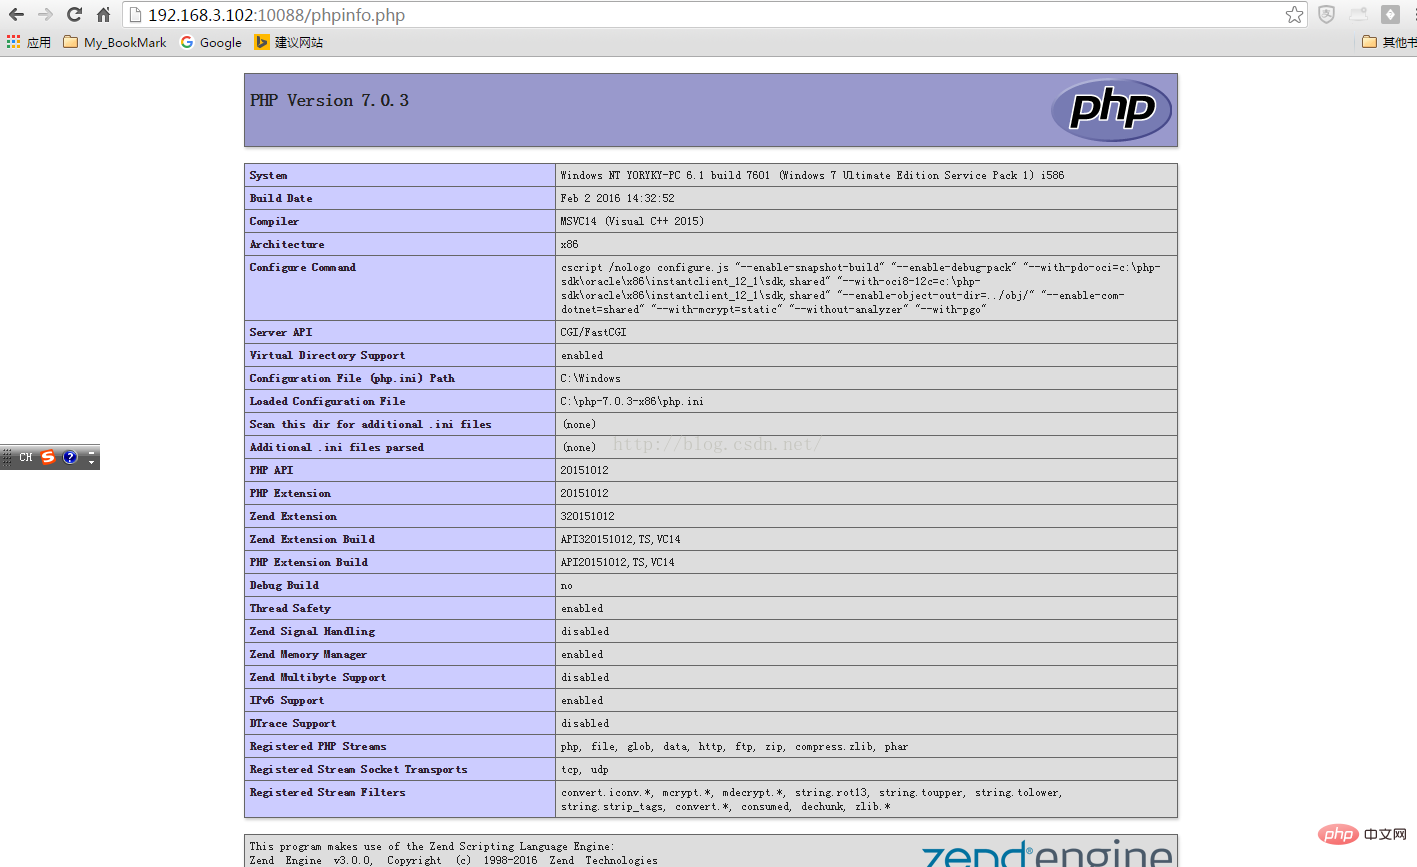
After filling in, restart iis, access the website and the following interface will appear, indicating that the configuration is successful. At this point, the configuration of PHP for iis7.5 under win7 is completed. I will continue to write a blog about using netbean xdebug to write and debug PHP code. These are some trivial articles recorded by myself, and all readers can comment lightly.
Recommended learning: php video tutorial
The above is the detailed content of How to configure php7 on iis7.5 under win7. For more information, please follow other related articles on the PHP Chinese website!

Hot AI Tools

Undresser.AI Undress
AI-powered app for creating realistic nude photos

AI Clothes Remover
Online AI tool for removing clothes from photos.

Undress AI Tool
Undress images for free

Clothoff.io
AI clothes remover

Video Face Swap
Swap faces in any video effortlessly with our completely free AI face swap tool!

Hot Article
Hot Tools

Notepad++7.3.1
Easy-to-use and free code editor

SublimeText3 Chinese version
Chinese version, very easy to use

Zend Studio 13.0.1
Powerful PHP integrated development environment

Dreamweaver CS6
Visual web development tools

SublimeText3 Mac version
God-level code editing software (SublimeText3)
Hot Topics
 1386
1386
 52
52

 What should I do if the Win7 taskbar does not display the icon? How to solve the problem of the computer taskbar icon disappearing
Jun 09, 2024 pm 01:49 PM
What should I do if the Win7 taskbar does not display the icon? How to solve the problem of the computer taskbar icon disappearing
Jun 09, 2024 pm 01:49 PM
Recently, many users using Win7 system have found that the icons in the taskbar suddenly disappeared, which makes the operation very inconvenient and they do not know how to solve the problem. This article will introduce to you how to solve the problem of disappearing taskbar icons in Win7 system. Bar! Cause Analysis When encountering such a situation, there are generally two situations: one is that the taskbar on the computer does not really disappear, but is just hidden, and the other is that the taskbar does disappear. Method 1: 1. There is a situation that you need to confirm first, that is, when the mouse is placed at the bottom of the screen, the taskbar will be displayed. You can directly click the mouse on the taskbar and select "Properties". 2. In the dialog box that opens, click & on the "Hide taskbar" option.
 How to clear all desktop background images in Win7? Tips for deleting personalized background images in Win7
Jun 02, 2024 am 09:01 AM
How to clear all desktop background images in Win7? Tips for deleting personalized background images in Win7
Jun 02, 2024 am 09:01 AM
In Win7 system, many users want to delete personalized desktop background images, but do not know how to delete them. This article will show you how to delete personalized background images in Win7 system. 1. First, open the control panel interface of the Win7 system and click to enter the "Appearance and Personalization" settings; 2. Then, in the opened interface, click the "Change Desktop Background" setting; 3. Then, click below "Desktop background" option; 4. Then, select Select all, and then click Clear all. Of course, you can also use it under "Customize", right-click the theme you want to delete, and then click &q on the shortcut menu
 Where is the network discovery in Win7? Tips for enabling the network discovery function in Win7
Jun 04, 2024 am 09:02 AM
Where is the network discovery in Win7? Tips for enabling the network discovery function in Win7
Jun 04, 2024 am 09:02 AM
Many computer users know that network discovery is a network setting. This setting will affect whether the computer can find other computers and devices on the network and whether it can find the computer when other computers on the network are found. So how to enable network discovery in win7? The following computer System Home U Disk Installation will introduce you to the tutorial on how to enable network discovery in win7 system. 1. First, click the "Start Menu" icon on the desktop taskbar and choose to open the "Control Panel" interface. 2. Then, in the interface that opens, set "View by" to "Category", and then choose to enter "Network and Internet"
 Introduction to how to change the startup sound of Windows 7 computer
Mar 26, 2024 pm 09:30 PM
Introduction to how to change the startup sound of Windows 7 computer
Mar 26, 2024 pm 09:30 PM
1. First copy the file you want to use as boot music to the corresponding directory of C: WindowsMedia. As shown in the figure: 2. Right-click the desktop on a single machine and select Personalize menu; as shown in the figure: 3. Select the sound option; as shown in the figure: 4. In the [Program Events] box in the [Sound] tab of the sound interface Select [Windows Login], then click [Browse]; as shown in the figure: 5. Select the music file that needs to be replaced, click Open, then click Apply and confirm to save the settings. as the picture shows:
 How to delete vbs virus in win7
Mar 26, 2024 pm 09:21 PM
How to delete vbs virus in win7
Mar 26, 2024 pm 09:21 PM
1. Click [Start → Run] and enter gpedit.msc. On the left side of the [Group Policy] window, click the [Computer Configuration → Windows Settings → Security Settings → Software Restriction Policy] item, and then click the [Action → Create New Policy] menu item. As shown in the picture: 2. Select [Other Rules] from the left. Right-click the blank space in the right pane and select the [New Path Rule] item in the menu. In the pop-up window, click the [Browse] button after [Path], select the wscript.exe file in the C: WindowsSystem32 folder, and set the [Security Level] to [Not Allowed]. Change C: System32, Dllcache and I386 under Windows
 How to modify boot animation in Windows 7
Mar 26, 2024 pm 08:51 PM
How to modify boot animation in Windows 7
Mar 26, 2024 pm 08:51 PM
1. Press and hold the [Win+R] keys to open the run dialog box, enter [regedit] in the search box, and then confirm; as shown in the figure: 2. Open HKEY_LOCAL_MACHINESoftwareMicrosoftWindowsCurrentVersionAuthenticationLogonUIBackgroud in the opened registry editor; as shown in the figure Display: 3. Double-click [OEMBackground] and open it, change the default value [0] to [1], and then confirm to exit; as shown in the figure: 4. Rename the image backgroundDefault.jpg, (the image size cannot exceed 256k
 Black screen when booting, mouse does not display desktop, explorer kills by mistake
Jun 18, 2024 pm 04:05 PM
Black screen when booting, mouse does not display desktop, explorer kills by mistake
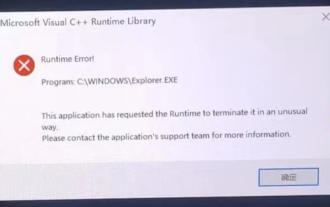
Jun 18, 2024 pm 04:05 PM
Yesterday (2024/06/17), many users suddenly experienced a black screen on startup, and the following interface popped up: MicrosoftVisualC++RuntimeLibraryRuntimeError!Program:C:\WINDOWS\Explorer.EXEThis application has requested theRuntimetoterminateitinanunusualway.Pleasecontacttheapplication'ssupportteamformoreinformation. It may also be this
 Solution to the problem that win7 network adapter cannot start
Mar 26, 2024 pm 09:56 PM
Solution to the problem that win7 network adapter cannot start
Mar 26, 2024 pm 09:56 PM
1. Enter the computer [Device Manager], open My Computer, right-click the mouse, select Properties at the bottom and click to enter the control panel. The first navigation on the left side of the control panel is [Device Manager]. As shown in the figure: 2. Check the [Network Adapter] status. After entering [Device Manager], search for [Network Adapter] and click to see the network cable and network card related status. As shown in the picture: 3. Update the driver software program. Usually, there may be a problem with the driver program. If the computer can be connected to the network cable, how to click [Update Driver Software Program] to update to the latest driver when connected to the computer? The problem can be solved. As shown in the figure: 4. Uninstall the wireless network card. If you do not have a network cable and the computer cannot access the Internet, select [Uninstall the wireless network card].
