An entry-level understanding of the CSS knowledge system
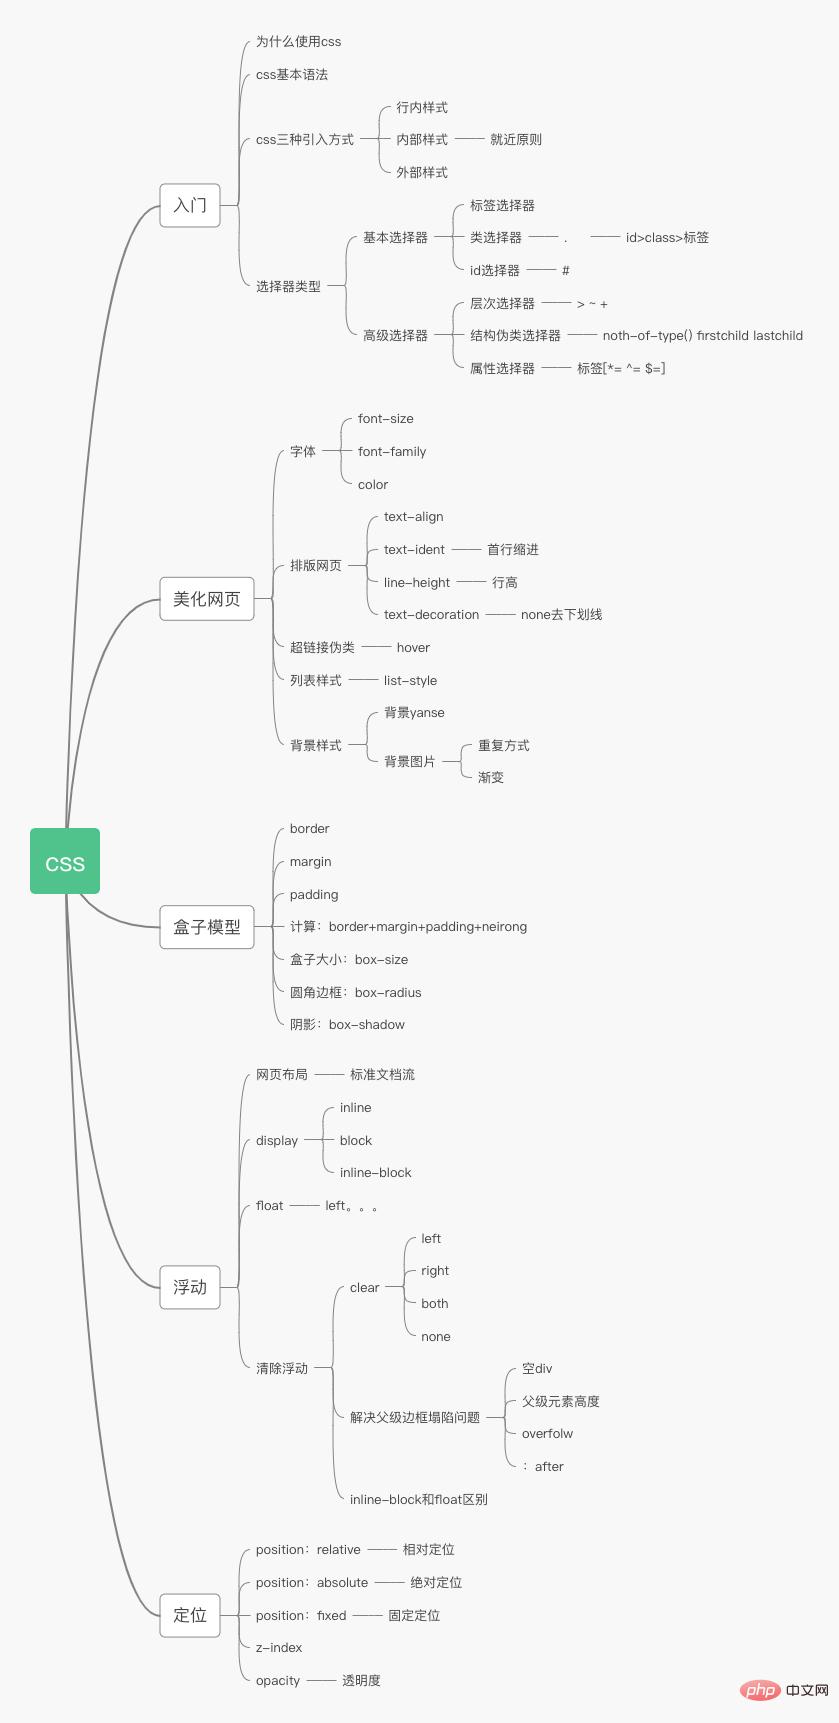
Let me share the CSS system diagram. It is very useful. Please save it. The following article will introduce you to the introductory knowledge of CSS.

CSS system
css You can have a rough understanding of the following:

CSS3
##Cascading Style SheetCascading Cascading Style SheetFont , color, margin, height, width, background image, web page positioning, web page floating...css selector (emphasis)Beautify the web page (text, shadow, hyperlink, list, gradient )Box modelFloating, positioningWeb page animationAdvantages of css;1. Separation of content and performance2. The web page structure is unified and can be reused3. The styles are very rich4. It is recommended to use css files independent of html5 , Use SEO to easily be included by search engines!1. Selector
1. Select a certain item on the page One or a certain type of element
- Basic selector
- Tag selector
- Class selector
- id selector
- Level selector
- Descendant selector: After an element
body p{
      background: #c56b22;
}2. Sub-selector
/*子选择器,只选择向下一代*/
body>p{
      background: deepskyblue;
}3. Adjacent sibling selector
/*相邻兄弟选择器,只有一个,向下*/
  .active + p{
      background: orange;
}4.Universal selector
/*通用兄弟选择器,当前选中元素的向下的所有元素*/
  .active~p{
      background: aquamarine;
}2. Pseudo-class selector
/*ul的第一个子元素*/
ul li:first-child{
    background: #c56b22;
}
/*ul的最后一个子元素*/
ul li:last-child{
    background: aqua;
}

/*选中p1,定位到父元素,选择当前的第一个元素
选择当前p元素的符集元素,选择符父级素的第一个,并且是当前元素才生效
*/
p:nth-child(1){
    background: antiquewhite;
}
/*选中父元素,下的p元素的第二个,按类型*/
p:nth-of-type(2) {
    background: #b04a6f;
}3. Beautify the web page
1. Font style
<!--
font-family:字体
font-size:字体大小  px代表像素,em代表一个字的缩进大小
font-weight:字体粗细 最大800,相当于bolder
color:字体颜色
-->
<style>
    body{
        font-family: Arial;
    }
    h1{
        font-size: 40px;
    }
    p[class=p1]{
        font-weight: bold;
        color: #b04a6f;
    }
</style>


<style>
    /*字体风格*/
    /*斜体 加粗 大小 字体*/
    p{
        font:oblique bold 20px Arial;
    }
</style>2. Text style
- Color
- color rgb rgba
- text-align=center
- text-indent:2em
- line-height:
Single line text is centered up and down!Decoration - text-decoration:
- /middle
is vertical/vertical-align: middle;
3. Shadow
<style>
    #price{
        /*阴影颜色,水平偏移,垂直偏移,垂直半径*/
        text-shadow: #c5527d 5px -5px 1px;
    }
</style>

<body>
<p id="price">
    ¥30
</p>
</body>4. Hyperlink pseudo-class
<style>
    /*默认的颜色*/
    a{
        text-decoration: none;
        color: #000000;
    }
    /*鼠标悬浮的颜色*/
    a:hover{
        color: #c56b22;
        font-size: 20px;
    }
    /*鼠标按住的颜色*/
    a:active{
        color: #c5527d;
    }
    /*鼠标未点击链接的颜色*/
    /*a:link{*/
    /*    color: gray;*/
    /*}*/
    /*!*链接已访问状态*!*/
    /*a:visited{*/
    /*    color: #66ccff;*/
    /*}*/
</style>

<body>
<a href="#">
    <img src="/static/imghw/default1.png"  data-src="images/1.jpg"  class="lazy"   alt="图片加载失败">
</a>
<p>
    <a href="#">《从0到1开启商业与未来的秘密》</a>
</p>
<p>
    作者:[美]<a href="#"> 彼得·蒂尔,布莱克·马斯特斯(Blake Masters)</a>著,
    <a href="#">高玉芳</a> 译
</p>
</body>5, List
1) Background- Background color
- Background image
<style>
    div{
        width: 800px;
        height: 500px;
        border: 1px solid #fcb4dc;
        /*默认全部平铺*/
        background-image: url("image/1.jpg");
    }
    .div1{
        background-repeat: repeat-x;
    }
    .div2{
        background-repeat: repeat-y;
    }
    .div3{
        background-repeat: no-repeat;
    }
</style>.title{
font-size: 18px;
/*font: oblique bold 20px/30px Arial;*/
font-weight: bold;
text-indent: 1em;
line-height: 35px;
/*background: #fcb4dc;*/
/*颜色、图片、位置、平铺方式*/
background: #fcb4dc url("../image/d.jpeg") 250px 4px no-repeat;
}
ul li{
/*行高*/
height: 30px;
list-style: none;
text-indent: 1em;
/*background: url("../image/r.jpeg") 200px 1px no-repeat;*/
background-image: url("../image/r.jpeg");
background-repeat: no-repeat;
background-position: 200px 1px;
}background-color: #A9C9FF; background-image: linear-gradient(60deg, #A9C9FF 0%, #FFBBEC 100%);
3) Box model
- Border
- Inner and outer margin
- Rounded border ## Shadow
- Floating
/*
clear:right;    右侧不允许又浮动元素
clear:lerf;     左侧不允许有浮动元素
clear:both;     两侧不允许有浮动元素
clear:none;
*/
Solution: Increase the height of the parent element
#father{
 border:1px #000 solid;
height:800px}- Add an empty p tag and clear the floating
<p class="clear"></p>
Copy after login .clear{ clear:both; margin:0; padding:0;}Copy after login
#在父级元素中添加一个 overflow:hodden;
- Add a pseudo-class to the parent class
#father:after{
 content:'';
 display:block;
 clear:both;}
Copy after loginIf it floats, it will break away from the standard document flow, so we need to solve the problem of parent border collapse
6. Positioning
- Relative positioning
Specify offset relative to the original position, relative positioning If so, it will still be in the standard document flow! The original position will be retained
position:relativetop:-20px; left:20px; bottom:-10px; right:20px;
Copy after login
- Absolute positioning
position:absolute
定位:基于xxx定位,.上下左右~
1、没有父级元素定位的前提下,相对于浏览器定位
2、假设父级元素存在定位,我们通常会相对于父级元素进行偏移~
3、在父级元素范围内移动
相对于父级或浏览器的位置,进行指定的偏移,绝对定位的话,它不在标准文档流中,原来的位置不会被保留
Copy after login
- Fixed positioning
position:fixed z-index- Level, the default is 0, the highest is unlimited Recommended learning:
/*背景透明度,或者使用rgba,早期版本filter:alpha(opacity=50)*/
opacity:0.5
/*filter:alpha(opacity=50)*/
Copy after login
The above is the detailed content of An entry-level understanding of the CSS knowledge system. For more information, please follow other related articles on the PHP Chinese website!

Hot AI Tools

Undresser.AI Undress
AI-powered app for creating realistic nude photos

AI Clothes Remover
Online AI tool for removing clothes from photos.

Undress AI Tool
Undress images for free

Clothoff.io
AI clothes remover

Video Face Swap
Swap faces in any video effortlessly with our completely free AI face swap tool!

Hot Article

Hot Tools

Notepad++7.3.1
Easy-to-use and free code editor

SublimeText3 Chinese version
Chinese version, very easy to use

Zend Studio 13.0.1
Powerful PHP integrated development environment

Dreamweaver CS6
Visual web development tools

SublimeText3 Mac version
God-level code editing software (SublimeText3)

Hot Topics
 1386
1386
 52
52
 How to use bootstrap in vue
Apr 07, 2025 pm 11:33 PM
Using Bootstrap in Vue.js is divided into five steps: Install Bootstrap. Import Bootstrap in main.js. Use the Bootstrap component directly in the template. Optional: Custom style. Optional: Use plug-ins.
 The Roles of HTML, CSS, and JavaScript: Core Responsibilities
Apr 08, 2025 pm 07:05 PM
HTML defines the web structure, CSS is responsible for style and layout, and JavaScript gives dynamic interaction. The three perform their duties in web development and jointly build a colorful website.
 How to write split lines on bootstrap
Apr 07, 2025 pm 03:12 PM
There are two ways to create a Bootstrap split line: using the tag, which creates a horizontal split line. Use the CSS border property to create custom style split lines.
 Understanding HTML, CSS, and JavaScript: A Beginner's Guide
Apr 12, 2025 am 12:02 AM
WebdevelopmentreliesonHTML,CSS,andJavaScript:1)HTMLstructurescontent,2)CSSstylesit,and3)JavaScriptaddsinteractivity,formingthebasisofmodernwebexperiences.
 How to set up the framework for bootstrap
Apr 07, 2025 pm 03:27 PM
To set up the Bootstrap framework, you need to follow these steps: 1. Reference the Bootstrap file via CDN; 2. Download and host the file on your own server; 3. Include the Bootstrap file in HTML; 4. Compile Sass/Less as needed; 5. Import a custom file (optional). Once setup is complete, you can use Bootstrap's grid systems, components, and styles to create responsive websites and applications.
 How to resize bootstrap
Apr 07, 2025 pm 03:18 PM
To adjust the size of elements in Bootstrap, you can use the dimension class, which includes: adjusting width: .col-, .w-, .mw-adjust height: .h-, .min-h-, .max-h-
 How to insert pictures on bootstrap
Apr 07, 2025 pm 03:30 PM
There are several ways to insert images in Bootstrap: insert images directly, using the HTML img tag. With the Bootstrap image component, you can provide responsive images and more styles. Set the image size, use the img-fluid class to make the image adaptable. Set the border, using the img-bordered class. Set the rounded corners and use the img-rounded class. Set the shadow, use the shadow class. Resize and position the image, using CSS style. Using the background image, use the background-image CSS property.
 How to use bootstrap button
Apr 07, 2025 pm 03:09 PM
How to use the Bootstrap button? Introduce Bootstrap CSS to create button elements and add Bootstrap button class to add button text


