How to install php extension with wdcp
How to install php extensions with wdcp: first determine to download the php version that needs to be installed; then enter the extension directory that needs to be installed; then execute phpize; finally configure and install the PHP extension.

The operating environment of this article: centos7 system, WDCP3.2 version, DELL G3 computer
How to install php extension with wdcp?
WDCP PHP7 install fileinfo extension
wdcp centos7 correctly install the php extension method, take the fileinfo extension as an example
Overview
Generally our wdcp is installed with centos7. The WDCP3.2 version allows multiple versions of PHP to exist, but By default, some extensions are not enabled, such as fileinfo. Many solutions on the Internet say that you can directly find the fileinfo extension in php.ini and remove the comment ';'. In fact, it is useless in most cases, because at the beginning The extension was not installed when installing the system, so the solution is to install it first.
Installation
1. Check the version
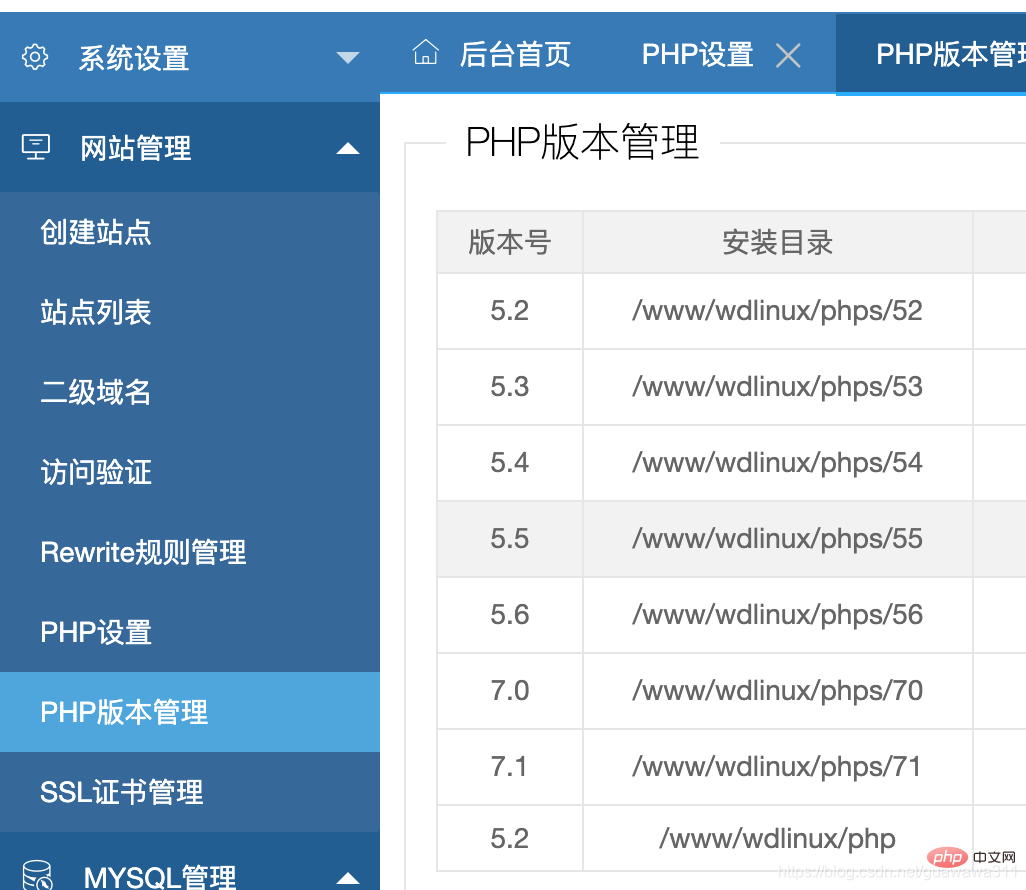
First determine the PHP version that needs to be installed. You can see all PHP versions in the wdcp management panel. (Website Management->PHP Management), wdcp3.2 multiple PHP version installation tutorial, you can also see the version here.
2. Determine the location of PHP
Generally, PHP files are under the /www/wdlinux/phps folder
3 , download the corresponding version
Enter the phps directory, and then download the complete version of the php compressed package of the corresponding version. The download address is https://www.php.net/ and find the installation package of the corresponding version
1 2 |
|
-
Note: If an error occurs, you can add the --no-check-certificate command
1
wget --no-check-certificate http://www.php.net/distributions/php-7.1.25.tar.gzCopy after login
4. Decompression configuration
After downloading the installation package, unzip it
1 |
|
5. Installation
Enter the extension directory of the installation package
1 |
|
Enter the extension that needs to be installed Directory
1 2 |
|
Execute phpize,
1 |
|

Configure and install
1 2 |
|

After the installation is complete, you will be prompted for a new installation The location where the extension is stored, must remember this location! 
#6. Modify php.ini
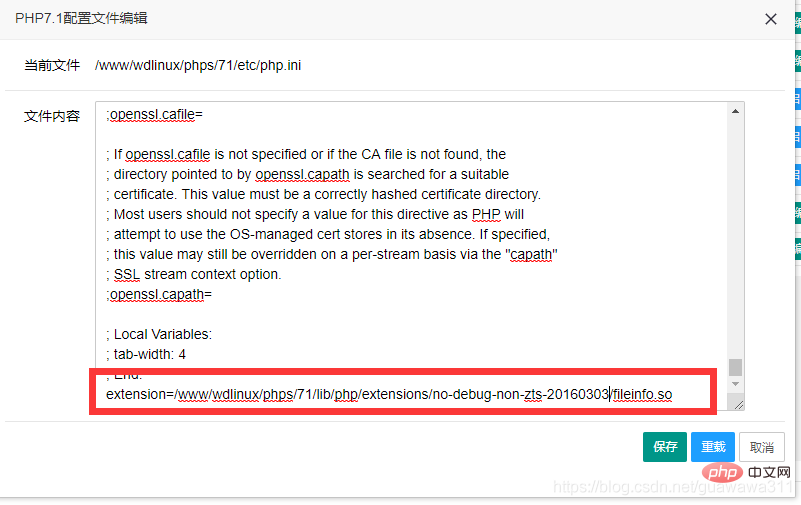
Enter the PHP management panel, modify php.ini and add a paragraph at the end
1 |
|


##7. Restart the serviceRestart PHP, and then check phpinfo()Recommended learning: "
PHP Video Tutorial"
The above is the detailed content of How to install php extension with wdcp. For more information, please follow other related articles on the PHP Chinese website!

Hot AI Tools

Undresser.AI Undress
AI-powered app for creating realistic nude photos

AI Clothes Remover
Online AI tool for removing clothes from photos.

Undress AI Tool
Undress images for free

Clothoff.io
AI clothes remover

Video Face Swap
Swap faces in any video effortlessly with our completely free AI face swap tool!

Hot Article

Hot Tools

Notepad++7.3.1
Easy-to-use and free code editor

SublimeText3 Chinese version
Chinese version, very easy to use

Zend Studio 13.0.1
Powerful PHP integrated development environment

Dreamweaver CS6
Visual web development tools

SublimeText3 Mac version
God-level code editing software (SublimeText3)

Hot Topics
 1387
1387
 52
52
 How to check which extensions are used in php
Aug 01, 2023 pm 04:13 PM
You can check which extensions are used by PHP by viewing the phpinfo() function output, using command line tools, and checking the PHP configuration file. 1. View the phpinfo() function output, create a simple PHP script, save this script as phpinfo.php, and upload it to your web server. Access this file in the browser and use the browser's search function. Just look for the keyword "extension" or "extension_loaded" on the page to find information about the extension.
 How to use php to extend PDO to connect to Oracle database
Jul 29, 2023 pm 07:21 PM
How to use PHP to extend PDO to connect to Oracle database Introduction: PHP is a very popular server-side programming language, and Oracle is a commonly used relational database management system. This article will introduce how to use PHP extension PDO (PHPDataObjects) to connect to Oracle database. 1. Install the PDO_OCI extension. To connect to the Oracle database, you first need to install the PDO_OCI extension. Here are the steps to install the PDO_OCI extension: Make sure
 How to extend SuiteCRM's report generation capabilities using PHP
Jul 19, 2023 am 10:27 AM
How to use PHP to extend the report generation function of SuiteCRM SuiteCRM is a powerful open source CRM system that provides rich functions to help enterprises manage customer relationships. One of the important functions is report generation. Using reports can help enterprises better understand their business situations and make correct decisions. This article will introduce how to use PHP to extend the report generation function of SuiteCRM and provide relevant code examples. Before starting, you need to make sure that SuiteCRM is installed.
 Getting Started with PHP: PHP Extension Installation
May 20, 2023 am 08:49 AM
When developing with PHP, we may need to use some PHP extensions. These extensions can provide us with more functions and tools, making our development work more efficient and convenient. But before using these extensions, we need to install them first. This article will introduce you to how to install PHP extensions. 1. What is a PHP extension? PHP extensions refer to components that provide additional functionality and services to the PHP programming language. These components can be installed and used through PHP's extension mechanism. PHP extension can help us with
 How to use PHP's geoip extension?
Jun 01, 2023 am 09:13 AM
PHP is a popular server-side scripting language that can handle dynamic content on web pages. The geoip extension for PHP allows you to get information about the user's location in PHP. In this article, we’ll cover how to use PHP’s geoip extension. What is the GeoIP extension for PHP? The geoip extension for PHP is a free, open source extension that allows you to obtain data about IP addresses and location information. This extension can be used with the GeoIP database, a database developed by MaxMin
 PHP extension and PHP version management of Pagoda Panel
Jun 21, 2023 am 08:49 AM
Pagoda Panel is an open source server management panel. While providing website operators with convenient website management, database management, SSL certificate management and other services, it also provides powerful PHP extension and PHP version management functions, making server management easier. Be more simple and efficient. 1. PHP extension PHP extension is a module used to enhance PHP functions. By installing PHP extensions, more functions and services can be implemented, such as: accelerator: accelerator can significantly improve PHP performance, and reduce service load by caching PHP scripts.
 In-depth exploration of PHP extension development: Uncovering the behind-the-scenes secrets of PHP extension development
Feb 19, 2024 pm 11:40 PM
PHP extension development is the art of creating custom functionality, extending PHP core functionality and building more powerful applications. It opens up new possibilities in the PHP world, allowing developers to transcend the basic limitations of the language. This article will take you on a journey of PHP extension development, providing you with comprehensive knowledge and practical guidance from basic concepts to advanced techniques. PHP extension development basics Before starting PHP extension development, you need to understand some basic concepts. What are PHP extensions? A PHP extension is a dynamic link library (DLL) that extends PHP core functionality and provides new data types, functions and classes. Advantages of PHP Extensions PHP extensions have many advantages, including: scalability, flexibility, performance optimization, and code reuse. PHP
 The Complete Guide: How to read and process XML data using the php extension SimpleXML
Jul 28, 2023 pm 02:46 PM
Complete Guide: How to Read and Process XML Data Using PHP Extension SimpleXML Introduction: In modern web development, processing and manipulating XML data is a very common task. As a powerful server-side scripting language, PHP provides a variety of extensions and functions for processing and manipulating XML data. Among them, the SimpleXML extension is a particularly useful tool that simplifies the process of reading and processing XML data. This article will provide you with a complete guide on how to use PHP extensions


