If you don't use Gitlab's CI/CD function anymore, you will be out.
I recently discovered that Gitlab's CI/CD function can also realize automated deployment, and it is quite simple to use! If you are using Gitlab as your Git warehouse, you might as well try its CI/CD function. This article still takes the automated deployment of SpringBoot as an example to practice the CI/DI function of Gitlab.
SpringBoot practical e-commerce project mall (50k star) address: https://github.com/macrozheng/mall
Installation
Achieved through Gitlab’s CI/CD function For automated deployment, we need to install services such as Gitlab, Gitlab Runner, and Maven.
Install Gitlab
First of all, let’s install Gitlab. Friends who don’t know about the installation and use of Gitlab can refer to "Build your own Git warehouse in 10 minutes".
Use the following command to run the Gitlab service. What needs to be noted here is that the hostname attribute is added so that we can access Gitlab through the domain name (in order to avoid unnecessary trouble). The GITLAB_ROOT_PASSWORD environment variable can be set directly Password for the root account in Gitlab;
docker run --detach \
  --hostname git.macrozheng.com \
  --publish 10443:443 --publish 1080:80 --publish 1022:22 \
  --name gitlab \
  --restart always \
  --volume /mydata/gitlab/config:/etc/gitlab \
  --volume /mydata/gitlab/logs:/var/log/gitlab \
  --volume /mydata/gitlab/data:/var/opt/gitlab \
  -e GITLAB_ROOT_PASSWORD=12345678 \
  gitlab/gitlab-ce:latest
We need to access Gitlab through the domain name git.macrozheng.com. If you don’t have a domain name, you can do it by modifying the host file of your machine;
192.168.7.134 git.macrozheng.com
Since our Gitlab runs on port 1080, if we want to access it without adding a port, we can use Nginx as a reverse proxy. Friends who are not familiar with Nginx can read "These wonderful uses of Nginx, you must not know it" of! 》, add the git.conf configuration file in the Nginx configuration folder, the content is as follows:
server {
    listen       80; # 同时支持HTTP
    server_name  git.macrozheng.com; #修改域名

    location / {
        proxy_pass   http://192.168.7.134:1080; # 设置代理服务访问地址
        index  index.html index.htm;
    }

    error_page   500 502 503 504  /50x.html;
    location = /50x.html {
        root   /usr/share/nginx/html;
    }
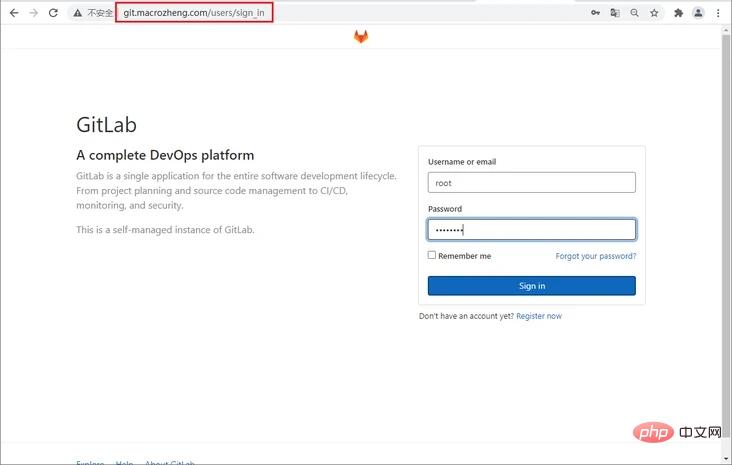
}After that, we can access Gitlab through the domain name git.macrozheng.com, enter the account password root: 12345678, that is You can log in;
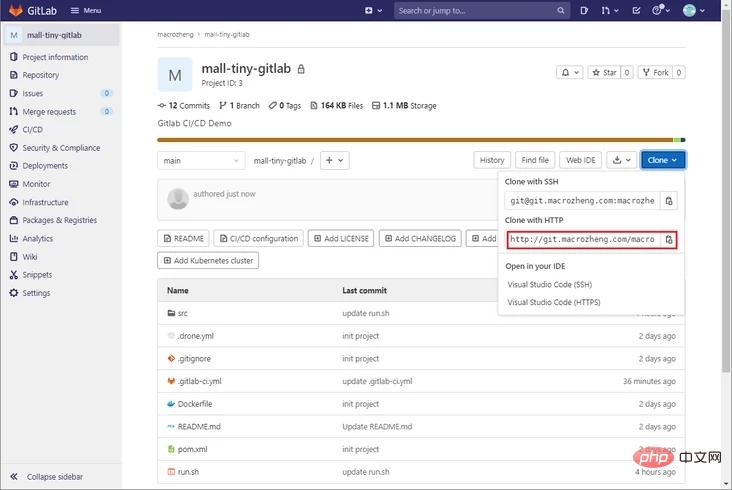
# Upload our SpringBoot application code to Gitlab, so Gitlab is ready! What needs to be noted here is that if you do not specify the hostname when starting Gitlab, your project's HTTP access address will be the ID of the container, and you will not be able to access the Git repository using this address!
Install Gitlab Runner
Gitlab is just a code warehouse. If you want to implement CI/CD, you need to install gitlab-runner. gitlab-runner is equivalent to Gitlab. The executor of the task, Gitlab will call it when it needs to execute the task.
First download the Docker image of gitlab-runner and choose alpine-bleeding. This version is very compact!
docker pull gitlab/gitlab-runner:alpine-bleeding
Use the following command to run gitlab-runner;
docker run --name gitlab-runner --restart always \
-v /var/run/docker.sock:/var/run/docker.sock \
-v /mydata/gitlab-runner:/etc/gitlab-runner \
-d gitlab/gitlab-runner:alpine-bleeding
If we check the container log of gitlab-runner at this time, we will find the following error, the config.toml file cannot be found, this problem Don’t worry, when we register gitlab-runner to Gitlab, this file will be automatically generated;
ERROR: Failed to load config stat /etc/gitlab-runner/config.toml: no such file or directory builds=0
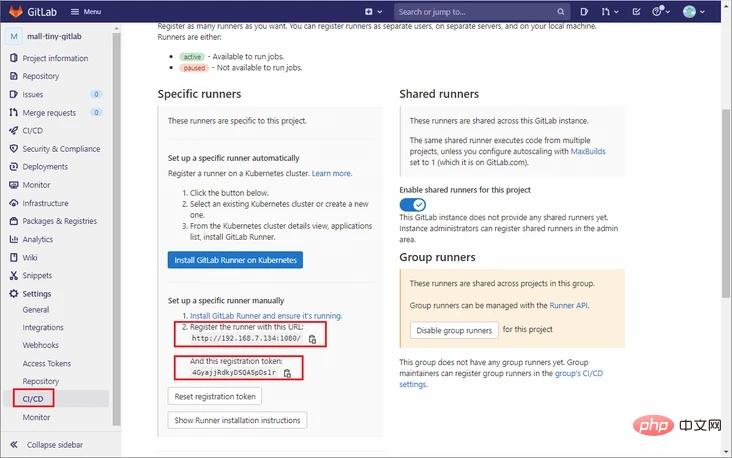
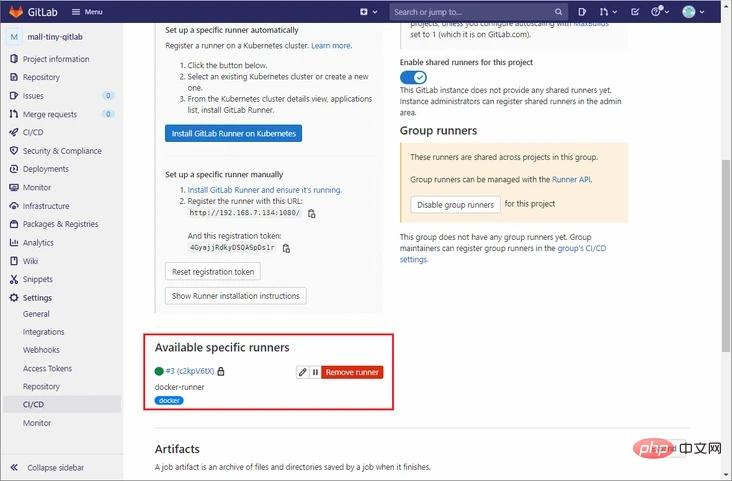
Next we need to register gitlab-runner to Gitlab and open Project->Settings->CI/ CD function, obtain the address and token required for runner registration;
Next use the following command to enter the inside of the gitlab-runner container;
docker exec -it gitlab-runner /bin/bash
Use the following command to register the runner in the container;
gitlab-runner register
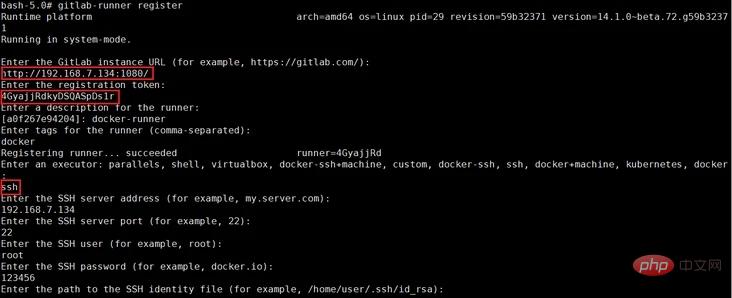
When registering, an interactive interface will appear, prompting you to enter the registration address, token, executor type and other information. The ssh executor can remotely execute Linux commands, which is very easy to use. Recommended to use this!
After the registration is completed, we can find that the config.toml file has been generated with the following content. If you want to modify the runner configuration in the future, just change this file directly.
concurrent = 1
check_interval = 0

[session_server]
  session_timeout = 1800

[[runners]]
  name = "docker-runner"
  url = "http://192.168.7.134:1080/"
  token = "c2kpV6tX6woL8TMxzBUN"
  executor = "ssh"
  [runners.custom_build_dir]
  [runners.cache]
    [runners.cache.s3]
    [runners.cache.gcs]
    [runners.cache.azure]
  [runners.ssh]
    user = "root"
    password = "123456"
    host = "192.168.7.134"
port = "22"In Gitlab's CI/CD settings, we can find that a runner has successfully registered!
Installing Maven
SpringBoot project packaging requires Maven, and we need to install it on the server first.
Download the Maven Linux installation package, download address: https://maven.apache.org/down...
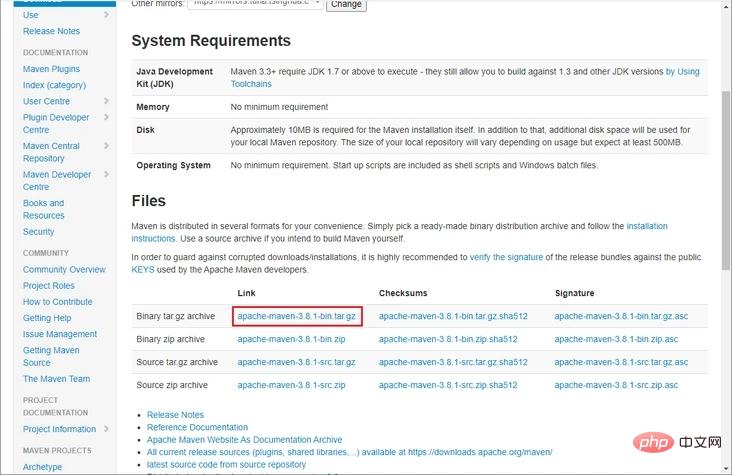
After downloading, use the following Extract the command to the specified directory;
cd /mydata
tar -zxvf apache-maven-3.8.1-bin.tar.gz
Modify the /etc/profile file and add environment variable configuration:
export MAVEN_HOME=/mydata/apache-maven-3.8.1
export PATH=$PATH:$MAVEN_HOME/bin
Test whether the installation is successful by checking the Maven version.
mvn -v
Maven home: /mydata/apache-maven-3.8.1
Java version: 1.8.0_292, vendor: AdoptOpenJDK, runtime: /mydata/java/jdk1.8/jre
Default locale: en_US, platform encoding: UTF-8
OS name: "linux", version: "3.10.0-957.el7.x86_64", arch: "amd64", family: "unix"
Installing JDK
JRE is installed by default on CentOS, and JDK needs to be installed to use Maven.
Download JDK 8, download address: https://mirrors.tuna.tsinghua...
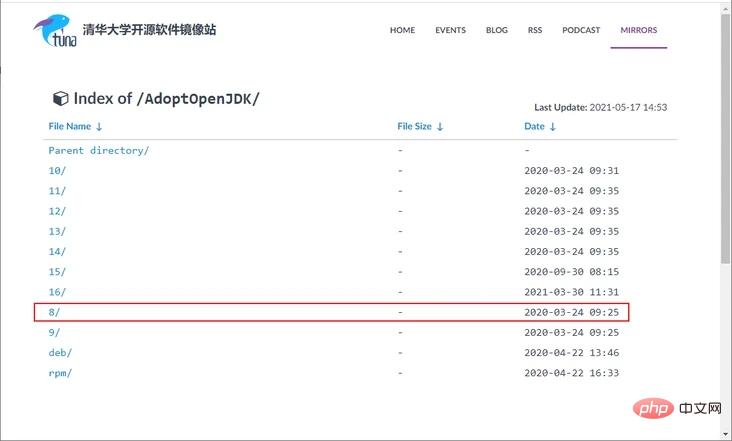
After the download is completed, extract the JDK to the specified directory;
cd /mydata/java
tar -zxvf OpenJDK8U-jdk_x64_linux_xxx.tar.gz
mv OpenJDK8U-jdk_x64_linux_xxx.tar.gz jdk1.8
Add the environment variable JAVA_HOME in the /etc/profile file.
vi /etc/profile
# 在profile文件中添加
export JAVA_HOME=/mydata/java/jdk1.8
export PATH=$PATH:$JAVA_HOME/bin
# 使修改后的profile文件生效
. /etc/profile
使用
一切准备就绪,接下来通过Gitlab的CI/CD功能就可以实现SpringBoot应用的自动化部署了!
首先在项目的根目录下添加.gitlab-ci.yml文件,定义了两个任务,一个任务会将应用代码打包成Jar包并复制到指定目录,另一个任务会通过运行脚本run.sh打包应用的Docker镜像并运行;
# 打包任务
build-job:
  stage: build
  # 指定标签,只有具有该标签的runner才会执行
  tags:
    - docker
  script:
    # 使用Maven打包
    - mvn clean package
    # 将jar包、Dockerfile、运行脚本复制到指定目录
    - cp target/mall-tiny-gitlab-1.0-SNAPSHOT.jar /mydata/build/mall-tiny-gitlab-1.0-SNAPSHOT.jar
    - cp Dockerfile /mydata/build/Dockerfile
    - cp run.sh /mydata/build/run.sh

# 部署任务
deploy-job:
  stage: deploy
  tags:
    - docker
  script:
    # 进入指定目录并执行运行脚本
    - cd /mydata/build
    - chmod +x run.sh
- ./run.sh这里值得一提的是,默认情况下runner只会执行具有相同标签的Job,由于我们对Job和runner都设置了标签为docker,所以我们这里是可以执行的。如果你没有设置标签的话,需要在runner的编辑界面设置下让runner可以执行没有标签的Job;
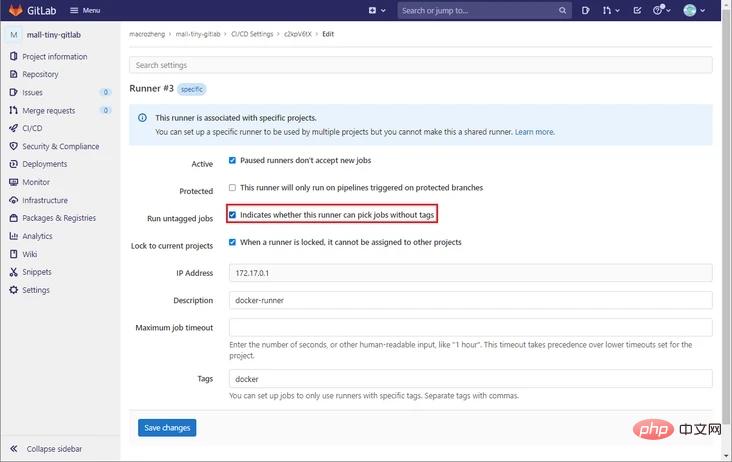
由于我们的gitlab-runner采用的是ssh的执行器,它会登录到我们指定的服务器,执行我们在.gitlab-ci.yml中定义的script命令,在此之前还会先从Git仓库中获取代码,所以我们还需修改下服务器上的host文件;
vim /etc/hosts
192.168.7.134 git.macrozheng.com
接下来就是要把脚本提交到Git仓库上去,提交后会在Project->CI/CD->Pipelines中发现正在执行的任务;
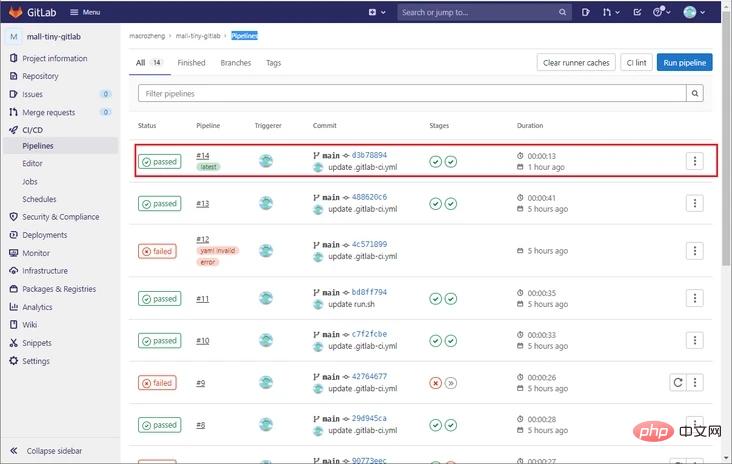
打开Pipeline的详情页面,可以发现我们定义的两个任务都已经执行成功了;
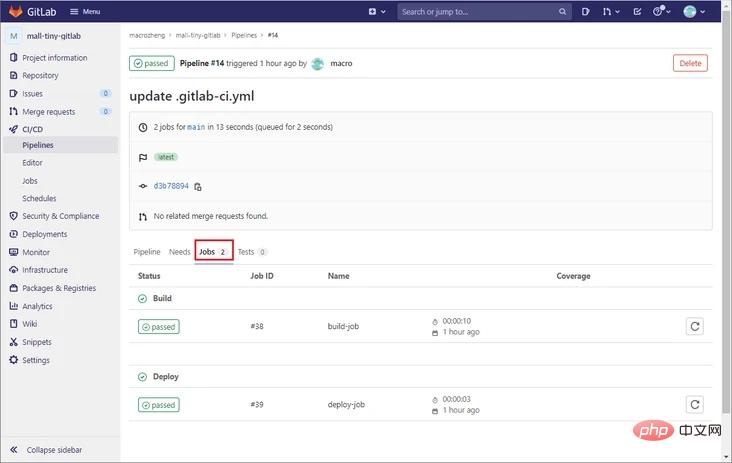
打开Job的详情界面,我们可以看到任务执行过程中输出的日志信息;
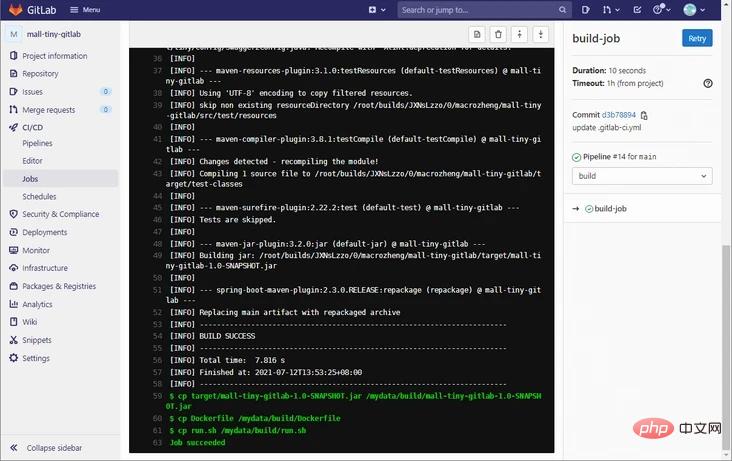
如果你想手动执行Pipeline,而不是提交触发的话,可以在Pipelines页面点击Run Pipeline按钮即可;
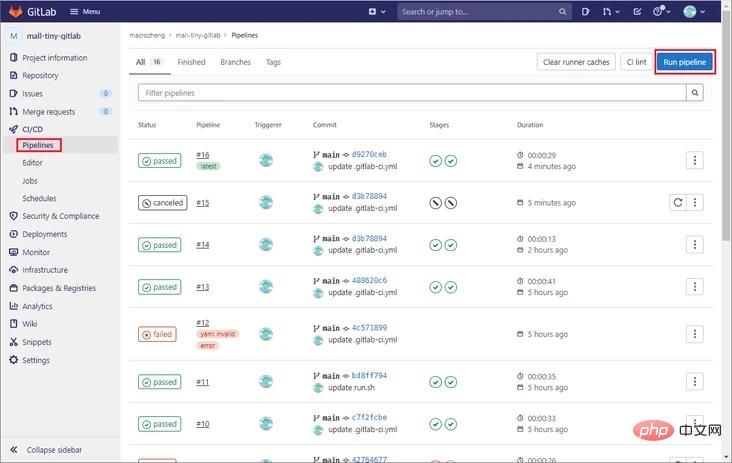
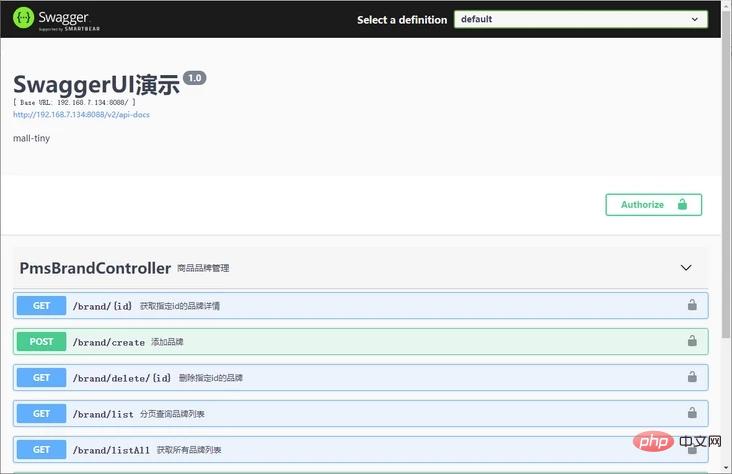
运行成功后,可以通过如下地址访问项目:http://192.168.7.134:8088/swa...
总结
如果你用Gitlab作为Git仓库的话,使用它的CI/CD功能来实现自动化部署确实很不错!安装一个轻量级gitlab-runner,编写简单的.gitlab-ci.yml脚本文件即可实现。其实我们之前以及介绍过很多种自动化部署方案,比如Jenkins、Gogs+Drone、Gitlab CI/CD,我们可以发现一个共同点,这些方案都离不开Linux命令。 所以说要想玩转自动化部署,还是得先玩转Linux命令!
相关视频教程推荐:Java视频教程
The above is the detailed content of If you don't use Gitlab's CI/CD function anymore, you will be out.. For more information, please follow other related articles on the PHP Chinese website!

Hot AI Tools

Undresser.AI Undress
AI-powered app for creating realistic nude photos

AI Clothes Remover
Online AI tool for removing clothes from photos.

Undress AI Tool
Undress images for free

Clothoff.io
AI clothes remover

AI Hentai Generator
Generate AI Hentai for free.

Hot Article

Hot Tools

Notepad++7.3.1
Easy-to-use and free code editor

SublimeText3 Chinese version
Chinese version, very easy to use

Zend Studio 13.0.1
Powerful PHP integrated development environment

Dreamweaver CS6
Visual web development tools

SublimeText3 Mac version
God-level code editing software (SublimeText3)

Hot Topics
 1378
1378
 52
52
 How to run the h5 project
Apr 06, 2025 pm 12:21 PM
Running the H5 project requires the following steps: installing necessary tools such as web server, Node.js, development tools, etc. Build a development environment, create project folders, initialize projects, and write code. Start the development server and run the command using the command line. Preview the project in your browser and enter the development server URL. Publish projects, optimize code, deploy projects, and set up web server configuration.
 Gitee Pages static website deployment failed: How to troubleshoot and resolve single file 404 errors?
Apr 04, 2025 pm 11:54 PM
GiteePages static website deployment failed: 404 error troubleshooting and resolution when using Gitee...
 Does H5 page production require continuous maintenance?
Apr 05, 2025 pm 11:27 PM
The H5 page needs to be maintained continuously, because of factors such as code vulnerabilities, browser compatibility, performance optimization, security updates and user experience improvements. Effective maintenance methods include establishing a complete testing system, using version control tools, regularly monitoring page performance, collecting user feedback and formulating maintenance plans.
 Can you learn how to make H5 pages by yourself?
Apr 06, 2025 am 06:36 AM
It is feasible to self-study H5 page production, but it is not a quick success. It requires mastering HTML, CSS, and JavaScript, involving design, front-end development, and back-end interaction logic. Practice is the key, and learn by completing tutorials, reviewing materials, and participating in open source projects. Performance optimization is also important, requiring optimization of images, reducing HTTP requests and using appropriate frameworks. The road to self-study is long and requires continuous learning and communication.
 How to quickly build a foreground page in a React Vite project using AI tools?
Apr 04, 2025 pm 01:45 PM
How to quickly build a front-end page in back-end development? As a backend developer with three or four years of experience, he has mastered the basic JavaScript, CSS and HTML...
 How to view the results after Bootstrap is modified
Apr 07, 2025 am 10:03 AM
Steps to view modified Bootstrap results: Open the HTML file directly in the browser to ensure that the Bootstrap file is referenced correctly. Clear the browser cache (Ctrl Shift R). If you use CDN, you can directly modify CSS in the developer tool to view the effects in real time. If you modify the Bootstrap source code, download and replace the local file, or rerun the build command using a build tool such as Webpack.
 How to use vue pagination
Apr 08, 2025 am 06:45 AM
Pagination is a technology that splits large data sets into small pages to improve performance and user experience. In Vue, you can use the following built-in method to paging: Calculate the total number of pages: totalPages() traversal page number: v-for directive to set the current page: currentPage Get the current page data: currentPageData()
 PHP vs. Python: Understanding the Differences
Apr 11, 2025 am 12:15 AM
PHP and Python each have their own advantages, and the choice should be based on project requirements. 1.PHP is suitable for web development, with simple syntax and high execution efficiency. 2. Python is suitable for data science and machine learning, with concise syntax and rich libraries.


