 Backend Development
 PHP Tutorial
 Environment installation of windows server apache, php, and postgresql
Environment installation of windows server apache, php, and postgresql
I have read a lot of articles about installing PHP environment on the Internet, but they are not very comprehensive. Maybe it is because it is too simple and everyone ignores it. For beginners, I don’t know how to install it. Today I compiled an article about installing PHP. The environment notes are for reference by novices. If novices don’t know how to install it, just follow the steps in my notes.
1. First download the required files, download the windows version of Apache, PHP, and postgresql
1. Download Apache http://www .apachelounge.com/download/ (I downloaded the version below)
Apache-2.4.25 (httpd-2.4.25-win64-VC14.zip)
2. Download PHP http://windows.php.net/download/ (For PHP, I downloaded the following version)
PHP-5.6. 30 (php-5.6.30-Win32-VC11-x64.zip)
3. Download postgresql https://www.postgresql.org/download/windows/ ( I downloaded the following version)
postgresql-9.6.2-3-windows-x64.exe
##2. Apache installation configuration
Decompress the Apache compressed package and copy the decompressed Apache24 to the target location to be installed. The configuration file path defaults to the root directory of drive C. Here I choose to copy to the root directory of drive D, so I need to modify the Apache configuration file d:\Apache24\conf\httpd.conf, Open the file d:\ Apache24\conf\httpd.conf. 1. Replace all c:/Apache24 with d:/Apache242. Before modification:Options Indexes FollowSymLinks AllowOverride None Require all granted
Options Indexes FollowSymLinks
AllowOverride All
Require all granted
C:\Windows\system32>d:
D:\>cd Apache24\bin
D:\Apache24\bin>httpd -t
D:\Apache24\bin>httpd -k install
#cd C:\Windows\System32
3. PHP installation configuration
1. Unzip PHP and copy it to the installation location. I chose d:/php here. Then copy and rename php.ini-development to php.ini. 2. Edit Apache's httpd.conf1) If your PHP is on the C drive, please replace D: with C:, and pay attention to the path using /. 2) Open httpd.conf under Apache24/conf and add#php5 support LoadModule php5_module d:/PHP/php5apache2_4.dll PHPIniDir d:/php/AddType application/x-httpd-php .php
D:\Apache24\bin>httpd -t
D:\Apache24\bin>httpd -k restart
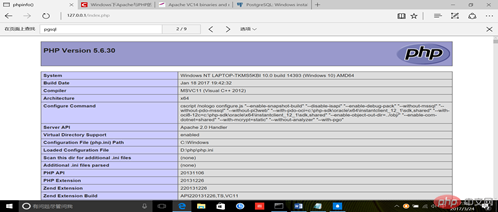
<?php phpinfo();?>
http://127.0.0.1 in the browser /phpinfo.php, if the following page is displayed, it means PHP is working normally:

libeay32.dll 、libiconv2.dll、libintl3.dll、libpq.dll、ssleay32.dll
Tip: If the pgsql extension fails to open, copy the above file to SysWOW64 (C:\Windows\SysWOW64 directory).
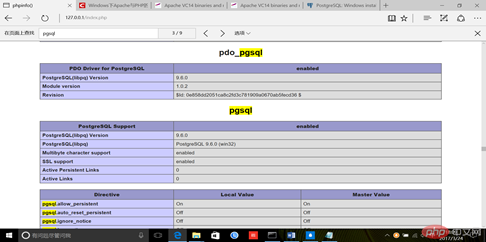
6) Restart apache and then visit http://127.0.0.1/phpinfo.php in the browser. If the following page is displayed, it means that pgsql is opened successfully: D:\Apache24\bin>httpd -k restart

4. Postgresql installation configuration
Run postgresql-9.6.2-3-windows-x64.exe and follow the interface steps to install That’s it (be careful not to move the downloaded postgresql-9.6.2-3-windows-x64.exe file, just click to install it, because moving files is prone to errors and is very troublesome for novices to solve).
The above steps have been installed successfully by me. Just follow the steps above to install them step by step. If you don’t understand anything, please leave a message. Thank you
for your support. Hope it can help Xiaobai.
The above is the detailed content of Environment installation of windows server apache, php, and postgresql. For more information, please follow other related articles on the PHP Chinese website!

Hot AI Tools

Undresser.AI Undress
AI-powered app for creating realistic nude photos

AI Clothes Remover
Online AI tool for removing clothes from photos.

Undress AI Tool
Undress images for free

Clothoff.io
AI clothes remover

AI Hentai Generator
Generate AI Hentai for free.

Hot Article

Hot Tools

Notepad++7.3.1
Easy-to-use and free code editor

SublimeText3 Chinese version
Chinese version, very easy to use

Zend Studio 13.0.1
Powerful PHP integrated development environment

Dreamweaver CS6
Visual web development tools

SublimeText3 Mac version
God-level code editing software (SublimeText3)

Hot Topics
 How to update the latest version of Bybit Exchange? Will there be any impact if it is not updated?
Feb 21, 2025 pm 10:54 PM
The way to update ByBit exchanges varies by platform and device: Mobile: Check for updates and install in the app store. Desktop Client: Check for updates in the Help menu and install automatically. Web page: You need to manually access the official website for updates. Failure to update the exchange can lead to security vulnerabilities, functional limitations, compatibility issues and reduced transaction execution efficiency.
 deepseek web version entrance deepseek official website entrance
Feb 19, 2025 pm 04:54 PM
DeepSeek is a powerful intelligent search and analysis tool that provides two access methods: web version and official website. The web version is convenient and efficient, and can be used without installation; the official website provides comprehensive product information, download resources and support services. Whether individuals or corporate users, they can easily obtain and analyze massive data through DeepSeek to improve work efficiency, assist decision-making and promote innovation.
 Pi Node Teaching: What is a Pi Node? How to install and set up Pi Node?
Mar 05, 2025 pm 05:57 PM
Detailed explanation and installation guide for PiNetwork nodes This article will introduce the PiNetwork ecosystem in detail - Pi nodes, a key role in the PiNetwork ecosystem, and provide complete steps for installation and configuration. After the launch of the PiNetwork blockchain test network, Pi nodes have become an important part of many pioneers actively participating in the testing, preparing for the upcoming main network release. If you don’t know PiNetwork yet, please refer to what is Picoin? What is the price for listing? Pi usage, mining and security analysis. What is PiNetwork? The PiNetwork project started in 2019 and owns its exclusive cryptocurrency Pi Coin. The project aims to create a one that everyone can participate
 How to install deepseek
Feb 19, 2025 pm 05:48 PM
There are many ways to install DeepSeek, including: compile from source (for experienced developers) using precompiled packages (for Windows users) using Docker containers (for most convenient, no need to worry about compatibility) No matter which method you choose, Please read the official documents carefully and prepare them fully to avoid unnecessary trouble.
 How do you parse and process HTML/XML in PHP?
Feb 07, 2025 am 11:57 AM
This tutorial demonstrates how to efficiently process XML documents using PHP. XML (eXtensible Markup Language) is a versatile text-based markup language designed for both human readability and machine parsing. It's commonly used for data storage an
 PHP Program to Count Vowels in a String
Feb 07, 2025 pm 12:12 PM
A string is a sequence of characters, including letters, numbers, and symbols. This tutorial will learn how to calculate the number of vowels in a given string in PHP using different methods. The vowels in English are a, e, i, o, u, and they can be uppercase or lowercase. What is a vowel? Vowels are alphabetic characters that represent a specific pronunciation. There are five vowels in English, including uppercase and lowercase: a, e, i, o, u Example 1 Input: String = "Tutorialspoint" Output: 6 explain The vowels in the string "Tutorialspoint" are u, o, i, a, o, i. There are 6 yuan in total
 Coinsuper exchange software channel official website entrance
Feb 21, 2025 pm 10:39 PM
The official website entrance of the Coinsuper Exchange: https://www.coinsuper.com. The client download channels are: Windows client, macOS client, and mobile (iOS/Android). Registration requires an email, mobile phone number and password, and you need to complete real-name authentication before you can trade. The platform provides a variety of digital asset transactions, including Bitcoin, Ethereum, etc., with the transaction fee rate of 0.1% for both orders and acceptors. Security safeguards include cold wallet storage, dual-factor verification, anti-money laundering and anti-terrorism financing measures, and with security public
 BITGet official website installation (2025 beginner's guide)
Feb 21, 2025 pm 08:42 PM
BITGet is a cryptocurrency exchange that provides a variety of trading services including spot trading, contract trading and derivatives. Founded in 2018, the exchange is headquartered in Singapore and is committed to providing users with a safe and reliable trading platform. BITGet offers a variety of trading pairs, including BTC/USDT, ETH/USDT and XRP/USDT. Additionally, the exchange has a reputation for security and liquidity and offers a variety of features such as premium order types, leveraged trading and 24/7 customer support.


