

How to develop Android native plug-ins in Uniapp? The following uniapp tutorial column will introduce you to the Uniapp Android native plug-in development method. I hope it will be helpful to everyone!
Environment preparation
l JAVA environment jdk1.8l Android Studio download address:Android Studio official website OR Android Studio Chinese community
l App offline SDK download : Please download the 2.9.8 version ofImport the uni plug-in native project
l UniPlugin-Hello -AS project please searchl in App Offline SDK
and click Android Studio menu option File--->New--->Import ProjectApp Offline SDK
Plug-in development
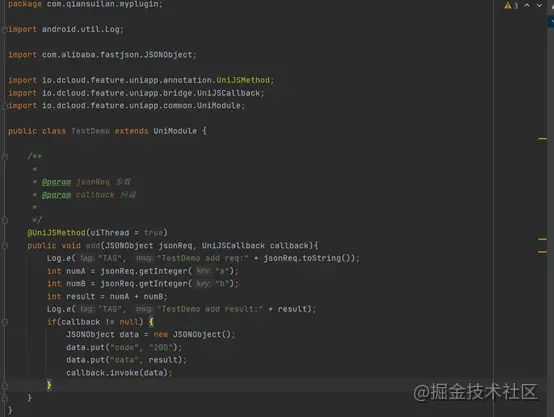
uni-app plug-in currently only supports Module extension and Component Extension, Adapter extension is not supported for the time being. The following is the Module extension (non-UI function extension)1. Create a new Module, File->New->New Module, select Android Library, fill in the information, Click Finish
    移除默认依赖,修改为

    compileOnly fileTree(dir: 'libs', include: ['*.jar'])\
    compileOnly fileTree(dir: '../app/libs', include: ['uniapp-v8-release.aar'])\
    compileOnly "com.android.support:recyclerview-v7:28.0.0"\
    compileOnly "com.android.support:support-v4:28.0.0"\
    compileOnly "com.android.support:appcompat-v7:28.0.0"\
    compileOnly 'com.alibaba:fastjson:1.1.46.android'\
    implementation 'com.facebook.fresco:fresco:1.13.0'

dcloud_uniplugins.json description:
nativePlugins: 插件根节点,可存放多个插件
hooksClass: 生命周期代理(实现AppHookProxy接口类)格式(完整包名加类名)
type : module 或 component类型
name : 注册名称
class : module 或 component 实体类完整名称
The code development is over now. The next step is to use android studio to verify the offline package. Portal

##Uniapp Packaging
HBuildX introduces the plug-in

##Cloud packaging for plug-in function verification
IOS
More For more programming-related knowledge, please visit: Introduction to Programming! !
The above is the detailed content of A brief discussion on how to develop Android native plug-ins in Uniapp. For more information, please follow other related articles on the PHP Chinese website!
 The difference between flutter and uniapp
 Advantages of downloading the official website of Yiou Exchange App
 Registration-free CDN acceleration service
 What are the problems with using php
 What are the e-commerce platforms?
 Python return value return usage
 JavaScript escape characters
 How to solve the problem of failure to load dll
 Complement algorithm for negative numbers


![[Web front-end] Node.js quick start](https://img.php.cn/upload/course/000/000/067/662b5d34ba7c0227.png)


