How to write node files into npm packages and publish them?
nodeHow to write files into npm packages? The following article will introduce to you how to copy the node file into an npm package and publish it. I hope it will be helpful to you!

Copy the node file into an npm package and publish it
npm plug-in release
Publishing npm is actually It's a very simple thing. I just forgot about it because I haven't released it for a long time, and I have to look it up online, so I wrote an article to record it. [Recommended learning: "nodejs Tutorial"]
Create a new file directory
- Create a new directory and name it Any
- Run the command to generate
package.json
npm init --yes
Install dependencies
if The project also requires other dependencies, which can be installed through npm install xxx as during normal development.
However, one thing to note here is the difference between -S, --save and --save-dev, because this is usually done when developing projects. There is no essential difference between the three, but there is still a difference when developing npm package
- ##-S
and--saveThe downloaded plug-in will be written todependencies, and when we install the custom plug-in, it will be downloaded together - --save-dev
The plug-in will be written todevDendencies. This is only used during development and will not be installed along with the custom plug-in.
Completepackage.json<span style="font-size: 16px;"></span>
- name
Others need to install this plug-in throughnpm install xxx, to install thisxxxcorresponds to thevalue# ofname##version - The version of the plug-in, you need to re-release this version every time, otherwise the release will fail
- Entry file
{
"name": "node-fs-copy", //发布的包名,默认是上级文件夹名。不得与现在npm中的包名重复。包名不能有大写字母/空格/下滑线!
  "version": "1.0.0",//你这个包的版本,默认是1.0.0。对于npm包的版本号有着一系列的规则,模块的版本号采用X.Y.Z的格式,具体体现为:
  1、修复bug,小改动,增加z。
  2、增加新特性,可向后兼容,增加y
  3、有很大的改动,无法向下兼容,增加x
  "description": "",
  "main": "index.js",//入口文件,默认是Index.js,可以修改成自己的文件,这个很重要,当你在实际项目使用的时候,let a = require("包名"),它就去会去找对应的文件路径哦。
  "scripts": {                  // 快捷命令,在package.json同目录下输入命令 npm run 键 就会执行 相对应的命令
    "bulid": "npx webpack --config myConfig.js"  //例如 输入 npm run bulid 就会执行npx webpack --config myConfig.js的命令 。
  },
  "keywords": [ // npm搜索的关键字
     "node",
     "fs",
     "copy"
  ],
  "publishConfig": {
    "registry": "" // 发布的npm地址
  },
  "repository": {
      "type": "git",
      "url": "git+https://github.com/xxxx" // 代码的git地址
  },
  "author": "zxw",
  "license": "ISC",//这个直接回车,开源文件协议吧,也可以是MIT,看需要吧。
  "dependencies": {             // 生产环境所依赖的包
    "jquery": "^3.4.1",
    "sea": "^1.0.2"
  },
  "devDependencies": {          // 开发环境所依赖的包
    "webpack": "^4.41.6"
  }
}After confirming that the entry file is index.js, and writing the code, note that both introduction and export need to be done through node
index.jsconst { exists, copyDir} = require('./lib/copy') const fsCopy = (sourcePath, deptPath)=> { exists(sourcePath,deptPath, copyDir) } module.exports = { fsCopy }Copy after login
const fs = require('fs')

/**
 * 复制一个文件夹下的文件到另一个文件夹
 * @param src 源文件夹,即需要写出的文件
 * @param dst 目标文件夹,需要写入的文件
 */
const copyDir = function (src, dst) {
  // 读取目录中的所有文件/目录
  fs.readdir(src, function (err, paths) {
    if (err) {
      throw err
    }
    paths.forEach(function (path) {
      const _src = src + '/' + path
      const _dst = dst + '/' + path
      let readable;
      let writable
      fs.stat(_src, function (err, st) {
        if (err) {
          throw err
        }
        // 判断是否为文件
        if (st.isFile()) {
          // 创建读取流
          readable = fs.createReadStream(_src)
          // 创建写入流
          writable = fs.createWriteStream(_dst)
          // 通过管道来传输流
          readable.pipe(writable)
        }
        // 如果是目录则递归调用自身
        else if (st.isDirectory()) {
          exists(_src, _dst, copyDir)
        }
      })
    })
  })
}
/*
* 判断当前目标文件是否存在
* 如若不存在需要先进行创建
* */
const exists = function (src, dst, callback) {
  // 如果路径存在,则返回 true,否则返回 false。
  if (fs.existsSync(dst)) {
    callback(src, dst)
  } else {
    fs.mkdir(dst, function () {
      callback(src, dst)
    })
  }
}

module.exports = {
  exists,
  copyDir
}
Copy after login
TestThis piece I just conducted a relatively simple test, and I will add a dedicated chapter on plug-in testing later
Publish
Register npm account, usually npm can log in directly by associating with gitlab- Make sure your current image points to the npm image instead of the Taobao image. If you are not sure, you can directly execute
npm config set registry https://registry.npmjs.org/
Copy after login
npm addUser
Copy after login

npm publish
Copy after login
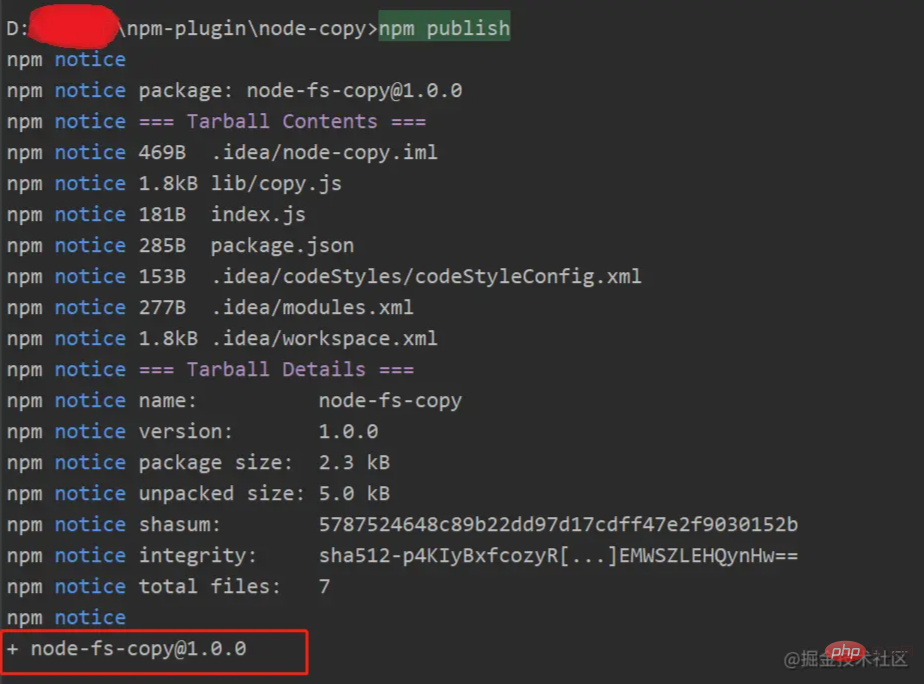
 As shown in the picture, the release is successful.
Publish errorIf the release encounters a
403 error, it is very It is possible that the name field in your package name, i.e. package.json, is the same as the existing plugin name in npm. You need to modify it and re-publish itAfter modifying the name, an error still occurs,
, indicating that this version already exists in npm, and the version number needs to be modified
IterationIf there are any changes in the subsequent content, you need to manually change it every time you re-publish it
package.json/version version number, and then execute the published command
installnpm install node-fs-copy
In node code, local copy testconst { fsCopy } = require('node-fs-copy')
// 把内容从本地D盘的test/test目录,拷贝到test/test1目录
fsCopy('d:/test/test', 'd:/test/test1')
Server code copyLocal is There is no way to directly copy the server code. If you need to copy the server code, you need to meet a condition
The node server code and the file to be copied are on the same server- For example, the file address on the author's server is
, and the node service is also deployed in another directory on the same server <div class="code" style="position:relative; padding:0px; margin:0px;"><pre class='brush:php;toolbar:false;'>//在服务器上运行,表示把服务器的/data/code-generator文件内的内容,拷贝到当前项目的./temporary/test内
fsCopy(&#39;/data/code-generator&#39;, &#39;./temporary/test&#39;)</pre><div class="contentsignin">Copy after login</div></div>After completing the copy, you can use the packaging plug-in Compress the content into
, output it to the front end, then delete the temporary file 更多编程相关知识,请访问:编程视频!! The above is the detailed content of How to write node files into npm packages and publish them?. For more information, please follow other related articles on the PHP Chinese website!./temporary/test, and then delete the zip package附上常用命令
npm init --yes(初始化配置)
npm i (会根据package.json里面的键dependencies,devDependencies来安装相对应的包)
npm i 包(默认安装一个最新的包,这个包在node_modules文件夹里面,并且会更新在你的package.json文件)
npm i 包@3.0.0(安装一个指定版本的包,会更新在你的package.json文件)
npm i 包 --save-dev(安装一个开发环境所需要的包,会更新在你的package.json文件)
npm uninstall 包(卸载一个包,会更新在你的package.json文件)
npm update 包(更新此包版本为最新版本,会更新在你的package.json文件)
npm run 脚本键(会根据package.json里面的"scripts"里面的脚本键自动执行相对于的值)
npm publish (根据package.json的name发布一个包)
npm unpublish 包名 --force(卸载npm网站上自己上传的包)

Hot AI Tools

Undresser.AI Undress
AI-powered app for creating realistic nude photos

AI Clothes Remover
Online AI tool for removing clothes from photos.

Undress AI Tool
Undress images for free

Clothoff.io
AI clothes remover

AI Hentai Generator
Generate AI Hentai for free.

Hot Article

Hot Tools

Notepad++7.3.1
Easy-to-use and free code editor

SublimeText3 Chinese version
Chinese version, very easy to use

Zend Studio 13.0.1
Powerful PHP integrated development environment

Dreamweaver CS6
Visual web development tools

SublimeText3 Mac version
God-level code editing software (SublimeText3)

Hot Topics
 1378
1378
 52
52
 How to delete node in nvm
Dec 29, 2022 am 10:07 AM
How to delete node with nvm: 1. Download "nvm-setup.zip" and install it on the C drive; 2. Configure environment variables and check the version number through the "nvm -v" command; 3. Use the "nvm install" command Install node; 4. Delete the installed node through the "nvm uninstall" command.
 How to use express to handle file upload in node project
Mar 28, 2023 pm 07:28 PM
How to handle file upload? The following article will introduce to you how to use express to handle file uploads in the node project. I hope it will be helpful to you!
 How to do Docker mirroring of Node service? Detailed explanation of extreme optimization
Oct 19, 2022 pm 07:38 PM
During this period, I was developing a HTML dynamic service that is common to all categories of Tencent documents. In order to facilitate the generation and deployment of access to various categories, and to follow the trend of cloud migration, I considered using Docker to fix service content and manage product versions in a unified manner. . This article will share the optimization experience I accumulated in the process of serving Docker for your reference.
 An in-depth analysis of Node's process management tool 'pm2”
Apr 03, 2023 pm 06:02 PM
This article will share with you Node's process management tool "pm2", and talk about why pm2 is needed, how to install and use pm2, I hope it will be helpful to everyone!
 Pi Node Teaching: What is a Pi Node? How to install and set up Pi Node?
Mar 05, 2025 pm 05:57 PM
Detailed explanation and installation guide for PiNetwork nodes This article will introduce the PiNetwork ecosystem in detail - Pi nodes, a key role in the PiNetwork ecosystem, and provide complete steps for installation and configuration. After the launch of the PiNetwork blockchain test network, Pi nodes have become an important part of many pioneers actively participating in the testing, preparing for the upcoming main network release. If you don’t know PiNetwork yet, please refer to what is Picoin? What is the price for listing? Pi usage, mining and security analysis. What is PiNetwork? The PiNetwork project started in 2019 and owns its exclusive cryptocurrency Pi Coin. The project aims to create a one that everyone can participate
 Let's talk about how to use pkg to package Node.js projects into executable files.
Dec 02, 2022 pm 09:06 PM
How to package nodejs executable file with pkg? The following article will introduce to you how to use pkg to package a Node project into an executable file. I hope it will be helpful to you!
 What to do if npm node gyp fails
Dec 29, 2022 pm 02:42 PM
npm node gyp fails because "node-gyp.js" does not match the version of "Node.js". The solution is: 1. Clear the node cache through "npm cache clean -f"; 2. Through "npm install -g n" Install the n module; 3. Install the "node v12.21.0" version through the "n v12.21.0" command.
 Token-based authentication with Angular and Node
Sep 01, 2023 pm 02:01 PM
Authentication is one of the most important parts of any web application. This tutorial discusses token-based authentication systems and how they differ from traditional login systems. By the end of this tutorial, you will see a fully working demo written in Angular and Node.js. Traditional Authentication Systems Before moving on to token-based authentication systems, let’s take a look at traditional authentication systems. The user provides their username and password in the login form and clicks Login. After making the request, authenticate the user on the backend by querying the database. If the request is valid, a session is created using the user information obtained from the database, and the session information is returned in the response header so that the session ID is stored in the browser. Provides access to applications subject to


