

php mysql source code installation tutorial

php Mysql source code installation method: 1. Install dependent packages through yum and compile and install the mysql source code; 2. Install the PHP source code through the "yum install" command and modify the configuration; 3. Install nginx source code and test the installation results That’s it.

The operating environment of this article: redhat6.5 system, PHP5.6, Dell G3 computer.
php mysql source code installation tutorial
mysql and php source code compilation and installation
mysql source code compilation and installation
Install dependency packages:
yum install cmake-2.8.12.2-4.el6.x86_64.rpm gcc-c++ ncurses-devel gcc -y
[root@server2 ~]# lsanaconda-ks.cfg    haproxy-1.6.11.tar.gz                  lamp                       nginx
drbd-8.4.3         heartbeat-3.0.4-2.el6.x86_64.rpm       mysql-5.7.11               php-5.6.20.tar.bz2
drbd-8.4.3.tar.gz  heartbeat-libs-3.0.4-2.el6.x86_64.rpm  mysql-boost-5.7.11.tar.gz  rpmbuild
[root@server2 ~]# tar zxf mysql-boost-5.7.11.tar.gz [root@server2 ~]# cd mysql-5.7.11/
- Compilation parameters:
cmake -DCMAKE_INSTALL_PREFIX=/usr/local/mysql \
#安装目录
-DMYSQL_DATADIR=/usr/local/mysql/data \#数据库存放目录
-DMYSQL_UNIX_ADDR=/usr/local/mysql/data/mysql.sock \ #Unix socket 文件路径-DWITH_MYISAM_STORAGE_ENGINE=1 \#安装 myisam 存储引擎
-DWITH_INNOBASE_STORAGE_ENGINE=1 \#安装 innodb 存储引擎
-DWITH_ARCHIVE_STORAGE_ENGINE=1 \#安装 archive 存储引擎
-DWITH_BLACKHOLE_STORAGE_ENGINE=1 \#安装 blackhole 存储引擎
-DWITH_PARTITION_STORAGE_ENGINE=1 \#安装数据库分区
-DENABLED_LOCAL_INFILE=1 \#允许从本地导入数据
-DWITH_READLINE=1 \#快捷键功能
-DWITH_SSL=yes \#支持 SSL
-DDEFAULT_CHARSET=utf8 \#使用 utf8 字符
-DDEFAULT_COLLATION=utf8_general_ci \#校验字符
-DEXTRA_CHARSETS=all \#安装所有扩展字符集
-DMYSQL_TCP_PORT=3306 \#MySQL 监听端口
[root@server2mysql-5.7.11]#cmake \
-DCMAKE_INSTALL_PREFIX=/usr/local/mysql \-DMYSQL_DATADIR=/usr/local/mysql/data \-DMYSQL_UNIX_ADDR=/usr/local/mysql/data/mysql.sock \-DWITH_MYISAM_STORAGE_ENGINE=1 \-DWITH_INNOBASE_STORAGE_ENGINE=1 \-DWITH_ARCHIVE_STORAGE_ENGINE=1 \-DWITH_BLACKHOLE_STORAGE_ENGINE=1 \-DWITH_PARTITION_STORAGE_ENGINE=1 \-DENABLED_LOCAL_INFILE=1 \-DWITH_READLINE=1 -DWITH_SSL=yes \-DDEFAULT_CHARSET=utf8 \-DDEFAULT_COLLATION=utf8_general_ci \-DEXTRA_CHARSETS=all -DMYSQL_TCP_PORT=3306 \-DWITH_BOOST=boost/boost_1_59_0/[root@server2mysql-5.7.11]make
[root@server2mysql-5.7.11]make install
[root@server1 support-files]# cp /etc/my.cnf /etc/my.cnf.bak #备份[root@server1 support-files]# cp my-default.cnf /etc/my.cnf #创建新的my.cnf文件[root@server1 support-files]# vim /etc/my.cnf
 18 basedir = /usr/local/lnmp/mysql 19 datadir = /usr/local/lnmp/mysql/data 20 port = 3306
 21 # server_id = .....
 22 socket = /usr/local/lnmp/mysql/data/mysql.sock
[root@server1 support-files]# cp mysql.server /etc/init.d/mysqld  #将脚本复制到启动脚本目录下[root@server1 mysql]# chmod +x /etc/init.d/mysqld #给与脚本执行权限[root@server1 mysql]# groupadd -g 27 mysql #创建mysql组[root@server1 mysql]# useradd -M -s /sbin/nologin -d /usr/local/lnmp/mysql/data  -u 27 mysql -g mysql #创建mysql用户[root@server1 mysql]# chown mysql:mysql -R . #更改目录下的所有文件所有者为nysql[root@server1 mysql]# mysqld --verbose --help | grep 'insecure' #过滤初始化需要用到的参数
  --initialize-insecure
                      insecure transport will be rejected.  Secure transports
initialize-insecure                                          FALSE
[root@server1 mysql]# mysqld   --initialize-insecure --user=mysql2017-09-26T03:54:01.520645Z 0 [Warning] TIMESTAMP with implicit DEFAULT value is deprecated. Please use --explicit_defaults_for_timestamp server option (see documentation for more details).2017-09-26T03:54:01.521056Z 0 [Warning] 'NO_ZERO_DATE', 'NO_ZERO_IN_DATE' and 'ERROR_FOR_pISION_BY_ZERO' sql modes should be used with strict mode. They will be merged with strict mode in a future release.2017-09-26T03:54:01.521075Z 0 [Warning] 'NO_AUTO_CREATE_USER' sql mode was not set.2017-09-26T03:54:01.528325Z 0 [ERROR] --initialize specified but the data directory has files in it. Aborting.  #报错data目录下有数据2017-09-26T03:54:01.529162Z 0 [ERROR] Aborting
[root@server1 mysql]# cd data/[root@server1 data]# lsauto.cnf    client-cert.pem  ibdata1      ibtmp1           mysql.sock          private_key.pem  server1.pid      sys
ca-key.pem  client-key.pem   ib_logfile0  mysql            mysql.sock.lock     public_key.pem   server-cert.pem
ca.pem      ib_buffer_pool   ib_logfile1  mysqld_safe.pid  performance_schema  server1.err      server-key.pem
[root@server1 data]# rm -fr * #删除data下数据[root@server1 mysql]# mysqld   --initialize-insecure --user=mysql #初始化数据库[root@server1 data]# vim ~/.bash_profile #给数据库添加环境变量
  8 # User specific environment and startup programs
  9
 10 PATH=$PATH:$HOME/bin:/usr/local/lnmp/mysql/bin
[root@server1 data]# /etc/init.d/mysqld start #启动数据库Starting MySQL. SUCCESS!
[root@server1 data]# mysql_secure_installation #第一次进入数据库的安全工作,设定mysql密码,匿名用户登陆。。。等等的设定[root@server2 data]#  mysql[root@server2 data]#  chown root:root data/ -R  #为了安全经mysql数据目录权限给root用户Welcome to the MySQL monitor.  Commands end with ; or \g.
Your MySQL connection id is 2Server version: 5.7.11 Source distribution

Copyright (c) 2000, 2016, Oracle and/or its affiliates. All rights reserved.

Oracle is a registered trademark of Oracle Corporation and/or its
affiliates. Other names may be trademarks of their respective
owners.

Type 'help;' or '\h' for help. Type '\c' to clear the current input statement.

mysql> show databases;
+--------------------+
| Database           |
+--------------------+
| information_schema |
| mysql              |
| performance_schema |
| sys                |
+--------------------+4 rows in set (0.00 sec)

mysql> quitNote: If the following error is found, it is because of mysql As a result of no initialization, restarting the database after mysqld –initialize-insecure –user=mysql will have no such problem.
[root@server2 bin]# /etc/init.d/mysqld startStarting MySQL... ERROR! The server quit without updating PID file (/usr/local/mysql/data//server2.pid).
php source code installation
Installation required dependency packages:
yum install libxml2-devel -yyum reinstall libcurl -yyum install libcurl-devel.x86_64 -ylibjpeg-turbo-devel-1.2.1-1.el6.x86_64 -yyum install gd-devel-2.0.35-11.el6.x86_64.rpm -yyum install gmp-devel -yyum install libmcrypt-2.5.8-9.el6.x86_64.rpm -yyum install libmcrypt-devel-2.5.8-9.el6.x86_64.rpm -yyum install net-snmp-devel -yyum install re2c-0.13.5-1.el6.x86_64.rpm -y
Compile and install
root@server1 lamp]#  tar jxf php-5.6.20.tar.bz2
[root@server1 php-5.6.20]#  ./configure \
--prefix=/usr/local/lnmp/php \--with-config-file-path=/usr/local/lnmp/php/etc \--with-mysql=mysqlnd \--with-openssl \--with-snmp \--with-gd \--with-zlib \--with-curl \--with-libxml-dir \--with-png-dir \--with-jpeg-dir \--with-freetype-dir \--with-pear \--with-gettext \--with-gmp \--enable-inline-optimization \--enable-soap \--enable-ftp \--enable-sockets \--enable-mbstring \--with-mysqli=mysqlnd \--enable-fpm \--with-fpm-user=nginx \--with-fpm-group=nginx   \--with-mcrypt \--with-mhash[root@server1 php-5.6.20]# useradd -M -s /sbin/nologin -d /usr/local/lnmp/mysql/ -u 1500 nginx
[root@server1 php-5.6.20]# make && make install
Basic configuration php
[root@server1 php-5.6.20]# cp php.ini-production /usr/local/lnmp/php/etc/php.ini[root@server1 php-5.6.20]# cp sapi/fpm/init.d.php-fpm /etc/init.d/php-fpm [root@server1 php-5.6.20]# chmod +x /etc/init.d/php-fpm [root@server1 php-5.6.20]# cd /usr/local/lnmp/php/[root@server1 php]# lsbin  etc  include  lib  php  sbin  var
[root@server1 php]# vim etc/php.ini
 923 ; Defines the default timezone used by the date functions 924 ; http://php.net/date.timezone 925 date.timezone = Asia/Shanghai #时区
 926 [root@server1 etc]# vim php-fpm.conf
 24 ; Default Value: none 25 pid = run/php-fpm.pid  #开启pid
 26 [root@server1 etc]# vim php.ini 1000 ; http://php.net/pdo_mysql.default-socket1001 pdo_mysql.default_socket=/usr/local/lnmp/mysql/data/mysql.sock
...1149 ; http://php.net/mysql.default-socket1150 mysql.default_socket =/usr/local/lnmp/mysql/data/mysql.sock
...1209 mysqli.default_socket =/usr/local/lnmp/mysql/data/mysql.sock1210 [root@server1 etc]# /etc/init.d/php-fpm startStarting php-fpm  done
nginx source code installation
[root@server1 ~]# cd nginx-1.12.0[root@server1 nginx-1.12.0]# lsauto CHANGES.ru configure html Makefile objs src
CHANGES conf contrib LICENSE man README
[root@server1 nginx-1.12.0]# ./configure --prefix=/usr/local/lnmp/nginx \--with-threads \
--with-http_ssl_module \
--with-file-aio \
--with-http_stub_status_module
[root@server1 nginx-1.12.0]# make && make install[root@server1 nginx-1.12.0]# ln -s /usr/local/lnmp/nginx/sbin/nginx /usr/local/sbin/[root@server1 nginx-1.12.0]# vim /usr/local/lnmp/nginx/conf/nginx.conf
42 location / { 43 root html; 44 index index.php index.html index.htm; 45 } #添加php的发布页面
64 location ~ \.php$ { 65 root html; 66 fastcgi_pass 127.0.0.1:9000; 67 fastcgi_index index.php; 68 fastcgi_param SCRIPT_FILENAME /scripts$fastcgi_script_name; 69 include fastcgi.conf; #修改成这个
70 }
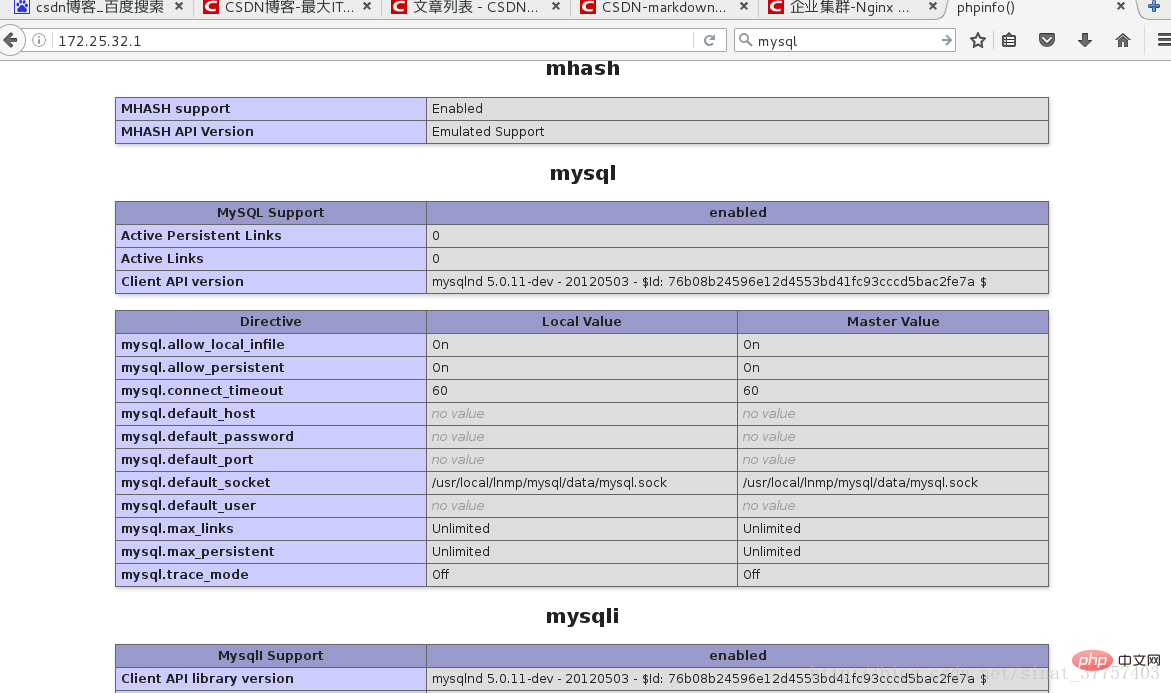
[root@server1 html]# cat index.php #php发布页面<?php
phpinfo()
?>
[root@server1 html]# nginx -s reload[root@server1 html]# /etc/init.d/php-fpm reloadReload service php-fpm done- Test:
172.25.32.1 in the browser
Recommended study: " PHP video tutorial》
The above is the detailed content of php mysql source code installation tutorial. For more information, please follow other related articles on the PHP Chinese website!

Hot AI Tools

Undresser.AI Undress
AI-powered app for creating realistic nude photos

AI Clothes Remover
Online AI tool for removing clothes from photos.

Undress AI Tool
Undress images for free

Clothoff.io
AI clothes remover

AI Hentai Generator
Generate AI Hentai for free.

Hot Article
Hot Tools

Notepad++7.3.1
Easy-to-use and free code editor

SublimeText3 Chinese version
Chinese version, very easy to use

Zend Studio 13.0.1
Powerful PHP integrated development environment

Dreamweaver CS6
Visual web development tools

SublimeText3 Mac version
God-level code editing software (SublimeText3)
Hot Topics


 PHP 8.4 Installation and Upgrade guide for Ubuntu and Debian
Dec 24, 2024 pm 04:42 PM
PHP 8.4 Installation and Upgrade guide for Ubuntu and Debian
Dec 24, 2024 pm 04:42 PM
PHP 8.4 brings several new features, security improvements, and performance improvements with healthy amounts of feature deprecations and removals. This guide explains how to install PHP 8.4 or upgrade to PHP 8.4 on Ubuntu, Debian, or their derivati
 How to fix mysql_native_password not loaded errors on MySQL 8.4
Dec 09, 2024 am 11:42 AM
How to fix mysql_native_password not loaded errors on MySQL 8.4
Dec 09, 2024 am 11:42 AM
One of the major changes introduced in MySQL 8.4 (the latest LTS release as of 2024) is that the "MySQL Native Password" plugin is no longer enabled by default. Further, MySQL 9.0 removes this plugin completely. This change affects PHP and other app
 How To Set Up Visual Studio Code (VS Code) for PHP Development
Dec 20, 2024 am 11:31 AM
How To Set Up Visual Studio Code (VS Code) for PHP Development
Dec 20, 2024 am 11:31 AM
Visual Studio Code, also known as VS Code, is a free source code editor — or integrated development environment (IDE) — available for all major operating systems. With a large collection of extensions for many programming languages, VS Code can be c
 How do you parse and process HTML/XML in PHP?
Feb 07, 2025 am 11:57 AM
How do you parse and process HTML/XML in PHP?
Feb 07, 2025 am 11:57 AM
This tutorial demonstrates how to efficiently process XML documents using PHP. XML (eXtensible Markup Language) is a versatile text-based markup language designed for both human readability and machine parsing. It's commonly used for data storage an
 PHP Program to Count Vowels in a String
Feb 07, 2025 pm 12:12 PM
PHP Program to Count Vowels in a String
Feb 07, 2025 pm 12:12 PM
A string is a sequence of characters, including letters, numbers, and symbols. This tutorial will learn how to calculate the number of vowels in a given string in PHP using different methods. The vowels in English are a, e, i, o, u, and they can be uppercase or lowercase. What is a vowel? Vowels are alphabetic characters that represent a specific pronunciation. There are five vowels in English, including uppercase and lowercase: a, e, i, o, u Example 1 Input: String = "Tutorialspoint" Output: 6 explain The vowels in the string "Tutorialspoint" are u, o, i, a, o, i. There are 6 yuan in total
 7 PHP Functions I Regret I Didn't Know Before
Nov 13, 2024 am 09:42 AM
7 PHP Functions I Regret I Didn't Know Before
Nov 13, 2024 am 09:42 AM
If you are an experienced PHP developer, you might have the feeling that you’ve been there and done that already.You have developed a significant number of applications, debugged millions of lines of code, and tweaked a bunch of scripts to achieve op
 Top 10 PHP CMS Platforms For Developers in 2024
Dec 05, 2024 am 10:29 AM
Top 10 PHP CMS Platforms For Developers in 2024
Dec 05, 2024 am 10:29 AM
CMS stands for Content Management System. It is a software application or platform that enables users to create, manage, and modify digital content without requiring advanced technical knowledge. CMS allows users to easily create and organize content
 How to Add Elements to the End of an Array in PHP
Feb 07, 2025 am 11:17 AM
How to Add Elements to the End of an Array in PHP
Feb 07, 2025 am 11:17 AM
Arrays are linear data structures used to process data in programming. Sometimes when we are processing arrays we need to add new elements to the existing array. In this article, we will discuss several ways to add elements to the end of an array in PHP, with code examples, output, and time and space complexity analysis for each method. Here are the different ways to add elements to an array: Use square brackets [] In PHP, the way to add elements to the end of an array is to use square brackets []. This syntax only works in cases where we want to add only a single element. The following is the syntax: $array[] = value; Example
