 Web Front-end
 JS Tutorial
 Teach you step by step how to deploy a TS Node.js project correctly and quickly!
Teach you step by step how to deploy a TS Node.js project correctly and quickly!
How to deploy a TS Node.js project correctly and quickly? The following article will teach you how to deploy a TS Node.js application in a few minutes. I hope it will be helpful to you!

As a full-stack developer, it is very interesting to create projects. You can design the architecture, brainstorm, and develop, but after the development is completed, we have to deploy or release application. So how to deploy a TS Node.js project correctly and quickly? Let’s get it done today. [Recommended learning: "nodejs Tutorial"]
Create a TS Node.js application
If you are already familiar with creating a TS Node.js project , you can jump directly to the "Deploy and Release Application" section
Initialize the Node.js project:
In our team, we really like TS and use it in all our new projects TS is used in every project, so creating a TS project is nothing new.
Let’s start with the basics:
npm initInitialize a Node.js project using-yParameters can quickly skip step-by-step configuration##npm install express @types/express
Install express dependencies, and express types file for TS developmentnpm install typescript --save-dev
Install typescript as a development dependency
1 2 3 4 |
|
TS configuration
- npx tsc --init
will create a typescript default configuration file tsconfig.json - declaration
used to specify whether to compile After completion, the corresponding *.d.ts file is generated. The default is false - outdir
Define the directory after TS compilation. If there is no declaration, the default compiled file location will be the same as the ts source file. In the same location
1 |
|
1 2 3 4 5 |
|
Create the project entry file
Createserver.tsFile
1 2 3 4 5 6 7 8 9 10 11 12 13 |
|
1 2 3 4 5 6 |
|
Compile TS
Our next step is to build and deploy our TS Node.js application. Since in the production environment, we do not run the TS version, but the compiled JS. Now let’s compile the projectModify the package.json file and add the following commandnpm run tsc
will be compiled according to the configuration of our tsconfig.json Our project and output to the specified directory- ##npm run start:prod
will run our compiled JS file
1
2
3
4
"scripts": {"tsc":"tsc","start:prod":"node dist/server.js"}Copy after loginThen test locally
1 2 3 4 |
|
Access http://localhost:3000/ through the browser, the access is successful, then we deploy and publish our application

Here we mainly use two methods to distribute and deploy the compiled TS project to various environments
The form of npm dependency package- docker container method
NPM life cycle hook
Some special life cycle hooks will be triggered when the specified operation is triggered. Here we will use the "prepare" hook, which will be triggered once before executing the npm publish command to publish to NPM. So we can compile the TS application at this time.
Specify publishing filesThrough the "files" field we can define which files should be included when publishing the NPM package. If this attribute is omitted, the default will be ["*" ], all files will be uploaded.
The following is the modified package.json
1 2 3 4 5 6 7 8 9 10 11 12 13 |
|
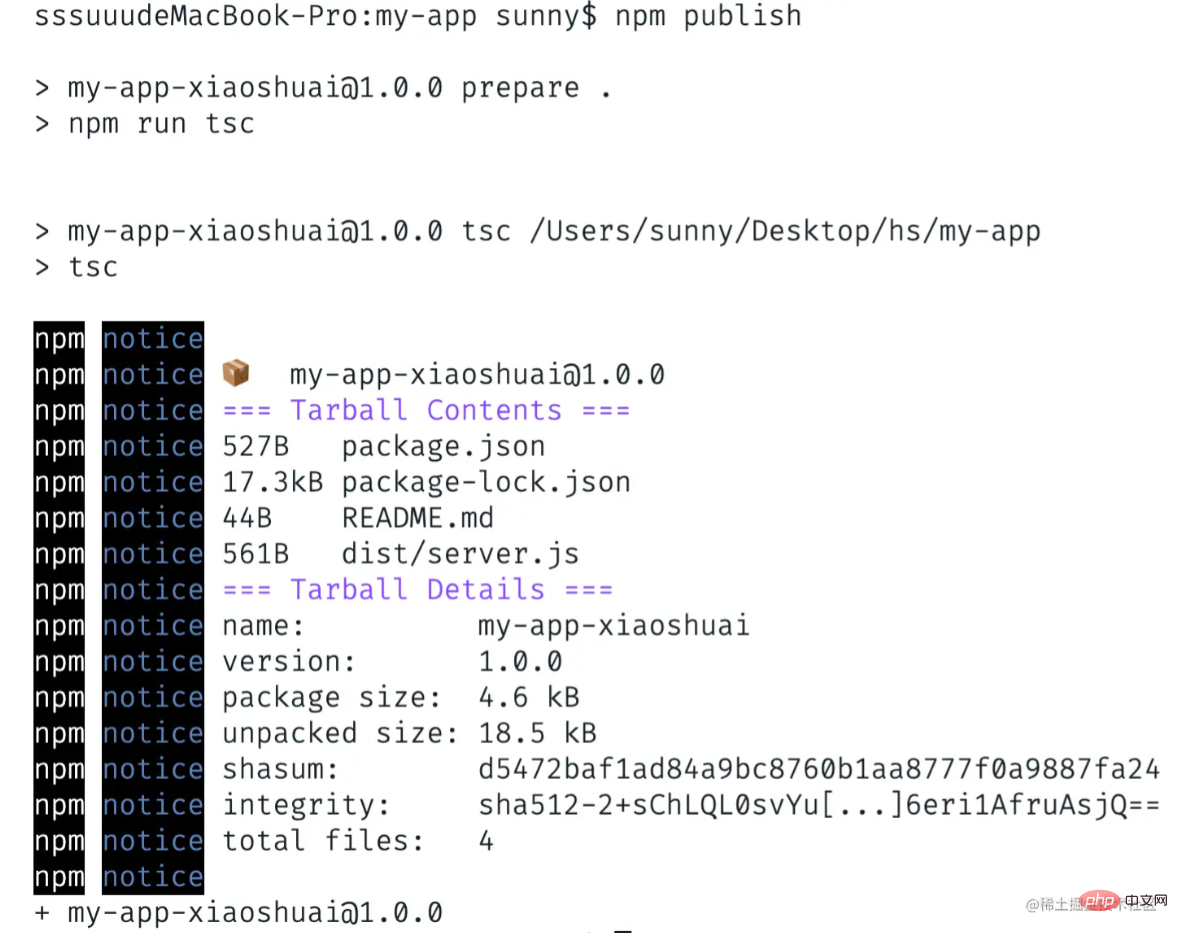
After modifying the package.json configuration, we run the npm publish command, Publish our application to NPM
1 |
|
Output
 After successful publishing, you can see that there is an additional
Package

To publish our TS Node.js application as a container, we need Create a docker configuration file Dockerfile in the project root directory.
Let’s write the Dockerfile step by step
- Copy the compiled file into the container
- Copy package.json and package-lock.json into the container
- Use
- npm install
Install dependencies
Use - node build/ server.js
Run our application
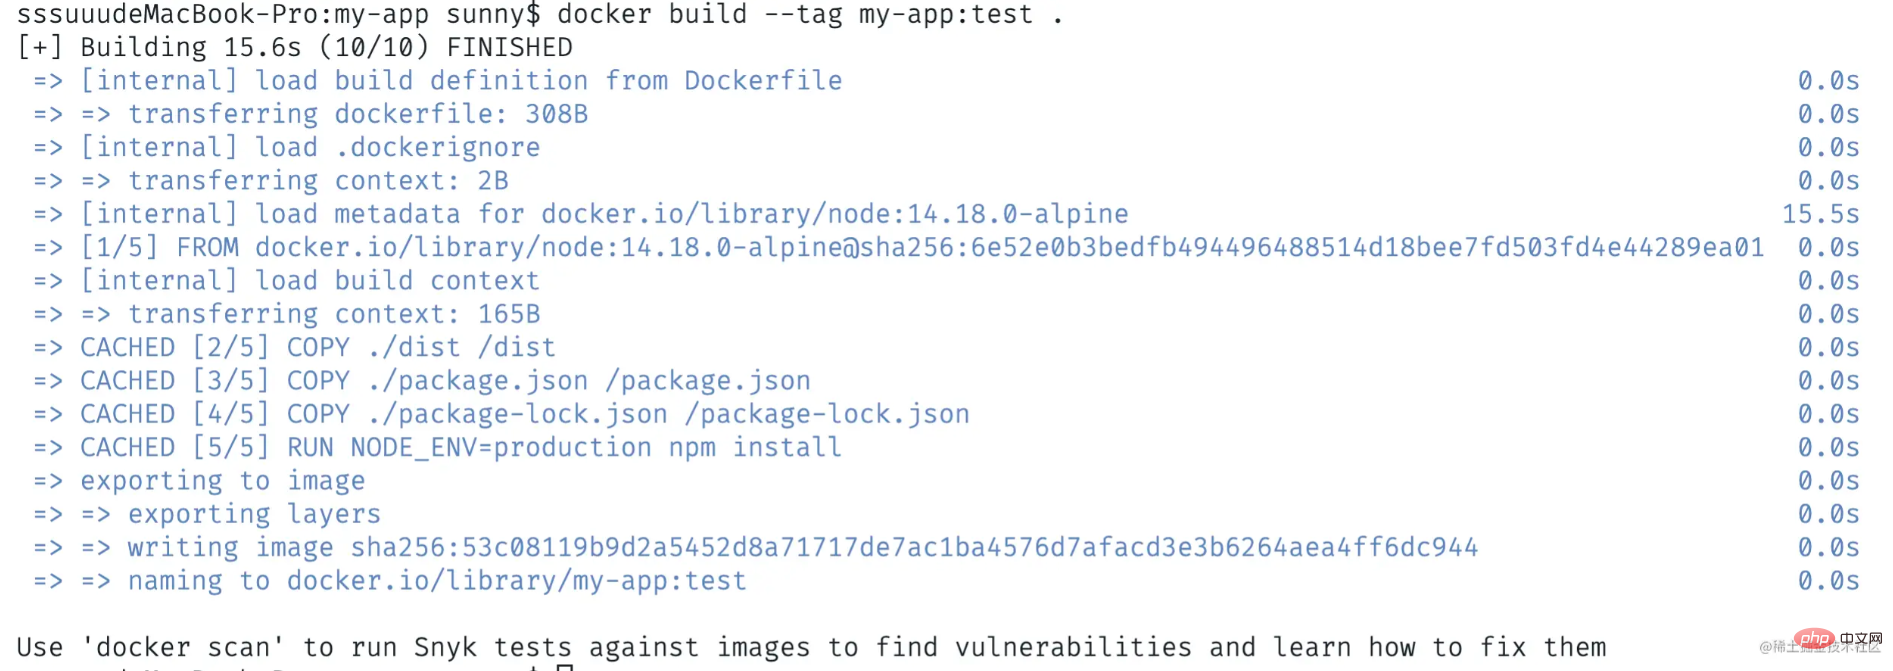
</li></ul><div class="code" style="position:relative; padding:0px; margin:0px;"><pre class='brush:php;toolbar:false;'># Node 版本 FROM node:14.18.0-alpine ARG NODE_ENV=production ENV NODE_ENV $NODE_ENV COPY ./dist /dist COPY ./package.json /package.json COPY ./package-lock.json /package-lock.json RUN NODE_ENV=$NODE_ENV npm install EXPOSE 3000 CMD ["node", "dist/server.js"]</pre><div class="contentsignin">Copy after login</div></div><p>现在我们可以在根目录中构建docker镜像,运行 <code>docker build --tag my-app:test .命令1
docker build --tag my-app:test .Copy after login成功后输出如下

接着我们运行容器,使用
docker run -p 3000:3000 -it my-app:test命令来运行我们的应用,可以看到程序成功运行在3000端口1
2
docker run -p 3000:3000 -it my-app:test# 服务启动成功,运行端口:3000Copy after login通过浏览器访问http://localhost:3000/,访问成功
源码
https://github.com/cmdfas/ts-node-express-deploy
总结
今天我们介绍了创建TS Node.js项目和部署它的基础知识,希望对大家有所帮助,能够用在现在或未来的项目中。
更多编程相关知识,请访问:编程视频!!
The above is the detailed content of Teach you step by step how to deploy a TS Node.js project correctly and quickly!. For more information, please follow other related articles on the PHP Chinese website!

Hot AI Tools

Undresser.AI Undress
AI-powered app for creating realistic nude photos

AI Clothes Remover
Online AI tool for removing clothes from photos.

Undress AI Tool
Undress images for free

Clothoff.io
AI clothes remover

Video Face Swap
Swap faces in any video effortlessly with our completely free AI face swap tool!

Hot Article

Hot Tools

Notepad++7.3.1
Easy-to-use and free code editor

SublimeText3 Chinese version
Chinese version, very easy to use

Zend Studio 13.0.1
Powerful PHP integrated development environment

Dreamweaver CS6
Visual web development tools

SublimeText3 Mac version
God-level code editing software (SublimeText3)

Hot Topics
 1393
1393
 52
52
 1206
1206
 24
24
 PHP and Vue: a perfect pairing of front-end development tools
Mar 16, 2024 pm 12:09 PM
PHP and Vue: a perfect pairing of front-end development tools. In today's era of rapid development of the Internet, front-end development has become increasingly important. As users have higher and higher requirements for the experience of websites and applications, front-end developers need to use more efficient and flexible tools to create responsive and interactive interfaces. As two important technologies in the field of front-end development, PHP and Vue.js can be regarded as perfect tools when paired together. This article will explore the combination of PHP and Vue, as well as detailed code examples to help readers better understand and apply these two
 C# development experience sharing: front-end and back-end collaborative development skills
Nov 23, 2023 am 10:13 AM
As a C# developer, our development work usually includes front-end and back-end development. As technology develops and the complexity of projects increases, the collaborative development of front-end and back-end has become more and more important and complex. This article will share some front-end and back-end collaborative development techniques to help C# developers complete development work more efficiently. After determining the interface specifications, collaborative development of the front-end and back-end is inseparable from the interaction of API interfaces. To ensure the smooth progress of front-end and back-end collaborative development, the most important thing is to define good interface specifications. Interface specification involves the name of the interface
 Questions frequently asked by front-end interviewers
Mar 19, 2024 pm 02:24 PM
In front-end development interviews, common questions cover a wide range of topics, including HTML/CSS basics, JavaScript basics, frameworks and libraries, project experience, algorithms and data structures, performance optimization, cross-domain requests, front-end engineering, design patterns, and new technologies and trends. . Interviewer questions are designed to assess the candidate's technical skills, project experience, and understanding of industry trends. Therefore, candidates should be fully prepared in these areas to demonstrate their abilities and expertise.
 Is Django front-end or back-end? check it out!
Jan 19, 2024 am 08:37 AM
Django is a web application framework written in Python that emphasizes rapid development and clean methods. Although Django is a web framework, to answer the question whether Django is a front-end or a back-end, you need to have a deep understanding of the concepts of front-end and back-end. The front end refers to the interface that users directly interact with, and the back end refers to server-side programs. They interact with data through the HTTP protocol. When the front-end and back-end are separated, the front-end and back-end programs can be developed independently to implement business logic and interactive effects respectively, and data exchange.
 Exploring Go language front-end technology: a new vision for front-end development
Mar 28, 2024 pm 01:06 PM
As a fast and efficient programming language, Go language is widely popular in the field of back-end development. However, few people associate Go language with front-end development. In fact, using Go language for front-end development can not only improve efficiency, but also bring new horizons to developers. This article will explore the possibility of using the Go language for front-end development and provide specific code examples to help readers better understand this area. In traditional front-end development, JavaScript, HTML, and CSS are often used to build user interfaces
 Django: A magical framework that can handle both front-end and back-end development!
Jan 19, 2024 am 08:52 AM
Django: A magical framework that can handle both front-end and back-end development! Django is an efficient and scalable web application framework. It is able to support multiple web development models, including MVC and MTV, and can easily develop high-quality web applications. Django not only supports back-end development, but can also quickly build front-end interfaces and achieve flexible view display through template language. Django combines front-end development and back-end development into a seamless integration, so developers don’t have to specialize in learning
 Combination of Golang and front-end technology: explore how Golang plays a role in the front-end field
Mar 19, 2024 pm 06:15 PM
Combination of Golang and front-end technology: To explore how Golang plays a role in the front-end field, specific code examples are needed. With the rapid development of the Internet and mobile applications, front-end technology has become increasingly important. In this field, Golang, as a powerful back-end programming language, can also play an important role. This article will explore how Golang is combined with front-end technology and demonstrate its potential in the front-end field through specific code examples. The role of Golang in the front-end field is as an efficient, concise and easy-to-learn
 Analysis of front-end engineer responsibilities: What is the main job?
Mar 25, 2024 pm 05:09 PM
Analysis of front-end engineer responsibilities: What is the main job? With the rapid development of the Internet, front-end engineers play a very important professional role, playing a vital role as a bridge between users and website applications. So, what do front-end engineers mainly do? This article will analyze the responsibilities of front-end engineers, let us find out. 1. Basic responsibilities of front-end engineers Website development and maintenance: Front-end engineers are responsible for the front-end development of the website, including writing the website’s HTML, CSS and JavaScr


