 Development Tools
 composer
 The most comprehensive and detailed Composer installation and configuration tutorial (win/linux)
The most comprehensive and detailed Composer installation and configuration tutorial (win/linux)
Installation and configuration of Composer under Windows and Linux
Introduction: Composer is a tool used by PHP to manage dependency relationships. You can declare the external libraries you depend on in your project, and Composer will install these dependent library files for you.
(1) Window installation
1.1 Download Composer
Composer official website download Composer.exe application (https ://getcomposer.org/)
1.2 Install Composer
The downloaded version is the latest Composer version and the PATH environment variable will be automatically set, so that you You can call Composer from any directory
- Select the version according to the local php configuration, and then install it in the next step
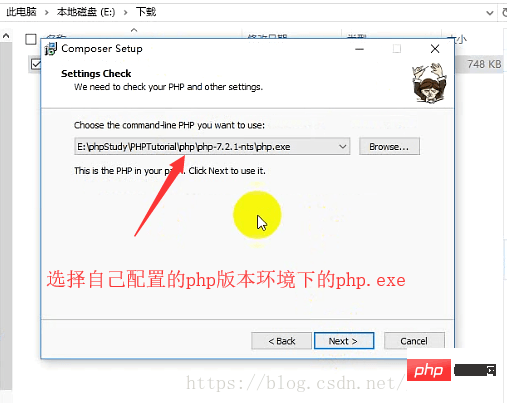
- ##Global configuration
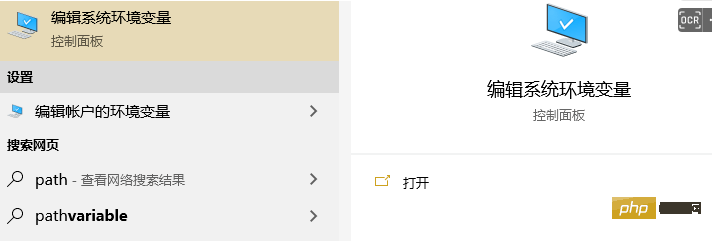
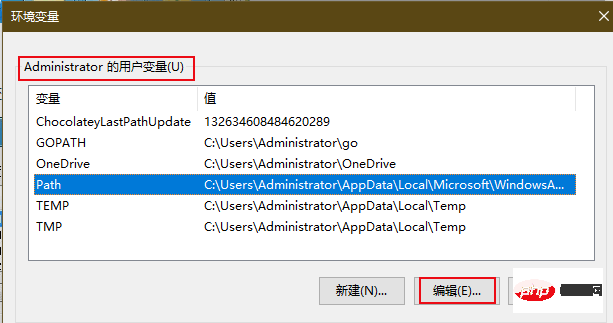
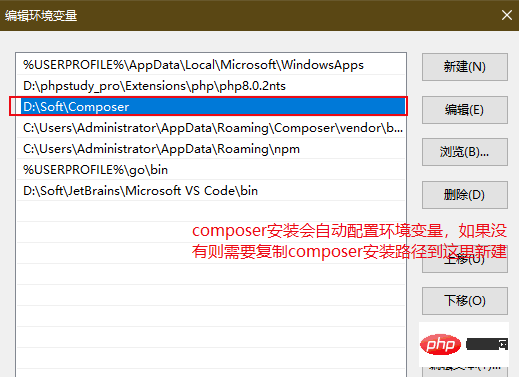
##1.3 Installation successful# win+R 输入cmd 进入C:\Users\Administrator>composer
______
/ ____/___ ____ ___ ____ ____ ________ _____
/ / / __ \/ __ `__ \/ __ \/ __ \/ ___/ _ \/ ___/
/ /___/ /_/ / / / / / / /_/ / /_/ (__ ) __/ /
\____/\____/_/ /_/ /_/ .___/\____/____/\___/_/
/_/
Composer version 2.1.9 2021-10-05 09:47:38
Copy after login
# win+R 输入cmd 进入C:\Users\Administrator>composer
 ______
 / ____/___  ____ ___  ____  ____  ________  _____
 / /   / __ \/ __ `__ \/ __ \/ __ \/ ___/ _ \/ ___/
/ /___/ /_/ / / / / / / /_/ / /_/ (__  )  __/ /
\____/\____/_/ /_/ /_/ .___/\____/____/\___/_/
 /_/
Composer version 2.1.9 2021-10-05 09:47:38
(2)Linux installation
2.1 Download Composer**# 进入根目录下载** [root@VM-12-9-centos /] curl -sS https://getcomposer.org/installer | php
Composer (version 2.1.9) successfully installed to: //composer.phar
Use it: php composer.phar #下载成功#友情提示:下载因为是外网可能会出现请求失败的情况,耐心多尝试下就成功了
Copy after login
If**# 进入根目录下载** [root@VM-12-9-centos /] curl -sS https://getcomposer.org/installer | php Composer (version 2.1.9) successfully installed to: //composer.phar Use it: php composer.phar #下载成功#友情提示:下载因为是外网可能会出现请求失败的情况,耐心多尝试下就成功了
- the download fails frequently
- , you can use the Alibaba Cloud image download
[root@VM-12-9-centos /] curl -sS mirrors.aliyun.com/composer/compos...
2.2 Global configuration# 复制composer.phar到/usr/local/bin/目录下生成composer的目录,方便全局使用[root@VM-12-9-centos /] mv composer.phar /usr/local/bin/composer
Copy after login
# 复制composer.phar到/usr/local/bin/目录下生成composer的目录,方便全局使用[root@VM-12-9-centos /] mv composer.phar /usr/local/bin/composer
2.3 Replacement Mirror source
Because foreign websites will be very slow in domestic requests, we can replace the domestic source to speed up the download of the source. There are many domestic mirror sources. Here are some commonly used ones. You can choose one of them according to your needs.- Alibaba Cloud Composer Image
- [Recommendation]
composer config -g repo.packagist composer https://mirrors.aliyun.com/composer/
Copy after login国产Cloud Composer Image -
composer config -g repo.packagist composer https://packagist.phpcomposer.com
Copy after loginTencent Cloud Composer Image -
composer config -g repo.packagist composer https://mirrors.cloud.tencent.com/composer/
Copy after loginHuawei Cloud Composer Image -
composer config -g repo.packagist composer https://repo.huaweicloud.com/repository/php/
Copy after login安长Cloud Composer Image -
composer config -g repo.packagist composer https://php.cnpkg.org/
Copy after login2.4 Installation successful
[root@VM-12-9-centos etc]# composer
 ______
/ ____/___  ____ ___  ____  ____  ________  _____
/ /   / __ \/ __ `__ \/ __ \/ __ \/ ___/ _ \/ ___/
/ /___/ /_/ / / / / / / /_/ / /_/ (__  )  __/ /
\____/\____/_/ /_/ /_/ .___/\____/____/\___/_/
                  /_/
Composer version 2.1.9 2021-10-05 09:47:38
Copy after login
##3.1 View version
composer --version# 查看版本会看到当前版本以及更新时间[root@VM-12-9-centos /]# composer --versionComposer version 2.1.9 2021-10-05 09:47:38
3.2 Version upgrade
# 升级将默认升到最新版本composer self-update# **友情提示:** 版本升级命令将会从官方版本去下载composer,phar镜像,速度将受限!强烈建议全局配置加速镜像
3.3 Execute diagnostic command
composer diagnose
3.4 Clear Caching
composer clear
3.5 Project update composer.lock
composer update --lock
3.6 Debugging
# **Composer调试只需要在命令前加上-vvv就可以打印出错信息** # 例如下载laravel命名为blog的项目composer -vvv create-project laravel/laravel blog
3.7 Installation Dependent package
# 该命令仅限在项目根目录操作
composer install
3.8 Update dependent package
# 该命令仅限在项目根目录操作

### 更新所有依赖包
composer update

### 更新指定依赖包
composer update monolog/monolog

### 更新多个指定依赖包
composer update monolog/monolog symfony/dependency-injection

### 根据通配符匹配更新依赖包
composer update monolog/monolog symfony/*
3.9 Remove dependent package
# 移除指定依赖包
composer remove monolog/monolog

# 根据通配符匹配移除依赖包
composer remove monolog/monolog symfony/*
3.10 Search for dependent packages
# 搜索依赖包:输出包及其描述信息
composer search monolog

# 只搜索包:--only-name
composer search --only-name monolog

# 根据通配符搜索依赖包
composer search mono*
3.11 View dependent packages
# **该命令仅限项目根目录使用**# 查看**当前项目**已安装的依赖包
composer show

# 根据通配符**当前项目**进行筛选
composer show laravel*# 查看**当前项目**指定依赖包
composer show laravel/tinker
(4) Project usage
in In projects, we often use composer to download and update packages or libraries, but we often encounter various problems during use. Next, we'll address common issues.
4.1 宝塔面板安装Composer
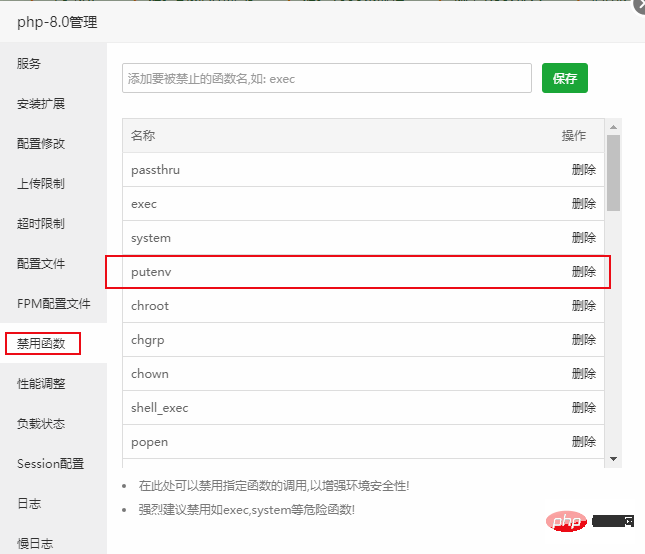
composer 的安装需要php开启 putenv 函数 ,否则会安装失败!由于 putenv 函数可以设置特定的环境变量而被认为是一个潜在的安全漏洞,因此php在安装之初是默认禁止它的!
- 删除禁用函数
宝塔面板出于对于安全的考虑,自动禁用了一些函数;因为安装Composer也会用到相应的函数,我们应该先删除在安装 Composer 。 安装 Composer 需要删除 的 PHP 禁用函数:putenv() 友情提示: 在使用 Composer 的时候需要根据项目的php版本去做操作(安装多少个PHP版本就需要相对应删除),下图示范是根据 php-8.0 来操作的。
composer 的安装需要php开启 putenv 函数 ,否则会安装失败!由于 putenv 函数可以设置特定的环境变量而被认为是一个潜在的安全漏洞,因此php在安装之初是默认禁止它的!
宝塔面板出于对于安全的考虑,自动禁用了一些函数;因为安装Composer也会用到相应的函数,我们应该先删除在安装 Composer 。 安装 Composer 需要删除 的 PHP 禁用函数:putenv() 友情提示: 在使用 Composer 的时候需要根据项目的php版本去做操作(安装多少个PHP版本就需要相对应删除),下图示范是根据 php-8.0 来操作的。
- 非宝塔面板管理操作
# 进入php.ini配置文件编辑--->搜索(输入 / 进入搜索模式,搜索disable_functions)# ---->依次删除putenv**### 第一步:查询php.ini路径** [root@VM-12-9-centos 74]# find / -name "php.ini"/www/server/php/56/etc/php.ini
/www/server/php/80/etc/php.ini
/www/server/php/74/etc/php.ini

**### 第二步:依次编辑php.ini文件** : 删除函数putenvvim /www/server/php/56/etc/php.ini

**### 第三步:搜索“disable_functions”** # ESC + :+ / + disable_functions 将会自动定位到指定位置disable_functions = passthru,exec,system,**putenv** ,chroot,chgrp,chown,shell_exec,popen,proc_open,pcntl_exec,ini_alter,ini_restore,dl,openlog,syslog,readlink,symlink,popepassthru,pcntl_alarm,pcntl_fork,pcntl_waitpid,pcntl_wait,pcntl_wifexited,pcntl_wifstopped,pcntl_wifsignaled,pcntl_wifcontinued,pcntl_wexitstatus,pcntl_wtermsig,pcntl_wstopsig,pcntl_signal,pcntl_signal_dispatch,pcntl_get_last_error,pcntl_strerror,pcntl_sigprocmask,pcntl_sigwaitinfo,pcntl_sigtimedwait,pcntl_exec,pcntl_getpriority,pcntl_setpriority,imap_open,apache_setenv

**### 第四步:保存文件并退出** ESC + :wq!
- 友情提醒
宝塔是支持php多版本的,如果在不同版本的php中使用 composer ,只要开启php中的 putenv 函数即可!
4.2 PHP项目使用
- composer.lock已经存在
使用场景: 由于下载代码或者git代码或者部署项目时会存在
composer.lock, 首先应该删除composer.lock
# 项目中composer.lock已经存在,需要进行删除,再重新安装,安装成功后会重新生成composer.lock文件# 案例示范:**### 第一步:进入项目blog根目录** cd www\wwwroot\blog

**### 第二步:删除composer.lock文件** # 删除请核对文件名后谨慎操作rm -rf composer.lock

**### 第三步:重新composer安装项目所需包** composer install
(五)结尾
提示: 不要忘了经常执行
composer selfupdate以保持 Composer 一直是最新版本哦!原文地址:https://learnku.com/articles/62076
The above is the detailed content of The most comprehensive and detailed Composer installation and configuration tutorial (win/linux). For more information, please follow other related articles on the PHP Chinese website!

Hot AI Tools

Undresser.AI Undress
AI-powered app for creating realistic nude photos

AI Clothes Remover
Online AI tool for removing clothes from photos.

Undress AI Tool
Undress images for free

Clothoff.io
AI clothes remover

Video Face Swap
Swap faces in any video effortlessly with our completely free AI face swap tool!

Hot Article

Hot Tools

Notepad++7.3.1
Easy-to-use and free code editor

SublimeText3 Chinese version
Chinese version, very easy to use

Zend Studio 13.0.1
Powerful PHP integrated development environment

Dreamweaver CS6
Visual web development tools

SublimeText3 Mac version
God-level code editing software (SublimeText3)

Hot Topics
 1387
1387
 52
52
 Laravel Introduction Example
Apr 18, 2025 pm 12:45 PM
Laravel is a PHP framework for easy building of web applications. It provides a range of powerful features including: Installation: Install the Laravel CLI globally with Composer and create applications in the project directory. Routing: Define the relationship between the URL and the handler in routes/web.php. View: Create a view in resources/views to render the application's interface. Database Integration: Provides out-of-the-box integration with databases such as MySQL and uses migration to create and modify tables. Model and Controller: The model represents the database entity and the controller processes HTTP requests.
 Solve caching issues in Craft CMS: Using wiejeben/craft-laravel-mix plug-in
Apr 18, 2025 am 09:24 AM
When developing websites using CraftCMS, you often encounter resource file caching problems, especially when you frequently update CSS and JavaScript files, old versions of files may still be cached by the browser, causing users to not see the latest changes in time. This problem not only affects the user experience, but also increases the difficulty of development and debugging. Recently, I encountered similar troubles in my project, and after some exploration, I found the plugin wiejeben/craft-laravel-mix, which perfectly solved my caching problem.
 Improve Doctrine entity serialization efficiency: application of sidus/doctrine-serializer-bundle
Apr 18, 2025 am 11:42 AM
I had a tough problem when working on a project with a large number of Doctrine entities: Every time the entity is serialized and deserialized, the performance becomes very inefficient, resulting in a significant increase in system response time. I've tried multiple optimization methods, but it doesn't work well. Fortunately, by using sidus/doctrine-serializer-bundle, I successfully solved this problem, significantly improving the performance of the project.
 How to view the version number of laravel? How to view the version number of laravel
Apr 18, 2025 pm 01:00 PM
The Laravel framework has built-in methods to easily view its version number to meet the different needs of developers. This article will explore these methods, including using the Composer command line tool, accessing .env files, or obtaining version information through PHP code. These methods are essential for maintaining and managing versioning of Laravel applications.
 Use Composer to solve dependency injection: application of PSR-11 container interface
Apr 18, 2025 am 07:39 AM
I encountered a common but tricky problem when developing a large PHP project: how to effectively manage and inject dependencies. Initially, I tried using global variables and manual injection, but this not only increased the complexity of the code, it also easily led to errors. Finally, I successfully solved this problem by using the PSR-11 container interface and with the power of Composer.
 How to use Composer to improve the security of Laravel applications: Applications of wiebenieuwenhuis/laravel-2fa library
Apr 18, 2025 am 11:36 AM
When developing a Laravel application, I encountered a common but difficult problem: how to improve the security of user accounts. With the increasing complexity of cyber attacks, a single password protection is no longer enough to ensure the security of users' data. I tried several methods, but the results were not satisfactory. Finally, I installed the wiebenieuwenhuis/laravel-2fa library through Composer and successfully added two-factor authentication (2FA) to my application, greatly improving security.
 How to quickly build Fecmall advanced project templates using Composer
Apr 18, 2025 am 11:45 AM
When developing an e-commerce platform, it is crucial to choose the right framework and tools. Recently, when I was trying to build a feature-rich e-commerce website, I encountered a difficult problem: how to quickly build a scalable and fully functional e-commerce platform. I tried multiple solutions and ended up choosing Fecmall's advanced project template (fecmall/fbbcbase-app-advanced). By using Composer, this process becomes very simple and efficient. Composer can be learned through the following address: Learning address
 Use Composer to solve the dilemma of recommendation systems: andres-montanez/recommendations-bundle
Apr 18, 2025 am 11:48 AM
When developing an e-commerce website, I encountered a difficult problem: how to provide users with personalized product recommendations. Initially, I tried some simple recommendation algorithms, but the results were not ideal, and user satisfaction was also affected. In order to improve the accuracy and efficiency of the recommendation system, I decided to adopt a more professional solution. Finally, I installed andres-montanez/recommendations-bundle through Composer, which not only solved my problem, but also greatly improved the performance of the recommendation system. You can learn composer through the following address:


