How to install vue state management: 1. Create a Vue-based project and execute the "npm install" command to install the dependencies; 2. In the control command line, execute the "npm install vuex --save" command to install Just Vuex.

The operating environment of this tutorial: windows7 system, vue2.9.6 version, DELL G3 computer.
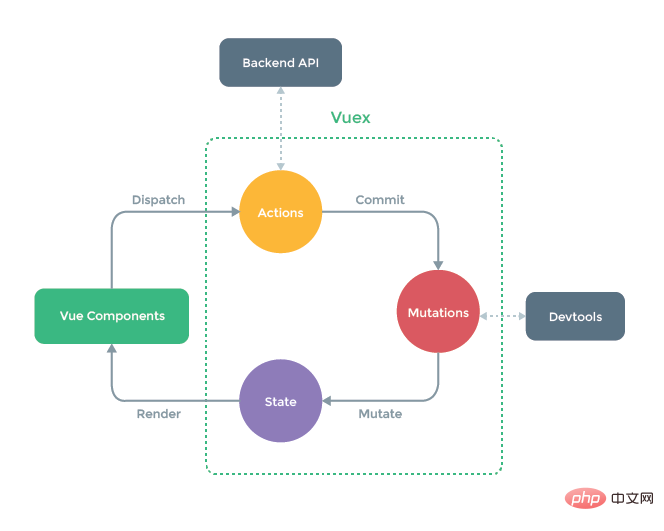
Vuex is a state management model developed specifically for Vue.js applications. It uses centralized storage to manage the state of all components of the application, and uses corresponding rules to ensure that the state changes in a predictable way. Vuex is also integrated into Vue's official debugging tool devtools extension, providing advanced debugging functions such as zero-configuration time-travel debugging, status snapshot import and export, etc.
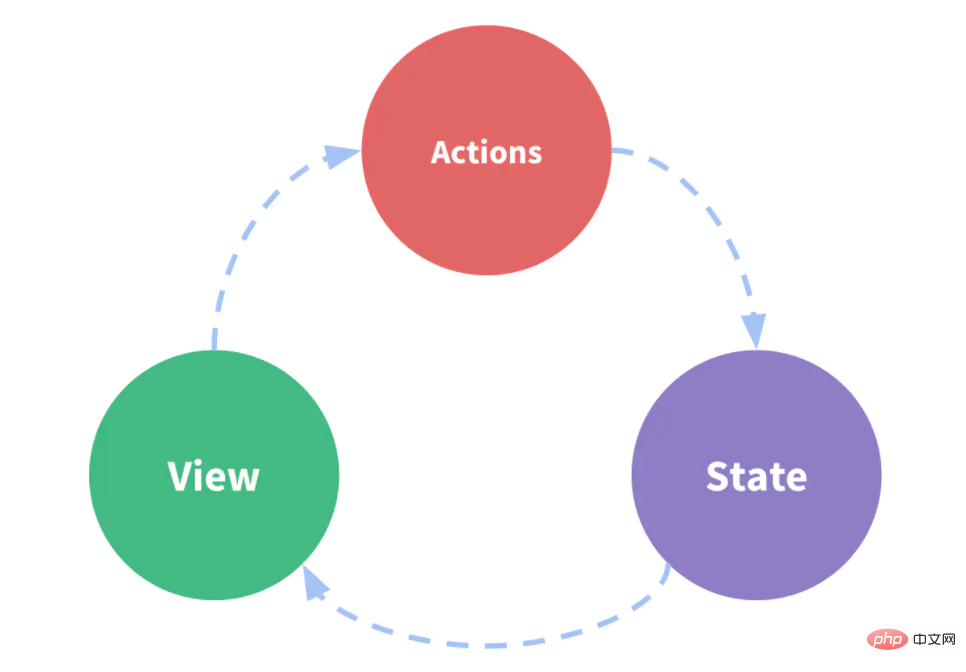
This state self-management application includes the following parts:
The following is a minimalist representation of the concept of "one-way data flow":


Flux architecture is like glasses: you know when you need it.
# 全局安装 vue-cli
$ npm install --global vue-cli
# 创建一个基于 webpack 模板的新项目
$ vue init webpack my-project
# 安装依赖,走你
$ cd my-project
$ npm install
$ npm run dev
Use npm package management tool to install vuex. Just enter the following command in the control command line.
npm install vuex --save
import Vue from 'vue'
import Vuex from 'vuex'

Vue.use(Vuex)
const store = new Vuex.Store({
  state: {
    count: 0
  },
  mutations: {
    increment (state) {
      state.count++
    }
  }
})
store.commit('increment')

/* eslint-disable no-new */
new Vue({
  el: '#app',
  template: `<p>{{ count }}</p>`,
  computed: {
    count () {
      return store.state.count
    }
  }
})It should be pointed out that we submit mutation instead of directly changing store.state.count because we want to track the state changes more clearly.
import Vue from 'vue';
import Vuex from 'vuex';
Vue.use(Vuex);
import store from './store/store'
import Vue from 'vue'
import App from './App'
import router from './router'
import store from './store/store'
Vue.config.productionTip = false
/* eslint-disable no-new */
new Vue({
el: '#app',
router,
store,
template: 'state: {
count: 1
},export default new Vuex.Store({
name: 'store',
state: {
count: 1
}
})count.vue. In the template we use {{$store.state.count}}Output the value of count (note: since the store has been injected into the vue instance before, there is no need to reference it again).
<template>
<p>
<h2>{{msg}}</h2>
<hr/>
<h3>{{$store.state.count}}</h3>
</p>
</template>
<script>
export default {
data () {
return {
msg: 'Hello Vuex'
}
},
computed: {
count () {
return this.$store.state.count
}
}
}
</script>mutations: {
increment (state) {
state.count += 1
},
decrement (state) {
state.count -= 1
}
}<p> <button @click="$store.commit('increment')">+</button> <button @click="$store.commit('decrement')">-</button> </p>
{
   path: '/count',
   name: 'Count',
   component: Count
}state,这个就是我们说的访问状态对象,它就是我们SPA(单页应用程序)中的共享值。
访问状态对象赋值给内部对象,也就是把stroe.js中的值,赋值给我们模板里data中的值。有三种赋值方式
1、通过computed的计算属性直接赋值
computed属性可以在输出前,对data中的值进行改变,我们就利用这种特性把store.js中的state值赋值给我们模板中的data值。
    computed:{
        count(){
            return this.$store.state.count;
        }
}这里需要注意的是return this.$store.state.count这一句,一定要写this,要不你会找不到$store的。这种写法很好理解,但是写起来是比较麻烦的,那我们来看看第二种写法。
2、通过mapState的对象来赋值
我们首先要用import引入mapState。
import {mapState} from 'vuex'然后还在computed计算属性里写如下代码:(根据需要选用一种方法即可)
   computed: mapState({
    // 箭头函数可使代码更简练
    count: state => state.count,   // es6写法,function (state) { return state.count }

    // 传字符串参数 'count' 等同于 `state => state.count`
    countAlias: 'count',

    // 为了能够使用 `this` 获取局部状态,必须使用常规函数
    countPlusLocalState (state) {
      return state.count + this.localCount
    }
})3、当映射的计算属性的名称与 state 的子节点名称相同时,我们也可以给 mapState 传一个字符串数组。
computed: mapState([
  // 映射 this.count 为 store.state.count
  'count'
])
4、还可以采用简化写法(个人比较喜欢这种写法本质上和第三种是一个意思,后面的mutations中也有类似的写法)
// 使用对象展开运算符将此对象混入到外部对象中
    ...mapState({
      num: 'count'
})这个算是最简单的写法了,在实际项目开发当中也经常这样使用。
相关推荐:《vue.js教程》
The above is the detailed content of How to install vue state management Vuex. For more information, please follow other related articles on the PHP Chinese website!