AngularHow does style isolation work? In this article, I will talk with you about Angular’s style isolation implementation mechanism. I hope it will be helpful to you!

angular takes components as the basic unit. We write components one by one, and then combine these components into a component tree. However, during the development process, it is often necessary to override the style of the child component in the parent component. For example, now we have a parent component and a child component. There is a span in the child component, and the font of the span is red. [Related tutorial recommendations: "angular tutorial"]
As shown below:
//child.componet.html
<span class="child-span">child span</span>
//child.component.scss
.child-span {
  color: red;
}If now, the parent component wants the content of span in the child component to turn green. You can use the following method
//parent.component.scss
app-child {
  ::ng-deep {
    .child-span {
      color: green;
    }
  }
}In the parent component, use the ::ng-deep keyword provided by angular to override the style.
Now let's modify the content of the child component and add a layer of div outside the span. After all, the component in reality will definitely not be as simple as just one layer.
//child.componet.html
<div class="child-div">
  <span class="child-span">child span</span>
</div>
//child.component.scss
.child-div {
  .child-span {
    color: red;
  }
}At this time, we will find that the content of span in the child component has changed back to red, and the previous overwriting by the parent component has not taken effect.
::ng-deep Why does it fail? In other words, when will ::ng-deep be effective? When does it expire? Furthermore, how is the style isolation between components and components in Angular achieved?
css provides element selector, id selector, class selector and attribute selector.
For the issue of style isolation in angular, the more important thing is the attribute selector. In the attribute selector, you can accurately select an element by adding any attribute to it. For example,
a[target] {
    background-color:yellow;
}Through the above selector, we can select all a elements with the target attribute.
The other one is descendant selector.
In CSS, the descendant selector selects all descendant elements of the specified element. For example,
[attr] span {
    color: green;
}This selector will first select the element with the attr attribute, and then select all descendant span elements of this element.
With css attribute selectors and descendant selectors, you have all the tools needed to complete component style isolation. The style isolation and ::ng-deep of components in angular are completely based on these two contents.
We now return to the previous angular component The content of the child component is
//child.componet.html
<span class="child-span">child span</span>
//child.component.scss
.child-span {
  color: red;
}The content of the parent component is
//parent.component.html
<app-child></app-child>
After the above two components are processed by angular, the generated html content is as follows

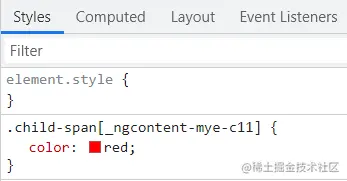
As you can see, the parent component has two more attributes, _ngcontent-mye-c13 and _nghost-mye-c12, while the child component has more _ngcontent- Two attributes, mye-c12 and _nghost-mye-c11, are added to the span tag under the child component. The _nghost-mye-c11 attribute is added.
For the scss file, after angular processing, the .child-span class in the child component becomes .child-span[_nghost-mye-c11] .

Through these contents, we can see that angular's style isolation is completed using attribute selectors.
_nghost-mye-c11 This attribute will only appear in the child component. The .child-span class in child.component.scss becomes .child-span[_nghost-mye-c11], according to the mechanism of the attribute selector mentioned before , .child-span will only take effect on the content of the child component.
If you also write a .child-span class selector inside the parent component, the generated class selector will be .child-span[_nghost-mye-c12 ]. The _nghost-mye-c12 attribute belongs to the parent component, so this .child-span class will only take effect on the content of the parent component. It will not affect the child component, and the isolation of styles is completed.
Then why can we use ::ng-deep to overwrite the content in the child component in the parent component? ?
//parent.component.scss
app-child {
  ::ng-deep {
    .child-span {
      color: green;
    }
  }
}上面的内容通过angular 处理以后,生成的内容为app-child[_nghost-mye-c12] .child_span。位于::ng-deep 后面的类,去掉了自动添加的属性,这时候根据css 的后代选择器机制。app-child[_nghost-mye-c12] .child_span会选中child 组件下面的所有带有.child_span 类的标签,而且根据优先级计算,app-child[_nghost-mye-c12] .child_span 高于child 组件生成的.child_span[_nghost-mye-c11] ,于是child 组件中的样式就被覆盖掉了。
那为什么有时候::ng-deep不能够覆盖掉呢?比如,当child 组件代码如下的时候
//child.componet.html
<div class="child-div">
  <span class="child-span">child span</span>
</div>
//child.component.scss
.child-div {
  .child-span {
    color: red;
  }
}这时候即使我们发现child 组件中span 的颜色依旧是红色。
实际上原因也不复杂,检查angular 生成的样式文件后,我们可以发现,之所以没有把覆盖掉,纯粹是因为css 选择器优先级的问题。child 组件生成的样式.child-div[_nghost-mye-c11] .child-span[_nghost-mye-c11] 优先级高于parent 组件生成的样式app-child[_nghost-mye-c12] .child。于是,我们看到的效果就是parent 组件中的::ng-deep 没有生效,一种比较快捷的做法是直接在parent 组件的样式后面加上!important。但是由于!important 权重太高的原因,并不是很推荐。歪个楼,在发现angular ::ng-deep 失效的原因之前,很遗憾,项目之前很多地方的都有这种用法。
另一个方法就是,既然是因为优先级不够,那么提高parent 组件生成的样式的优先级就可以了。 修改parent 组件的代码为
:host {
  app-child {
    ::ng-deep {
      .child-div {
        .child-span {
          color: green;
        }
      }
    }
  }
}这时候,parent 组件生成的样式[_nghost-mye-c12] app-child[_nghost-mye-c12] .child-div .child-span 优先级高于child 组件生成的样式.child-div[_nghost-mye-c11] .child-span[_nghost-mye-c11] ,child 组件中span 的颜色也就变绿了。
这里我们使用了:host 关键字,接下来,我们简单看看它的作用。
上个小结中,parent 组件生成的样式是[_nghost-mye-c12] app-child[_nghost-mye-c12] .child-div .child-span,如果去掉:host,就会发现,生成的样式变成了app-child[_nghost-mye-c12] .child-div .child-span。所以:host 关键字只是给生成的样式,加上了parent 组件属性字段而已。
那这个:host有什么用呢?
常见的作用有两个。
一个就是选择当前的组件标签,在angular 中,我们自定义的组件,比如这里的parent 组件app-parent 和child 组件app-child 最后都是会渲染到生成的html 文档上的。如果需要选中这些标签,就可以使用:host 关键字。
另一个作用还是隔离样式,将class 类写在:host 内部,这个类无论如何也是不可能泄漏到全局去的。实际上,通过前面的内容分析可以发现,不写在:host 里面,也不会泄漏到全局。但是如果出现了以下的情况
//some.component.scss
::ng-deep {
    .random-class {
        xxxx
    }
}这个类经过angular 处理以后,最后会变为
.random-class {
    xxxx
}random-class 将会对全局造成影响。
但是如果把它包裹在:host 内部,哪怕使用了::ng-deep 关键字,最多也只会影响到这个组件的后代元素。
所以在angular 官方文档中有下面的一段话。
Applying the
::ng-deeppseudo-class to any CSS rule completely disables view-encapsulation for that rule. Any style with::ng-deepapplied becomes a global style. In order to scope the specified style to the current component and all its descendants, be sure to include the:hostselector before::ng-deep. If the::ng-deepcombinator is used without the:hostpseudo-class selector, the style can bleed into other components.
我们首先介绍了css 的属性选择器和后代选择器。通过分析angular 生成的html 和css 代码,发现angular 的样式隔离功能,完全是基于这两个内容实现的。接下来,分析了::ng-deep 有时候生效,有时候有不生效的原因。最后介绍了使用:host 关键字来完全避免样式泄漏到全局。
更多编程相关知识,请访问:编程视频!!
The above is the detailed content of Let's talk about Angular's style isolation implementation mechanism. For more information, please follow other related articles on the PHP Chinese website!