

What is react stateless writing?

The stateless writing method of react is "{props.xxx}". Its stateless component is mainly used to define templates, receive data passed from the parent component props, and use the expression of "{props.xxx}" Put props into the template.

The operating environment of this article: Windows7 system, react17.0.1, Dell G3.
What is the way to write stateless react?
How to write stateless components and stateful components in React and the differences
##Components in React are mainly divided into two categories: stateless components and stateful components. 1. Stateless components are mainly used to define templates, receive data passed from parent component props, and use the expression {
props.xxx} to stuff props into the template. Stateless components should keep the template pure to facilitate component reuse. Create stateless components as follows: var Header = (props) = (
<p>{props.xxx}</p>
);
export default HeaderCopy after loginCopy after login
2. Stateful components are mainly used to define interaction logic and business data (if Redux is used, business data can be extracted and managed uniformly), use {var Header = (props) = (
<p>{props.xxx}</p>
);
export default Headerthis The expression of .state.xxx} mounts the business data to the instance of the container component (stateful components can also be called container components, and stateless components can also be called display components), and then pass props to the display component, and the display component receives props, stuff props into the template. Create a stateful component as follows: class Home extends React.Component {
constructor(props) {
super(props);
};
render() {
return (
<header></header> //也可以写成<header></header>
)
}
}
export default HomeCopy after loginCopy after login
This is the official default writing method. In the constructor, a parameter must be passed by default, and the super() method must be called to obtain an instance of the subclass. But what is more confusing is why these parameters should be passed, and what is the use of passing these parameters? Because from the perspective of the component in render(), the constructor can obtain the props attribute on the component instance without passing parameters. As follows: class Home extends React.Component {
constructor(props) {
super(props);
};
render() {
return (
<header></header> //也可以写成<header></header>
)
}
}
export default Homeclass Home extends React.Component {
constructor() {
super();
};
render (){
return(
<p>
<header></header>
</p>
);
};
};
class Header extends React.Component {
constructor() {
super();
};
render() {
return (
<p>{this.props.name}</p> //构造函数中并没有传递props属性,这里通过{this.props.name}依然获取到了值
);
};
};Copy after loginCopy after login
This is easier to understand, because the render() method is a method on the subcomponent prototype. When obtaining instance attributes, you must access them through this. If you remove this, you will not be able to obtain them. Then the question comes, what if we want to access props in the constructor? At this point, we need to pass a props parameter in the constructor constructor so that we can access the props attribute on the subcomponent instance. As follows:
class Home extends React.Component {
constructor() {
super();
};
render (){
return(
<p>
<header></header>
</p>
);
};
};
class Header extends React.Component {
constructor() {
super();
};
render() {
return (
<p>{this.props.name}</p> //构造函数中并没有传递props属性,这里通过{this.props.name}依然获取到了值
);
};
};class Header extends React.Component {
constructor(props) {
super();
this.name = props.name; //获取到子组件实例上的props.name属性,赋值给实例属性name
};
render() {
return (
<p>{this.name}</p>
);
};
};class Header extends React.Component {
constructor(props) {
super(props);
this.state = {
nameOne: props.name,
nameTwo: this.props.name //super()方法中传递了props属性,this.props才可以获取到name属性
}
};
render() {
return (
<p>{this.state.nameOne}{this.state.nameTwo}</p>
);
};
};Copy after loginCopy after login
In fact, the values of props.name and this.props.name are the same, but they are still different. The props in props.name are the attribute props of the subcomponent. , but the props in this.props.name are not the attribute props of the subcomponent. Although the values are the same, these props are actually passed to the parent class Component when the super method is called, so this.props .name obtains the props attribute in the Component parent class. Take a look at the source code of React: class Header extends React.Component {
constructor(props) {
super(props);
this.state = {
nameOne: props.name,
nameTwo: this.props.name //super()方法中传递了props属性,this.props才可以获取到name属性
}
};
render() {
return (
<p>{this.state.nameOne}{this.state.nameTwo}</p>
);
};
};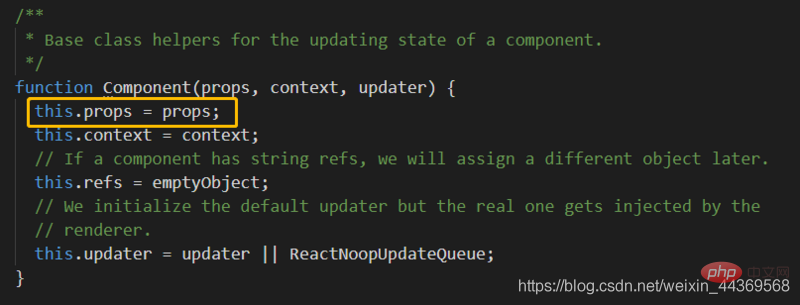 Did you find that the subclass super method passes the props parameters to the parent class Component, and the Component mounts the props parameters to its instance attribute props. Therefore, you can only use this in the constructor by passing the props parameter to the super method, props.xxx
class Header extends React.Component {
constructor(props) {
super();
this.state = {
nameOne: this.props.name,
nameTwo: this.props
};
console.log(this.props.name); //报错
console.log(this.props); //undifined
};
render() {
return (
<p>{this.state.nameOne}{this.state.nameTwo}</p>
);
};
}; Why does this.props print out undefined? Because props are parameters passed in when calling the subcomponent, props cannot be accessed inside the constructor, so for this.props.name, there is no doubt that an error will be reported.
constructor(props) {
super(props);
this.state = {
name: props.name
}
};Components in React are mainly divided into two categories: stateless components and stateful components.
1. Stateless components are mainly used to define templates, receive data passed from parent component props, and use the expression {props.xxx} to stuff props into the template. Stateless components should keep the template pure to facilitate component reuse. Create stateless components as follows:
var Header = (props) = (
    <p>{props.xxx}</p>
);
export default Header2. Stateful components are mainly used to define interaction logic and business data (if Redux is used, business data can be extracted and managed uniformly), use {this The expression of .state.xxx} mounts the business data to the instance of the container component (stateful components can also be called container components, and stateless components can also be called display components), and then pass props to the display component, and the display component receives props, stuff props into the template. Create a stateful component as follows:
class Home extends React.Component {
    constructor(props) {
        super(props);
    };
    render() {
        return (
            <header></header>  //也可以写成<header></header>
        )
    }
}
export default HomeThis is the official default writing method. In the constructor, a parameter must be passed by default, and the super() method must be called to obtain an instance of the subclass. But what is more confusing is why these parameters should be passed, and what is the use of passing these parameters?
Because from the perspective of the component in render(), the constructor can obtain the props attribute on the component instance without passing parameters. As follows:
class Home extends React.Component {
    constructor() {
        super();
    };
    render (){
        return(
            <p>
                <header></header>
            </p>
        );
    };
};

class Header extends React.Component {
    constructor() {
        super();
    };
    render() {
        return (
            <p>{this.props.name}</p>  //构造函数中并没有传递props属性,这里通过{this.props.name}依然获取到了值
        );
    };
};This is easier to understand, because the render() method is a method on the subcomponent prototype. When obtaining instance attributes, you must access them through this. If you remove this, you will not be able to obtain them.
Then the question comes, what if we want to access props in the constructor? At this point, we need to pass a props parameter in the constructor constructor so that we can access the props attribute on the subcomponent instance. As follows:
class Header extends React.Component {
    constructor(props) {
        super();
        this.name = props.name;  //获取到子组件实例上的props.name属性,赋值给实例属性name
    };
    render() {
        return (
            <p>{this.name}</p>
        );
    };
};There is another question, why do we need to pass a props attribute in the super(props) method? Look at the following example:
class Header extends React.Component {
    constructor(props) {
        super(props);
        this.state = {
            nameOne: props.name,
            nameTwo: this.props.name  //super()方法中传递了props属性,this.props才可以获取到name属性
        }
    };
    render() {
        return (
            <p>{this.state.nameOne}{this.state.nameTwo}</p>
        );
    };
};In fact, the values of props.name and this.props.name are the same, but they are still different. The props in props.name are the attribute props of the subcomponent. , but the props in this.props.name are not the attribute props of the subcomponent. Although the values are the same, these props are actually passed to the parent class Component when the super method is called, so this.props .name obtains the props attribute in the Component parent class. Take a look at the source code of React:
Did you find that the subclass super method passes the props parameters to the parent class Component, and the Component mounts the props parameters to its instance attribute props. Therefore, you can only use this in the constructor by passing the props parameter to the super method, props.xxx
If the props parameter is not passed in the super method, an error will be reported when getting the value of this.props.name. Obtain this.props and display it as undiffed: as follows:
class Header extends React.Component {
    constructor(props) {
        super();
        this.state = {
            nameOne: this.props.name,
            nameTwo: this.props
        };
        console.log(this.props.name);  //报错
        console.log(this.props);  //undifined
    };
    render() {
        return (
            <p>{this.state.nameOne}{this.state.nameTwo}</p>
        );
    };
};The essence of this writing method is to assign an instance attribute props of the sub-component Header to the instance attributes state.nameOne and state.nameTwo of the sub-component Header. In simple terms , that is, the Header subcomponent creates a state attribute, and then assigns its own props attribute to its own state attribute.
Why does this.props print out undefined? Because props are parameters passed in when calling the subcomponent, props cannot be accessed inside the constructor, so for this.props.name, there is no doubt that an error will be reported.
So, for the props parameters in the constructor and the props parameters in super, if you don’t use this.props and props in the constructor, you don’t need to pass parameters at all. Otherwise, pass the reference. But the values obtained are the same for this.props and props, so you can write either one. However, both parameters are written in the official documentation. So for the sake of rigor, let’s write them all down.
However, I personally still like this way of writing.
constructor(props) {
    super(props);
    this.state = {
        name: props.name
    }
};What does not add this is value, what adds this is key.
Recommended learning: "react video tutorial"
The above is the detailed content of What is react stateless writing?. For more information, please follow other related articles on the PHP Chinese website!

Hot AI Tools

Undresser.AI Undress
AI-powered app for creating realistic nude photos

AI Clothes Remover
Online AI tool for removing clothes from photos.

Undress AI Tool
Undress images for free

Clothoff.io
AI clothes remover

Video Face Swap
Swap faces in any video effortlessly with our completely free AI face swap tool!

Hot Article
Hot Tools

Notepad++7.3.1
Easy-to-use and free code editor

SublimeText3 Chinese version
Chinese version, very easy to use

Zend Studio 13.0.1
Powerful PHP integrated development environment

Dreamweaver CS6
Visual web development tools

SublimeText3 Mac version
God-level code editing software (SublimeText3)
Hot Topics
 1386
1386
 52
52

 How to build a real-time chat app with React and WebSocket
Sep 26, 2023 pm 07:46 PM
How to build a real-time chat app with React and WebSocket
Sep 26, 2023 pm 07:46 PM
How to build a real-time chat application using React and WebSocket Introduction: With the rapid development of the Internet, real-time communication has attracted more and more attention. Live chat apps have become an integral part of modern social and work life. This article will introduce how to build a simple real-time chat application using React and WebSocket, and provide specific code examples. 1. Technical preparation Before starting to build a real-time chat application, we need to prepare the following technologies and tools: React: one for building
 Guide to React front-end and back-end separation: How to achieve decoupling and independent deployment of front-end and back-end
Sep 28, 2023 am 10:48 AM
Guide to React front-end and back-end separation: How to achieve decoupling and independent deployment of front-end and back-end
Sep 28, 2023 am 10:48 AM
React front-end and back-end separation guide: How to achieve front-end and back-end decoupling and independent deployment, specific code examples are required In today's web development environment, front-end and back-end separation has become a trend. By separating front-end and back-end code, development work can be made more flexible, efficient, and facilitate team collaboration. This article will introduce how to use React to achieve front-end and back-end separation, thereby achieving the goals of decoupling and independent deployment. First, we need to understand what front-end and back-end separation is. In the traditional web development model, the front-end and back-end are coupled
 How to build simple and easy-to-use web applications with React and Flask
Sep 27, 2023 am 11:09 AM
How to build simple and easy-to-use web applications with React and Flask
Sep 27, 2023 am 11:09 AM
How to use React and Flask to build simple and easy-to-use web applications Introduction: With the development of the Internet, the needs of web applications are becoming more and more diverse and complex. In order to meet user requirements for ease of use and performance, it is becoming increasingly important to use modern technology stacks to build network applications. React and Flask are two very popular frameworks for front-end and back-end development, and they work well together to build simple and easy-to-use web applications. This article will detail how to leverage React and Flask
 How to build a reliable messaging app with React and RabbitMQ
Sep 28, 2023 pm 08:24 PM
How to build a reliable messaging app with React and RabbitMQ
Sep 28, 2023 pm 08:24 PM
How to build a reliable messaging application with React and RabbitMQ Introduction: Modern applications need to support reliable messaging to achieve features such as real-time updates and data synchronization. React is a popular JavaScript library for building user interfaces, while RabbitMQ is a reliable messaging middleware. This article will introduce how to combine React and RabbitMQ to build a reliable messaging application, and provide specific code examples. RabbitMQ overview:
 React code debugging guide: How to quickly locate and solve front-end bugs
Sep 26, 2023 pm 02:25 PM
React code debugging guide: How to quickly locate and solve front-end bugs
Sep 26, 2023 pm 02:25 PM
React code debugging guide: How to quickly locate and resolve front-end bugs Introduction: When developing React applications, you often encounter a variety of bugs that may crash the application or cause incorrect behavior. Therefore, mastering debugging skills is an essential ability for every React developer. This article will introduce some practical techniques for locating and solving front-end bugs, and provide specific code examples to help readers quickly locate and solve bugs in React applications. 1. Selection of debugging tools: In Re
 React Router User Guide: How to implement front-end routing control
Sep 29, 2023 pm 05:45 PM
React Router User Guide: How to implement front-end routing control
Sep 29, 2023 pm 05:45 PM
ReactRouter User Guide: How to Implement Front-End Routing Control With the popularity of single-page applications, front-end routing has become an important part that cannot be ignored. As the most popular routing library in the React ecosystem, ReactRouter provides rich functions and easy-to-use APIs, making the implementation of front-end routing very simple and flexible. This article will introduce how to use ReactRouter and provide some specific code examples. To install ReactRouter first, we need
 How to build a fast data analysis application using React and Google BigQuery
Sep 26, 2023 pm 06:12 PM
How to build a fast data analysis application using React and Google BigQuery
Sep 26, 2023 pm 06:12 PM
How to use React and Google BigQuery to build fast data analysis applications Introduction: In today's era of information explosion, data analysis has become an indispensable link in various industries. Among them, building fast and efficient data analysis applications has become the goal pursued by many companies and individuals. This article will introduce how to use React and Google BigQuery to build a fast data analysis application, and provide detailed code examples. 1. Overview React is a tool for building
 How to package and deploy front-end applications using React and Docker
Sep 26, 2023 pm 03:14 PM
How to package and deploy front-end applications using React and Docker
Sep 26, 2023 pm 03:14 PM
How to use React and Docker to package and deploy front-end applications. Packaging and deployment of front-end applications is a very important part of project development. With the rapid development of modern front-end frameworks, React has become the first choice for many front-end developers. As a containerization solution, Docker can greatly simplify the application deployment process. This article will introduce how to use React and Docker to package and deploy front-end applications, and provide specific code examples. 1. Preparation Before starting, we need to install
