How to make the image display in the upper left corner with css
Method: 1. Use the "element {background-image:url(picture element);}" statement to set the image as the background image of the element; 2. Use the "element {background-position:left top;}" ” statement to position the background image and display it in the upper right corner.

The operating environment of this tutorial: Windows 7 system, CSS3&&HTML5 version, Dell G3 computer.
How to display css images in the upper left corner
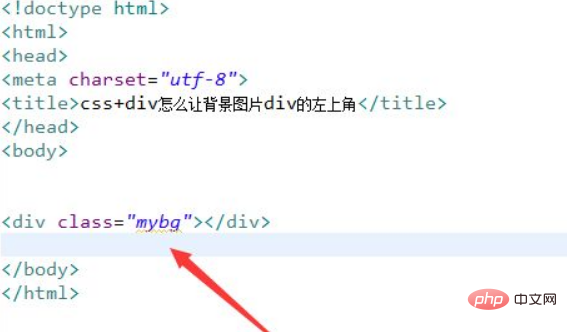
1. Create a new html file, named test.html, to explain css div How to make the background image the upper left corner of the div. Create a module using div for testing. Add a class attribute to the div tag and set it to mybg.

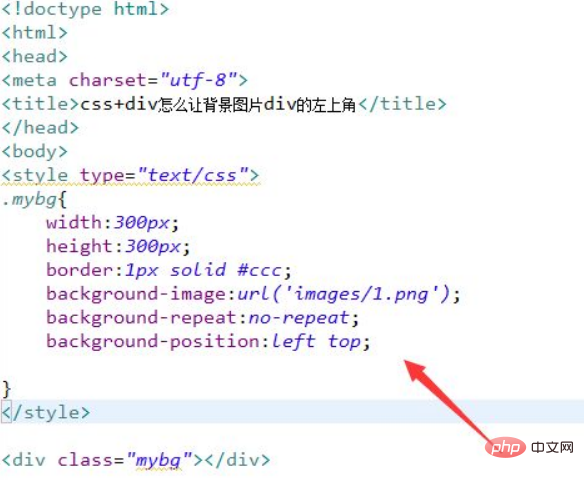
#2. In the css tag, set the style of the div through class, define its width as 300px, height as 300px, and border as 1px. Then set the background image to 1.png through the background-image attribute, set the background image to not be tiled through background-repeat, and set the background-position attribute to "left top" to control the background image in the upper left corner.

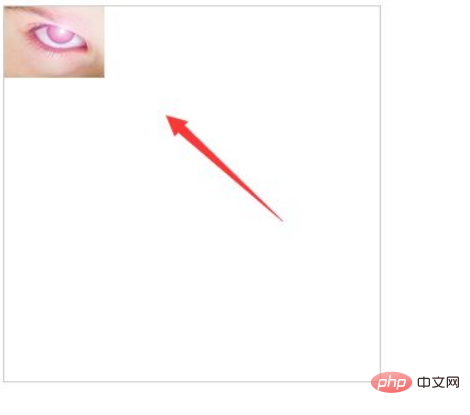
Open the test.html file in the browser to check the effect.

Summary:
1. Use div to create a module and add a class attribute to the div tag.
2. In the css tag, set the style of the div through class, define its width as 300px, height as 300px, and border as 1px.
3. In the css tag, set the background image to 1.png through the background-image attribute, set the background image to not be tiled through background-repeat, and set the background-position attribute to "left top". Control the background image in the upper left corner.
(Learning video sharing: css video tutorial)
The above is the detailed content of How to make the image display in the upper left corner with css. For more information, please follow other related articles on the PHP Chinese website!

Hot AI Tools

Undresser.AI Undress
AI-powered app for creating realistic nude photos

AI Clothes Remover
Online AI tool for removing clothes from photos.

Undress AI Tool
Undress images for free

Clothoff.io
AI clothes remover

AI Hentai Generator
Generate AI Hentai for free.

Hot Article

Hot Tools

Notepad++7.3.1
Easy-to-use and free code editor

SublimeText3 Chinese version
Chinese version, very easy to use

Zend Studio 13.0.1
Powerful PHP integrated development environment

Dreamweaver CS6
Visual web development tools

SublimeText3 Mac version
God-level code editing software (SublimeText3)

Hot Topics
 What is node in js
May 07, 2024 pm 09:06 PM
Nodes are entities in the JavaScript DOM that represent HTML elements. They represent a specific element in the page and can be used to access and manipulate that element. Common node types include element nodes, text nodes, comment nodes, and document nodes. Through DOM methods such as getElementById(), you can access nodes and operate on them, including modifying properties, adding/removing child nodes, inserting/replacing nodes, and cloning nodes. Node traversal helps navigate within the DOM structure. Nodes are useful for dynamically creating page content, event handling, animation, and data binding.
 What language is the browser plug-in written in?
May 08, 2024 pm 09:36 PM
Browser plug-ins are usually written in the following languages: Front-end languages: JavaScript, HTML, CSS Back-end languages: C++, Rust, WebAssembly Other languages: Python, Java
 How to set unknown attributes in vscode vscode method to set unknown attributes
May 09, 2024 pm 02:43 PM
1. First, open the settings icon in the lower left corner and click the settings option. 2. Then, find the CSS column in the jumped window. 3. Finally, change the drop-down option in the unknownproperties menu to the error button.
 Graphical steps for setting the default properties of CSS in Visual Studio 2019
May 09, 2024 pm 02:01 PM
1. Open Visual Studio 2019, find its option settings, and click CSS. 2. Here you can see the technical settings of the following attributes. 3. Now you can set text and fill borders here. 4. At this time, you can also set the floating positioning here. 5. At this moment, you can also set the border and background here to complete the operation. 6. Finally, click the OK button here to set the CSS default properties.
 How to isolate styles in components in vue
May 09, 2024 pm 03:57 PM
Style isolation in Vue components can be achieved in four ways: Use scoped styles to create isolated scopes. Use CSS Modules to generate CSS files with unique class names. Organize class names using BEM conventions to maintain modularity and reusability. In rare cases, it is possible to inject styles directly into the component, but this is not recommended.
 How to wrap alert in javascript
May 08, 2024 pm 10:00 PM
How to wrap the alert box in JavaScript: use \n escape character: const myString = "First line\nSecond line\nThird line"; alert(myString);Use HTML <br> tag: const myString = " First line<br>Second line<br>Third line"; alert(myString); Set the CSS white-space property: const myString = First line, Second line, Third line; alert(myString);
 How to register for Bitstamp exchange pro? Is it safe? Is it formal?
Aug 13, 2024 pm 06:36 PM
How to register BitstampPro? Visit the BitstampPro website. Fill in your personal information and email address. Create a password and accept the terms. Verify email address. Is BitstampPro safe? Authentication required. Enforce the use of two-factor authentication. Most assets are stored in cold storage. Use HTTPS to encrypt communication. Conduct regular security audits. Is BitstampPro legitimate? Registered in Luxembourg. Regulated by the Luxembourg Financial Supervisory Committee. Comply with anti-money laundering and know-your-customer regulations.
 The difference between v-show and v-if in vue
May 09, 2024 pm 01:48 PM
The main difference between v-show and v-if in Vue is: v-show: controls the display of elements by changing the display style attribute. It is lightweight and performance-friendly for elements that frequently switch to display/hide; but it will retain the space occupied by the elements. , may cause flickering. v-if: Insert or delete elements through conditions, affecting the layout flow and avoiding flickering; however, the cost of destroying and re-creating elements is high, and it is not suitable for frequently switching displayed/hidden elements.


