 WeChat Applet
 Mini Program Development
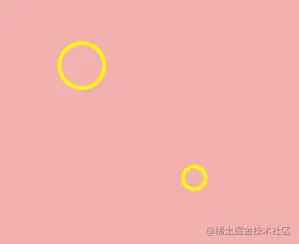
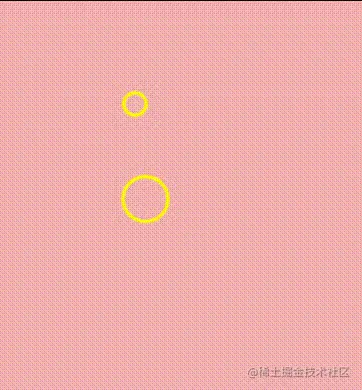
 Learn how to implement the canvas drag function in the mini program through an example
Learn how to implement the canvas drag function in the mini program through an example
This article will explain how to implement the canvas drag element function of the WeChat applet through code examples. I hope it will be helpful to everyone!

<canvas type="2d" id="myCanvas" style="max-width:90%"></canvas>
Copy after login
data data<canvas type="2d" id="myCanvas" style="max-width:90%"></canvas>
// 鼠标状态
statusConfig : {
      idle: 0,       //正常状态
      Drag_start: 1, //拖拽开始
      Dragging: 2,   //拖拽中
},
// canvas 状态
canvasInfo : {
   // 圆的状态
   status: 0,
   // 鼠标在在圆圈里位置放里头
   dragTarget: null,
   // 点击圆时的的位置
   lastEvtPos: {x: null, y: null},
},onLoad: function (options) {
// 设置画布,获得画布的上下文 ctx
this.getCanvas();
},
getCanvas(){
// 根据id获取canvas元素,微信小程序无法使用document, 我们需要使用wx.createSelectorQuery()来代替
const query = wx.createSelectorQuery()
query.select('#myCanvas')
.fields({ node: true, size: true })
.exec((res) => {
const canvas = res[0].node
// 设置画布的比例
canvas.width="500";
canvas.height="600";
const ctx = canvas.getContext('2d')
// 在画布上画两个圆,将ctx传递过去绘画
this.drawCircle(ctx, 100, 100, 20);
this.drawCircle(ctx, 200, 200, 10);
// 将我们绘画的信息保存起来,之后移动后需要清空画板重新画
var circles = []
circles.push({x: 100, y: 100, r: 20});
circles.push({x: 200, y: 200, r: 10});
// 不要忘记保存哦
this.setData({
circles
})
})
},
// 画圆
drawCircle(ctx, cx, cy, r){
ctx.save()
ctx.beginPath()
ctx.strokeStyle = 'yellow'
ctx.lineWidth = 3
ctx.arc(cx, cy, r, 0, 2 * Math.PI)
ctx.stroke()
ctx.closePath()
ctx.restore()
}, 
<canvas type="2d" id="myCanvas"
 bindtouchstart="handleCanvasStart"  bindtouchmove="handleCanvasMove"  bindtouchend="handleCanvasEnd"
 style="height: 600px; width: 500px;">
</canvas>
Copy after login
<canvas type="2d" id="myCanvas" bindtouchstart="handleCanvasStart" bindtouchmove="handleCanvasMove" bindtouchend="handleCanvasEnd" style="height: 600px; width: 500px;"> </canvas>
| Trigger conditions | |
|---|---|
| Finger touch action starts | |
| Finger moves after touching | |
| The finger touch action is interrupted, such as an incoming call reminder, pop-up window | |
| The finger touch action ends | |
| Leave immediately after touching the finger |
handleCanvasStart(e){
    // 获取点击点的位置
    const canvasPosition = this.getCanvasPosition(e);
    // 判断点击点的位置在不在圈里,如果不在返回false, 在返回圆的信息
    const circleRef = this.ifInCircle(canvasPosition);
    const {canvasInfo, statusConfig} = this.data;
    // 在圆里的话,改变圆此时的状态信息
    if(circleRef){
      canvasInfo.dragTarget = circleRef;
      //改变拖动状态 idle -> Drag_start
      canvasInfo.status = statusConfig.Drag_start;
      canvasInfo.lastEvtPos = canvasPosition;
    }
    this.setData({
      canvasInfo
    })
  },
// 获取点击点的位置
getCanvasPosition(e){
    return{
      x: e.changedTouches[0].x,
      y: e.changedTouches[0].y
    }
},

// 看点击点击点是不是在圈里
ifInCircle(pos){
    const {circles} = this.data;
    for( let i = 0 ; i < circles.length; i++ ){
      // 判断点击点到圆心是不是小于半径
      if( this.getDistance(circles[i], pos) < circles[i].r ){
        return circles[i]
      }
    }
    return false
  },
// 获取两点之间的距离(数学公式)
getDistance(p1, p2){
    return Math.sqrt((p1.x-p2.x) ** 2 + (p1.y-p2.y) ** 2)
}Move after touching the finger, redraw the circle
handleCanvasMove(e){
    const canvasPosition = this.getCanvasPosition(e);
    const {canvasInfo, statusConfig, circles} = this.data;
    // 是拖拽开始状态,滑动的大小大于5(防抖)
    if( canvasInfo.status === statusConfig.Drag_start &&
      this.getDistance(canvasPosition, canvasInfo.lastEvtPos) > 5){
        // 改变拖动状态 Drag_start ->  Dragging
        canvasInfo.status = statusConfig.Dragging;
    }else if( canvasInfo.status === statusConfig.Dragging ){
        canvasInfo.dragTarget.x = canvasPosition.x;
        canvasInfo.dragTarget.y = canvasPosition.y;
        // 重新绘制
        const query = wx.createSelectorQuery()
        query.select('#myCanvas')
          .fields({ node: true, size: true })
          .exec((res) => {
            const canvas = res[0].node
            canvas.width="500";
            canvas.height="600";
            const ctx = canvas.getContext('2d')
            // 遍历circles,把圆重新画一遍
            circles.forEach(c => this.drawCircle(ctx, c.x, c.y, c.r))
          })
    }

    this.setData({
      canvasInfo,
    })
}The finger touch action ends, change the canvasInfo state to idle again
 handleCanvasEnd(e){
    const {canvasInfo, statusConfig} = this.data;
    if( canvasInfo.status === statusConfig.Dragging ){
    // 改变拖动状态 Dragging ->  idle
      canvasInfo.status = statusConfig.idle;
      this.setData({
        canvasInfo
      })
    }
} Learn from the bosses of Bilibili, but the gap between WeChat mini program and html canvas has already made me depressed
[Related learning recommendations:
小program development tutorialThe above is the detailed content of Learn how to implement the canvas drag function in the mini program through an example. For more information, please follow other related articles on the PHP Chinese website!

Hot AI Tools

Undresser.AI Undress
AI-powered app for creating realistic nude photos

AI Clothes Remover
Online AI tool for removing clothes from photos.

Undress AI Tool
Undress images for free

Clothoff.io
AI clothes remover

Video Face Swap
Swap faces in any video effortlessly with our completely free AI face swap tool!

Hot Article

Hot Tools

Notepad++7.3.1
Easy-to-use and free code editor

SublimeText3 Chinese version
Chinese version, very easy to use

Zend Studio 13.0.1
Powerful PHP integrated development environment

Dreamweaver CS6
Visual web development tools

SublimeText3 Mac version
God-level code editing software (SublimeText3)

Hot Topics
 1386
1386
 52
52
 Implement card flipping effects in WeChat mini programs
Nov 21, 2023 am 10:55 AM
Implementing card flipping effects in WeChat mini programs In WeChat mini programs, implementing card flipping effects is a common animation effect that can improve user experience and the attractiveness of interface interactions. The following will introduce in detail how to implement the special effect of card flipping in the WeChat applet and provide relevant code examples. First, you need to define two card elements in the page layout file of the mini program, one for displaying the front content and one for displaying the back content. The specific sample code is as follows: <!--index.wxml-->&l
 Alipay launched the 'Chinese Character Picking-Rare Characters' mini program to collect and supplement the rare character library
Oct 31, 2023 pm 09:25 PM
According to news from this site on October 31, on May 27 this year, Ant Group announced the launch of the "Chinese Character Picking Project", and recently ushered in new progress: Alipay launched the "Chinese Character Picking-Uncommon Characters" mini program to collect collections from the society Rare characters supplement the rare character library and provide different input experiences for rare characters to help improve the rare character input method in Alipay. Currently, users can enter the "Uncommon Characters" applet by searching for keywords such as "Chinese character pick-up" and "rare characters". In the mini program, users can submit pictures of rare characters that have not been recognized and entered by the system. After confirmation, Alipay engineers will make additional entries into the font library. This website noticed that users can also experience the latest word-splitting input method in the mini program. This input method is designed for rare words with unclear pronunciation. User dismantling
 How uniapp achieves rapid conversion between mini programs and H5
Oct 20, 2023 pm 02:12 PM
How uniapp can achieve rapid conversion between mini programs and H5 requires specific code examples. In recent years, with the development of the mobile Internet and the popularity of smartphones, mini programs and H5 have become indispensable application forms. As a cross-platform development framework, uniapp can quickly realize the conversion between small programs and H5 based on a set of codes, greatly improving development efficiency. This article will introduce how uniapp can achieve rapid conversion between mini programs and H5, and give specific code examples. 1. Introduction to uniapp unia
 How to use JavaScript to achieve the left and right drag switching effect of images?
Oct 21, 2023 am 09:27 AM
How to achieve the left and right drag switching effect of images with JavaScript? In modern web design, dynamic effects can increase user experience and visual appeal. The left and right drag switching effect of pictures is a common dynamic effect, which allows users to switch different content by dragging pictures. In this article, we will introduce how to use JavaScript to achieve this image switching effect and provide specific code examples. First, we need to prepare some HTML and CSS code to create an image containing multiple images
 What versions of html2canvas are there?
Aug 22, 2023 pm 05:58 PM
The versions of html2canvas include html2canvas v0.x, html2canvas v1.x, etc. Detailed introduction: 1. html2canvas v0.x, which is an early version of html2canvas. The latest stable version is v0.5.0-alpha1. It is a mature version that has been widely used and verified in many projects; 2. html2canvas v1.x, this is a new version of html2canvas.
 Learn the canvas framework and explain the commonly used canvas framework in detail
Jan 17, 2024 am 11:03 AM
Explore the Canvas framework: To understand what are the commonly used Canvas frameworks, specific code examples are required. Introduction: Canvas is a drawing API provided in HTML5, through which we can achieve rich graphics and animation effects. In order to improve the efficiency and convenience of drawing, many developers have developed different Canvas frameworks. This article will introduce some commonly used Canvas frameworks and provide specific code examples to help readers gain a deeper understanding of how to use these frameworks. 1. EaselJS framework Ea
 How to use JavaScript to drag and zoom images while limiting them to the container?
Oct 20, 2023 pm 04:19 PM
How does JavaScript implement dragging and zooming of images while limiting them to the container? In web development, we often encounter the need to drag and zoom images. This article will introduce how to use JavaScript to implement dragging and zooming of images and limit operations within the container. 1. Drag the picture To drag the picture, we can use mouse events to track the mouse position and move the picture position accordingly. The following is a sample code: //Get the picture element varimage
 uniapp implements how to use canvas to draw charts and animation effects
Oct 18, 2023 am 10:42 AM
How to use canvas to draw charts and animation effects in uniapp requires specific code examples 1. Introduction With the popularity of mobile devices, more and more applications need to display various charts and animation effects on the mobile terminal. As a cross-platform development framework based on Vue.js, uniapp provides the ability to use canvas to draw charts and animation effects. This article will introduce how uniapp uses canvas to achieve chart and animation effects, and give specific code examples. 2. canvas


