

How to set up linux php debugging environment

How to build the linux php debugging environment: 1. Download and install MySQL; 2. Enable php-fpm and listen to port 9000; 3. Decompress, compile and install PHP; 4. Modify the configuration file and install Nginx.

The operating environment of this article: ubuntu 16.04 system, PHP version 7.1, Dell G3 computer.
How to set up a linux php debugging environment?
Linux PHP development environment quick setup
The environment built is LNMP:
1. Install MySQL
This is very simple. I use Ubuntu, so use the apt source, download the deb file and follow the new installation document in order: a. Add apt library b. Update apt library c. Install d. Run MySQL
Download:
https://dev.mysql.com/downloads/repo/apt/
Documentation:
https://dev.mysql.com/doc/mysql-apt-repo-quick-guide/en/#apt-repo-fresh-install
2, PHP
here Turn on php-fpm and listen on port 9000.
Related documents:
http://php.net/manual/zh/install.unix.nginx.php
a. Download
https://www.php.net/downloads.phpwget https://www.php.net/distributions/php-7.1.33.tar.gz
Choose any image to download locally or get the download address and then wget to download it locally
b .Decompress, compile and install
tar zxf php-x.x.x
cd ../php-x.x.x./configure --prefix=/usr/local/php --enable-fpm --enable-pdo --with-pdo-mysql --enable-mysqlnd --with-mysqli --with-opensslmake
sudo make install
If you have streamlined control, you must add --prefix, so that the installation directory will be there
The problems you will encounter when executing in order include pcre, If zlib and libxml2 do not exist, then directly go to Baidu’s official website to obtain the latest version of the tar.gz format installation package and then decompress, compile and install it.
swoole's introductory manual
https://linkeddestiny.gitbooks.io/easy-swoole/content/book/chapter01/install.html
./configure --prefix=/usr/local/php \
--with-config-file-path=/etc/php \
--enable-fpm \
--enable-pcntl \
--enable-mysqlnd \
--enable-opcache \
--enable-sockets \
--enable-sysvmsg \
--enable-sysvsem \
--enable-sysvshm \
--enable-shmop \
--enable-zip \
--enable-soap \
--enable-xml \
--enable-mbstring \
--disable-rpath \
--disable-debug \
--disable-fileinfo \
--with-mysqli=mysqlnd \
--with-pdo-mysql=mysqlnd \
--with-pcre-regex \
--with-iconv \
--with-zlib \
--with-mcrypt \
--with-gd \
--with-openssl \
--with-mhash \
--with-xmlrpc \
--with-curl \
--with-imap-ssl
c. After the installation is completed, the configuration file (the official document was moved here), every line cannot be forgotten
sudo cp php.ini-development /usr/local/php/lib/php.ini
cp /usr/local/php/etc/php-fpm.conf.default /usr/local/php/etc/php-fpm.conf
cp sapi/fpm/php-fpm /usr/local/php/bin
Interlude: Prevent If the file does not exist, Nginx is prevented from sending the request to the back-end PHP-FPM module to avoid being attacked by malicious script injection
vim /usr/local/php/lib/php.ini
修改参数为:cgi.fix_pathinfo=0
Since I am not familiar with vim, I recommend sudo atom or sudo sublime. Open the graphical interface software.
d. The following is different from the PHP manual: (The following function is to let fpm read and configure PHP-FPM user groups and users and open the listening port 9000)
In fact, the manual says that /usr/local/etc/php-fpm.conf does not have user group configuration options at all. If you add it manually, it will report that the file cannot be found, or even Depressed, it should be set up like this
Create web user:
groupadd www-data
useradd -g www-data www-data
Openphp-fpm.conf
vim /usr/local/php/etc/php-fpm.conf
Find the bottom line:
include=NONEl/etc/php-fpm.d/*.conf
Change NONE to the real path:
include=/usr/local/php/etc/php-fpm.d/*.conf
Then add the user group and user information to this regular matching configuration file:
cd /usr/local/php/etc/php-fpm.d
sudo cp www.conf.default www.conf
vim /usr/local/php/etc/php-fpm.d/www.conf
Find the user settings and change the content as follows :
; Unix user/group of processes
; Note: The user is mandatory. If the group is not set, the default user's group;       will be used.
user = www-data
group = www-data
Enable FPM
/usr/local/bin/php-fpm
e and check whether it is successful:
netstat -tln | grep 9000
If you see TCP 9000 LISTEN, it means the configuration is successful. If there is no output, it means that port 9000 is not listening. Please try again
3. Install Nginx
The Chinese documentation of Nginx is confusing me
http://www.nginx.cn/installhttp://www.nginx.cn/doc/setup/nginx-ubuntu.html
These two The version is too old, PHP5 or something, or there are too many parameters to install, there are always various problems, and I don’t like apt to install, at least I don’t have so much freedom in version selection, and I have to use apt to delete, so I installed it in the simplest way. Just download, compile and install
Download
http://nginx.org/en/download.html
Choose a favorite version and download it
tar -zxvf
cd
./configure --prefix=/usr/local/nginx
make
make install
If you are prompted during configure that some software such as zlib does not exist, Baidu download tar Unzip the package and install it in the
installation directory answer:
After the installation is complete, go to /usr/local/nginx
Configuration file: /usr/local/nginx/conf/nginx .conf
Virtual host file directory:/usr/local/nginx/html
Execution file:/usr/local/nginx/sbin/nginx
Configuration file needs to be done What you get is to add index.php after a.index.html b. If it conforms to the .php rules, hand it over to port 9000
The port uses the default nginx:80 php:9000 and the virtual host directory uses the default /usr/local/ nginx/html
A total of two places are configured:
location / {
            root   html;
            index  index.html index.php index.htm;
}#location ~ \.php$ {# root html;# fastcgi_pass 127.0.0.1:9000;# fastcgi_index index.php;# fastcgi_param SCRIPT_FILENAME $document_root$fastcgi_script_name;# include fastcgi_params;#}Okay, now go to the execution directory
sudo ./nginx -s reopen
Start nginx
html directory and create a new test. Enter localhost/text.php in the PHP browser and you will see that the configuration is successful.

##PHP extension installation:
Reference Manualhttp://php.net/manual/zh/install.pecl.phpize.php
cd /home/username/php7.0.29/ext
cd curl
phpize
./configure --with-php-config=/usr/local/php/bin/php-config
make
make install
sudo apt-get install autoconf
Linux Simple and Commonly used instructions:
1. Find the httpd.conf file in the root directory:
find / -name httpd.conf
File (including subdirectories)Contains magic lines, this search is the content of the file:
grep -r magic /usr/src
尾行模式:/content Enter
sudo pkill php-fpm
./configure –with-php-config=/usr/local/php/bin/php-config –with-mysqli=/usr/bin/mysql_config
php_config找不到
sudo apt-get install libmysqlclient-dev
之后遇到make错误,mysqli.lo不存在,是因为某个.h文件未找到导致编译失败图示:
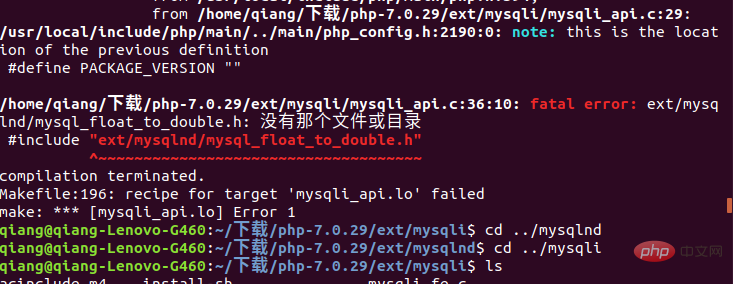
解决方案:
https://www.cnblogs.com/xiaoqian1993/p/6277771.html
6、ubuntu安装apt install资源占用
Could not get lock /var/lib/dpkg/lock!
sudo rm /var/cache/apt/archives/locksudo rm /var/lib/dpkg/lock
7、简单的定时任务
ubuntu 设定定时器任务:1、
    将ubuntu中crontab的编译器切换到VIM
    export EDITOR=vim
    修改后最好重启一下crontab    /etc/init.d/cron stop
    /etc/init.d/cron start

2、
    设定每一分钟向/home/hello.txt文本追加一个hello
    创建tesh.sh内容:
    echo hello >> /home/hello.txt
    创建文件hello.txt(注意所属用户、所属组、其他用户)的读写执行权限的分配.
    将.sh加入定时任务
    命令行输入
    crontab -e
编辑文本内容为 */1 * * * * sh /home/test.shlinux添加环境变量:
由于linux环境变量值中/usr/local/php并不属于,/usr/local/bin里面的倒是可以全局访问的,现在将php加入全局变量。
sudo vim /etc/profile//加入mysql、PHP的执行文件所在目录PATH=$PATH:/usr/local/php/bin:/usr/local/mysql/bin
export PATH//两行代码加到末尾然后执行以下指令使其生效source /etc/profile
或者添加快捷方式形式:
ln -s /usr/local/mysql/bin/mysql_config /usr/local/bin/mysql_config
nginx.conf | laravel
#user  www-data;
worker_processes  1;

events {
    worker_connections  1024;
}

http {
    include       mime.types;
    default_type  application/octet-stream;

    sendfile        on;
    keepalive_timeout  65;

    #gzip  on;
    #
    server {
        listen       8080;
        server_name  localhost;

        index index.html index.htm index.php;

        location / {
            root   /home/www/laravel/public;
            autoindex on;
            try_files $uri $uri/ /index.php?$query_string;
        }

        # pass the PHP scripts to FastCGI server listening on 127.0.0.1:9000
        #
        location ~ \.php$ {
            root           /home/www/laravel/public;
            fastcgi_pass   127.0.0.1:9000;
            fastcgi_index  index.php;
            fastcgi_param  SCRIPT_FILENAME  $document_root$fastcgi_script_name;
            include        fastcgi_params;
        }
    }

    server {
        listen       80;
        server_name  localhost;

        index index.html index.htm index.php;

        location / {
            root   /home/www;
            autoindex on;
            try_files $uri $uri/ /index.php?$query_string;
        }

        # pass the PHP scripts to FastCGI server listening on 127.0.0.1:9000
        #
        location ~ \.php$ {
            root           /home/www;
            fastcgi_pass   127.0.0.1:9000;
            fastcgi_index  index.php;
            fastcgi_param  SCRIPT_FILENAME  $document_root$fastcgi_script_name;
            include        fastcgi_params;
        }
    }


}composer安装
https://pkg.phpcomposer.com/#how-to-install-composer
推荐学习:《PHP视频教程》
The above is the detailed content of How to set up linux php debugging environment. For more information, please follow other related articles on the PHP Chinese website!

Hot AI Tools

Undresser.AI Undress
AI-powered app for creating realistic nude photos

AI Clothes Remover
Online AI tool for removing clothes from photos.

Undress AI Tool
Undress images for free

Clothoff.io
AI clothes remover

AI Hentai Generator
Generate AI Hentai for free.

Hot Article
Hot Tools

Notepad++7.3.1
Easy-to-use and free code editor

SublimeText3 Chinese version
Chinese version, very easy to use

Zend Studio 13.0.1
Powerful PHP integrated development environment

Dreamweaver CS6
Visual web development tools

SublimeText3 Mac version
God-level code editing software (SublimeText3)
Hot Topics
 1377
1377
 52
52

 How to open web.xml
Apr 03, 2025 am 06:51 AM
How to open web.xml
Apr 03, 2025 am 06:51 AM
To open a web.xml file, you can use the following methods: Use a text editor (such as Notepad or TextEdit) to edit commands using an integrated development environment (such as Eclipse or NetBeans) (Windows: notepad web.xml; Mac/Linux: open -a TextEdit web.xml)
 Four ways to implement multithreading in C language
Apr 03, 2025 pm 03:00 PM
Four ways to implement multithreading in C language
Apr 03, 2025 pm 03:00 PM
Multithreading in the language can greatly improve program efficiency. There are four main ways to implement multithreading in C language: Create independent processes: Create multiple independently running processes, each process has its own memory space. Pseudo-multithreading: Create multiple execution streams in a process that share the same memory space and execute alternately. Multi-threaded library: Use multi-threaded libraries such as pthreads to create and manage threads, providing rich thread operation functions. Coroutine: A lightweight multi-threaded implementation that divides tasks into small subtasks and executes them in turn.
 What is the Linux best used for?
Apr 03, 2025 am 12:11 AM
What is the Linux best used for?
Apr 03, 2025 am 12:11 AM
Linux is best used as server management, embedded systems and desktop environments. 1) In server management, Linux is used to host websites, databases, and applications, providing stability and reliability. 2) In embedded systems, Linux is widely used in smart home and automotive electronic systems because of its flexibility and stability. 3) In the desktop environment, Linux provides rich applications and efficient performance.
 How is Debian Hadoop compatibility
Apr 02, 2025 am 08:42 AM
How is Debian Hadoop compatibility
Apr 02, 2025 am 08:42 AM
DebianLinux is known for its stability and security and is widely used in server, development and desktop environments. While there is currently a lack of official instructions on direct compatibility with Debian and Hadoop, this article will guide you on how to deploy Hadoop on your Debian system. Debian system requirements: Before starting Hadoop configuration, please make sure that your Debian system meets the minimum operating requirements of Hadoop, which includes installing the necessary Java Runtime Environment (JRE) and Hadoop packages. Hadoop deployment steps: Download and unzip Hadoop: Download the Hadoop version you need from the official ApacheHadoop website and solve it
 Do I need to install an Oracle client when connecting to an Oracle database using Go?
Apr 02, 2025 pm 03:48 PM
Do I need to install an Oracle client when connecting to an Oracle database using Go?
Apr 02, 2025 pm 03:48 PM
Do I need to install an Oracle client when connecting to an Oracle database using Go? When developing in Go, connecting to Oracle databases is a common requirement...
 Is Debian Strings compatible with multiple browsers
Apr 02, 2025 am 08:30 AM
Is Debian Strings compatible with multiple browsers
Apr 02, 2025 am 08:30 AM
"DebianStrings" is not a standard term, and its specific meaning is still unclear. This article cannot directly comment on its browser compatibility. However, if "DebianStrings" refers to a web application running on a Debian system, its browser compatibility depends on the technical architecture of the application itself. Most modern web applications are committed to cross-browser compatibility. This relies on following web standards and using well-compatible front-end technologies (such as HTML, CSS, JavaScript) and back-end technologies (such as PHP, Python, Node.js, etc.). To ensure that the application is compatible with multiple browsers, developers often need to conduct cross-browser testing and use responsiveness
 Unable to log in to mysql as root
Apr 08, 2025 pm 04:54 PM
Unable to log in to mysql as root
Apr 08, 2025 pm 04:54 PM
The main reasons why you cannot log in to MySQL as root are permission problems, configuration file errors, password inconsistent, socket file problems, or firewall interception. The solution includes: check whether the bind-address parameter in the configuration file is configured correctly. Check whether the root user permissions have been modified or deleted and reset. Verify that the password is accurate, including case and special characters. Check socket file permission settings and paths. Check that the firewall blocks connections to the MySQL server.
 libv are two
Apr 03, 2025 pm 08:03 PM
libv are two
Apr 03, 2025 pm 08:03 PM
I developed a project called Lua-Libuv and am happy to share my experience. The original intention of the project is to explore how to use Libuv (an asynchronous I/O library written in C) to build a simple HTTP server without having to learn the C language in depth. With the help of ChatGPT, I completed the basic code of HTTP.C. When dealing with persistent connections, I successfully implemented closing the connection and freeing resources at the right time. At first I tried to create a simple server that ended the main program by closing the connection, but I had some problems. I've tried sending blocks of data using streaming, and while it works, this blocks the main thread. In the end, I decided to give up on this approach because my goal was not to learn C language in depth. Finally, I
