 Web Front-end
 Bootstrap Tutorial
 How to use Toasts component in Bootstrap? (example explanation)
How to use Toasts component in Bootstrap? (example explanation)
How to use Toasts component in
Bootstrap? The following article will introduce to you the usage of the toast message Toasts component in Bootstrap5. I hope it will be helpful to you!

1 Toasts Example
Toasts is a lightweight notification designed to mimic mobile and desktop operating systems Push notifications have become popular. They are built with flexbox so they are easy to align and position. [Related recommendations: "bootstrap tutorial"]
Like the pop-up prompt, the toast message also needs to be initialized by itself. I don’t know why the initialization method on the official website is invalid. I found a feasible method on a foreign website. method.
<!doctype html>
<html>
<head>
<meta charset="utf-8">
<meta name="viewport" content="width=device-width, initial-scale=1">
<meta name="keywords" content="">
<meta name="description" content="">
<link href="../bootstrap5/bootstrap.min.css" rel="stylesheet">
<title>Popovers</title>
</head>
<body>
<div>
<br><br><br><br>
<button type="button" class="btn btn-primary" id="liveToastBtn">显示吐司消息</button>
<div class="position-fixed bottom-0 end-0 p-3" style="z-index: 5">
<div id="liveToast" class="toast hide" data-bs-animation="false" role="alert" aria-live="assertive" aria-atomic="true">
<div>
<strong>吐司消息提示</strong>
<small>11 mins ago</small>
<button type="button" data-bs-dismiss="toast" aria-label="Close"></button>
</div>
<div>
你有一条短消息!
</div>
</div>
</div>
</div>
<script src="../bootstrap5/bootstrap.bundle.min.js" ></script>
<script>
document.querySelector("#liveToastBtn").onclick = function() {
new bootstrap.Toast(document.querySelector('.toast')).show();
}
</script>
</body>
</html>
2 Setting options
Options can be passed through data attributes or JavaScript. For data attributes, append the option name to data-bs-, such as: data-bs-animation="".
- data-bs-animation="true" Apply CSS fade transition effect to toast
- data-bs-autohide="true" Automatically hide toast
- data-bs-delay="5000", delay hiding toast for 5s (default unit: milliseconds)
The above values are the default values. If you are satisfied with the grinding effect, there is no need to write it at all. Well, in the 27.3.1 example, I set data-bs-autohide="false" to not automatically hide the toast, so that it is convenient to take screenshots, otherwise the message box will disappear as long as the mouse is clicked anywhere.
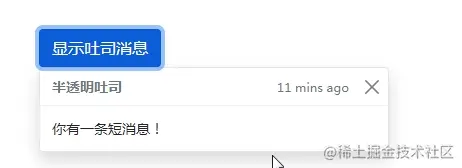
3 Translucent
Toasts can also be translucent and therefore blend in with anything they may appear on. Browsers that support the CSS attribute background-filter will also try to blur the elements below the toast.
<!doctype html>
<html>
<head>
<meta charset="utf-8">
<meta name="viewport" content="width=device-width, initial-scale=1">
<meta name="keywords" content="">
<meta name="description" content="">
<link href="../bootstrap5/bootstrap.min.css" rel="stylesheet">
<title>吐司消息</title>
</head>
<body>
<div>
<br><br><br><br>
<button type="button" class="btn btn-primary" id="liveToastBtn">显示吐司消息</button>
<div role="alert" aria-live="assertive" aria-atomic="true">
<div>
<strong>半透明吐司</strong>
<small>11 mins ago</small>
<button type="button" data-bs-dismiss="toast" aria-label="Close"></button>
</div>
<div>
你有一条短消息!
</div>
</div>
</div>
<script ></script>
<script>
document.querySelector("#liveToastBtn").onclick = function() {
new bootstrap.Toast(document.querySelector('.toast')).show();
}
</script>
</body>
</html>
4 Stacking
You can stack toasts by packaging them in toast-container containers, which will Add some spacing vertically.
<!doctype html>
<html>
<head>
<meta charset="utf-8">
<meta name="viewport" content="width=device-width, initial-scale=1">
<meta name="keywords" content="">
<meta name="description" content="">
<link href="../bootstrap5/bootstrap.min.css" rel="stylesheet">
<title>吐司消息</title>
</head>
<body>
<div>
<br><br><br><br>
<button type="button" class="btn btn-primary" id="liveToastBtn1">显示吐司消息1</button>
<button type="button" class="btn btn-primary" id="liveToastBtn2">显示吐司消息2</button>
<div>
<div id="toast1" role="alert" aria-live="assertive" aria-atomic="true">
<div>
<strong>吐司消息</strong>
<small>刚刚发送</small>
<button type="button" data-bs-dismiss="toast" aria-label="Close"></button>
</div>
<div>
第一条消息
</div>
</div>
<div id="toast2" role="alert" aria-live="assertive" aria-atomic="true">
<div>
<strong>吐司消息</strong>
<small>2分钟前</small>
<button type="button" data-bs-dismiss="toast" aria-label="Close"></button>
</div>
<div>
第二条消息
</div>
</div>
</div>
</div>
<script src="../bootstrap5/bootstrap.bundle.min.js" ></script>
<script>
document.querySelector("#liveToastBtn1").onclick = function() {
new bootstrap.Toast(document.querySelector('#toast1')).show();
}
document.querySelector("#liveToastBtn2").onclick = function() {
new bootstrap.Toast(document.querySelector('#toast2')).show();
}
</script>
</body>
</html>
5 Custom content
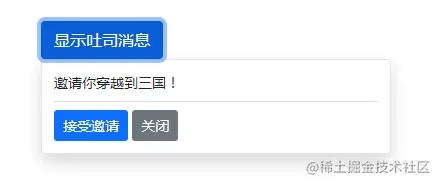
Customize toast by removing child components, adjusting common classes, or adding markup.
<!doctype html>
<html>
<head>
<meta charset="utf-8">
<meta name="viewport" content="width=device-width, initial-scale=1">
<meta name="keywords" content="">
<meta name="description" content="">
<link href="../bootstrap5/bootstrap.min.css" rel="stylesheet">
<title>吐司消息</title>
</head>
<body>
<div>
<br><br><br><br>
<button type="button" class="btn btn-primary" id="liveToastBtn">显示吐司消息</button>
<div role="alert" aria-live="assertive" aria-atomic="true">
<div>
邀请你穿越到三国!
<div class="mt-2 pt-2 border-top">
<button type="button" class="btn btn-primary btn-sm">接受邀请</button>
<button type="button" class="btn btn-secondary btn-sm" data-bs-dismiss="toast">关闭</button>
</div>
</div>
</div>
</div>
<script ></script>
<script>
document.querySelector("#liveToastBtn").onclick = function() {
new bootstrap.Toast(document.querySelector('.toast')).show();
}
</script>
</body>
</html>
6 Color Scheme
Based on the above example, you can also create different toast color schemes through our color general categories. Next, we add bg-danger and text-white to toast, and then add text-white to the close button. In order to make the edges appear clearly, the default borders are removed via border-0.
<!doctype html>
<html>
<head>
<meta charset="utf-8">
<meta name="viewport" content="width=device-width, initial-scale=1">
<meta name="keywords" content="">
<meta name="description" content="">
<link href="../bootstrap5/bootstrap.min.css" rel="stylesheet">
<title>吐司消息</title>
</head>
<body>
<div>
<br><br><br><br>
<button type="button" class="btn btn-primary" id="liveToastBtn">显示吐司消息</button>
<div class="toast align-items-center text-white bg-danger border-0" role="alert" aria-live="assertive" aria-atomic="true">
<div>
<div>
这里是红色背景的
</div>
<button type="button" class="btn-close btn-close-white me-2 m-auto" data-bs-dismiss="toast" aria-label="Close"></button>
</div>
</div>
</div>
<script src="../bootstrap5/bootstrap.bundle.min.js" ></script>
<script>
document.querySelector("#liveToastBtn").onclick = function() {
new bootstrap.Toast(document.querySelector('.toast')).show();
}
</script>
</body>
</html>
7 Set the display position
The default toast message is displayed in the lower right corner of the browser. According to requirements, use custom CSS to specify the toast position. The top right corner is usually used for notifications, as is the top middle. If you only want to display one toast at a time, put the positioning style on the toast.
<form>
<div >
<label for="selectToastPlacement">Toast placement</label>
<select  id="selectToastPlacement">
<option value="" selected>Select a position...</option>
<option value="top-0 start-0">Top left</option>
<option value="top-0 start-50 translate-middle-x">Top center</option>
<option value="top-0 end-0">Top right</option>
<option value="top-50 start-0 translate-middle-y">Middle left</option>
<option value="top-50 start-50 translate-middle">Middle center</option>
<option value="top-50 end-0 translate-middle-y">Middle right</option>
<option value="bottom-0 start-0">Bottom left</option>
<option value="bottom-0 start-50 translate-middle-x">Bottom center</option>
<option value="bottom-0 end-0">Bottom right</option>
</select>
</div>
</form>
<div aria-live="polite" aria-atomic="true" >
<div  id="toastPlacement">
<div >
<div >
  <img class="rounded me-2 lazy"  src="/static/imghw/default1.png"  data-src="..."    alt="...">
  <strong class="me-auto">Bootstrap</strong>
  <small>11 mins ago</small>
</div>
<div class="toast-body">
  Hello, world! This is a toast message.
</div>
</div>
</div>
</div>
The above is the official example, Bootstrap5 ToastsI didn’t find the driver js code. But it can be given as a reference for everyone. If you are interested, you can study it. Here I have modified it to be displayed in the upper left corner based on the above code.
<!doctype html>
<html>
<head>
<meta charset="utf-8">
<meta name="viewport" content="width=device-width, initial-scale=1">
<meta name="keywords" content="">
<meta name="description" content="">
<link href="../bootstrap5/bootstrap.min.css" rel="stylesheet">
<title>吐司消息</title>
</head>
<body>
<div>
<br><br><br><br>
<button type="button" class="btn btn-primary" id="liveToastBtn">显示吐司消息</button>
<div class="position-fixed top-0 start-0 p-3" style="z-index: 5">
<div id="liveToast" class="toast hide" data-bs-animation="false" role="alert" aria-live="assertive" aria-atomic="true">
<div>
<strong>吐司消息提示</strong>
<small>11 mins ago</small>
<button type="button" data-bs-dismiss="toast" aria-label="Close"></button>
</div>
<div>
你有一条短消息!
</div>
</div>
</div>
</div>
<script src="../bootstrap5/bootstrap.bundle.min.js" ></script>
<script>
document.querySelector("#liveToastBtn").onclick = function() {
new bootstrap.Toast(document.querySelector('.toast')).show();
}
</script>
</body>
</html>For more knowledge about bootstrap, please visit: bootstrap basic tutorial! !
The above is the detailed content of How to use Toasts component in Bootstrap? (example explanation). For more information, please follow other related articles on the PHP Chinese website!

Hot AI Tools

Undresser.AI Undress
AI-powered app for creating realistic nude photos

AI Clothes Remover
Online AI tool for removing clothes from photos.

Undress AI Tool
Undress images for free

Clothoff.io
AI clothes remover

AI Hentai Generator
Generate AI Hentai for free.

Hot Article

Hot Tools

Notepad++7.3.1
Easy-to-use and free code editor

SublimeText3 Chinese version
Chinese version, very easy to use

Zend Studio 13.0.1
Powerful PHP integrated development environment

Dreamweaver CS6
Visual web development tools

SublimeText3 Mac version
God-level code editing software (SublimeText3)

Hot Topics
 1378
1378
 52
52
 How to get the bootstrap search bar
Apr 07, 2025 pm 03:33 PM
How to use Bootstrap to get the value of the search bar: Determines the ID or name of the search bar. Use JavaScript to get DOM elements. Gets the value of the element. Perform the required actions.
 How to do vertical centering of bootstrap
Apr 07, 2025 pm 03:21 PM
Use Bootstrap to implement vertical centering: flexbox method: Use the d-flex, justify-content-center, and align-items-center classes to place elements in the flexbox container. align-items-center class method: For browsers that do not support flexbox, use the align-items-center class, provided that the parent element has a defined height.
 How to write split lines on bootstrap
Apr 07, 2025 pm 03:12 PM
There are two ways to create a Bootstrap split line: using the tag, which creates a horizontal split line. Use the CSS border property to create custom style split lines.
 How to use bootstrap in vue
Apr 07, 2025 pm 11:33 PM
Using Bootstrap in Vue.js is divided into five steps: Install Bootstrap. Import Bootstrap in main.js. Use the Bootstrap component directly in the template. Optional: Custom style. Optional: Use plug-ins.
 How to insert pictures on bootstrap
Apr 07, 2025 pm 03:30 PM
There are several ways to insert images in Bootstrap: insert images directly, using the HTML img tag. With the Bootstrap image component, you can provide responsive images and more styles. Set the image size, use the img-fluid class to make the image adaptable. Set the border, using the img-bordered class. Set the rounded corners and use the img-rounded class. Set the shadow, use the shadow class. Resize and position the image, using CSS style. Using the background image, use the background-image CSS property.
 How to resize bootstrap
Apr 07, 2025 pm 03:18 PM
To adjust the size of elements in Bootstrap, you can use the dimension class, which includes: adjusting width: .col-, .w-, .mw-adjust height: .h-, .min-h-, .max-h-
 How to set up the framework for bootstrap
Apr 07, 2025 pm 03:27 PM
To set up the Bootstrap framework, you need to follow these steps: 1. Reference the Bootstrap file via CDN; 2. Download and host the file on your own server; 3. Include the Bootstrap file in HTML; 4. Compile Sass/Less as needed; 5. Import a custom file (optional). Once setup is complete, you can use Bootstrap's grid systems, components, and styles to create responsive websites and applications.
 How to use bootstrap button
Apr 07, 2025 pm 03:09 PM
How to use the Bootstrap button? Introduce Bootstrap CSS to create button elements and add Bootstrap button class to add button text


)
