JS CSS implements simple sliding door effect code_javascript skills
The example in this article describes how to implement a simple sliding door effect code using JS CSS. Share it with everyone for your reference. The details are as follows:
After reading a lot of information about sliding doors and sliding menus, I finally came up with a decent sliding door. Although it doesn’t look very good, it is compatible with Firefox. Seniors please don’t laugh. I’ll ask you for more in the future. Everyone criticizes.
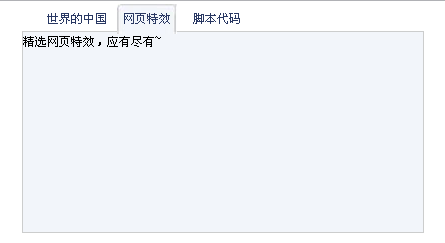
The screenshot of the running effect is as follows:

The online demo address is as follows:
http://demo.jb51.net/js/2015/js-css-simple-hdtx-demo-codes/
The specific code is as follows:
<!DOCTYPE html PUBLIC "-//W3C//DTD XHTML 1.0 Transitional//EN"
"http://www.w3.org/TR/xhtml1/DTD/xhtml1-transitional.dtd">
<html xmlns="http://www.w3.org/1999/xhtml">
<head>
<meta http-equiv="Content-Type" content="text/html; charset=gb2312" />
<title>学习练手写下个简易的滑动门</title>
<style>
*{
margin:0px;
padding:0px;
font-size:9pt;
}
#tab{width:400px;
height:auto;
margin:0 auto;
}
ul{list-style:none; margin-left:20px;}
li{ float:left;height:30px;background:url(15.jpg);margin:0 5px;text-align:center;line-height:30px;color:#293863;width:60px; position:relative;bottom:-3px;}/*margin;那里调节各个li之间的距离,position是保证下边框的出现*/
.dise{display:block;}
.undise{display:none;}
.fff{background:
url(images/tr.jpg);}
#all{clear:left; width:400px;}
#all div{width:400px;background-color:#F2F5FA;text-align:left;line-height:20px; height:200px;
border:1px #CCCDCD solid; }/*一定要设border*/
}
</style>
</head>
<script language="javascript">
function g(o){return document.getElementById(o);}
function showdiv(i){
for(j=1;j<=3;j++){
g("div"+j).className="undise"//将三个都设为undise,以便将来可以设置显示的那个;
g("li"+j).className=""//消除原来所有li的属性
}
g("div"+i).className="dise"
g("li"+i).className="fff"
}
function showdiv1(i){
for(j=4;j<=6;j++){
g("div"+j).className="undise"//将三个都设为undise,以便将来可以设置显示的那个;
g("li"+j).className=""//消除原来所有li的属性
}
g("div"+i).className="dise"
g("li"+i).className="fff"
}
</script>
<body>
 <div div id="tab">
  <ul>
  <li id="li1" class="fff"><span onmouseover="showdiv(1)">世界的中国</span></li>
  <li id="li2"><span onmouseover="showdiv(2)">网页特效</span></li>
  <li id="li3"><span href="#" onmouseover="showdiv(3)">脚本代码</span></li>
  </ul>
 <div id="all">
  <div id="div1" class="dise">学习型源码下载站。</div>
  <div id="div2" class="undise">精选网页特效,应有尽有~</div>
  <div id="div3" class="undise">高质量脚本代码资源随您下载!</div>
 </div>
 </div>
</body>
</html>I hope this article will be helpful to everyone’s JavaScript programming.

Hot AI Tools

Undresser.AI Undress
AI-powered app for creating realistic nude photos

AI Clothes Remover
Online AI tool for removing clothes from photos.

Undress AI Tool
Undress images for free

Clothoff.io
AI clothes remover

AI Hentai Generator
Generate AI Hentai for free.

Hot Article

Hot Tools

Notepad++7.3.1
Easy-to-use and free code editor

SublimeText3 Chinese version
Chinese version, very easy to use

Zend Studio 13.0.1
Powerful PHP integrated development environment

Dreamweaver CS6
Visual web development tools

SublimeText3 Mac version
God-level code editing software (SublimeText3)

Hot Topics
 1378
1378
 52
52
 How to write split lines on bootstrap
Apr 07, 2025 pm 03:12 PM
There are two ways to create a Bootstrap split line: using the tag, which creates a horizontal split line. Use the CSS border property to create custom style split lines.
 How to insert pictures on bootstrap
Apr 07, 2025 pm 03:30 PM
There are several ways to insert images in Bootstrap: insert images directly, using the HTML img tag. With the Bootstrap image component, you can provide responsive images and more styles. Set the image size, use the img-fluid class to make the image adaptable. Set the border, using the img-bordered class. Set the rounded corners and use the img-rounded class. Set the shadow, use the shadow class. Resize and position the image, using CSS style. Using the background image, use the background-image CSS property.
 How to resize bootstrap
Apr 07, 2025 pm 03:18 PM
To adjust the size of elements in Bootstrap, you can use the dimension class, which includes: adjusting width: .col-, .w-, .mw-adjust height: .h-, .min-h-, .max-h-
 How to set up the framework for bootstrap
Apr 07, 2025 pm 03:27 PM
To set up the Bootstrap framework, you need to follow these steps: 1. Reference the Bootstrap file via CDN; 2. Download and host the file on your own server; 3. Include the Bootstrap file in HTML; 4. Compile Sass/Less as needed; 5. Import a custom file (optional). Once setup is complete, you can use Bootstrap's grid systems, components, and styles to create responsive websites and applications.
 The Roles of HTML, CSS, and JavaScript: Core Responsibilities
Apr 08, 2025 pm 07:05 PM
HTML defines the web structure, CSS is responsible for style and layout, and JavaScript gives dynamic interaction. The three perform their duties in web development and jointly build a colorful website.
 How to use bootstrap button
Apr 07, 2025 pm 03:09 PM
How to use the Bootstrap button? Introduce Bootstrap CSS to create button elements and add Bootstrap button class to add button text
 How to use bootstrap in vue
Apr 07, 2025 pm 11:33 PM
Using Bootstrap in Vue.js is divided into five steps: Install Bootstrap. Import Bootstrap in main.js. Use the Bootstrap component directly in the template. Optional: Custom style. Optional: Use plug-ins.
 How to view the date of bootstrap
Apr 07, 2025 pm 03:03 PM
Answer: You can use the date picker component of Bootstrap to view dates in the page. Steps: Introduce the Bootstrap framework. Create a date selector input box in HTML. Bootstrap will automatically add styles to the selector. Use JavaScript to get the selected date.


