Compile and install PHP7.4 (ubuntu)
This article is provided by the PHP7 tutorial column to introduce to you how to compile and install PHP7.4 (ubuntu). It has certain reference value. Friends in need can refer to it. I hope it will be helpful to everyone.
Download PHP7.4 source code package
wget https://www.php.net/distributions/php-7.4.26.tar.gz
Unzip
tar -zxvf php-7.4.26.tar.gz
Install PHP dependency library
apt-get install libxml2 libxml2-dev sqlite3 libsqlite3-dev libcurl3-dev libxml-dev
Run ./configure
# cd 到php源码目录
./configure --prefix=/usr/local/php7 \
--with-config-file-path=/etc \
--with-fpm-user=test \
--with-fpm-group=test \
--with-curl --enable-fpm
Note: There are only a few extensions here, because if there are more, the compilation time will be very long. It is only used for testing compilation and installation of php, so there are not many extensions added. After the installation is complete, if you want to add more extensions later and forget the previous compilation parameters, you can see the previous compilation parameters in the source code directory cat config.nice. Then add new parameters and recompile (don’t forget to install the extended dependency library first).
Run make && make install
You can add the -j parameter when running make install, which means multiple jobs are working at the same time, and the compilation speed will be faster.
make install -j 2
Set PHP environment variables
1. Open the file
vim /etc/profile
2. Write the content
PATH=$PATH:/usr/local/php7/bin
export PATH
3. Make the environment The variable takes effect immediately
source /etc/profile
4. No error is reported when entering php -v, and the environment variable is set successfully
Configuration file
# 修改配置文件
cd /usr/local/php7/etc
cp php-fpm.conf.default php-fpm.conf
cp php-fpm.d/www.conf.default php-fpm.d/www.conf

# 修改pid文件位置
vim php-fpm.conf
# 添加这行
pid = /run/php-fpm.pid

# 创建php-fpm软链接
ln -s /usr/local/php7/sbin/php-fpm /usr/sbin/php-fpm
Start and stop php-fpm
# 启动
/usr/sbin/php-fpm
# 关闭
kill -INT `cat /run/php-fpm.pid`
# 重启
kill -USR2 `cat /run/php-fpm.pid`
Error handling
ERROR: [pool www] cannot get uid for user 'test'
1. Reason: Due to the previous settings during compilation, the user and user group of php-fpm are test [set casually] (--with-fpm-user=test --with-fpm-group= test), in fact, this user does not exist. There are two ways to deal with it:
Create the user and user group for test
Modify php-fpm.conf sets the user and user group to the same as nginx or apache user group
# 打开php-fpm.conf
vim /usr/local/php7/etc/php-fpm.conf
# 找到位置修改为(我nignx用户组是 www-data user = www-data)
group = www-data
2. ERROR: failed to retrieve TCP_INFO for socket: Protocol not available (92 )
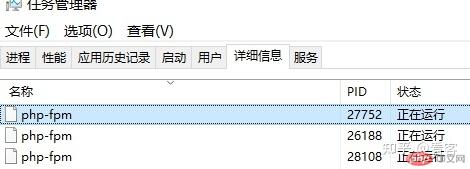
Reason: I am using the Linux subsystem (ubuntu system) under Windows, which is not a completely virtual system. There will be some problems, but it does not affect it. Check in the host task manager that php-fpm has been started.

Solution: Modify php-fpm.conf
# 方法1:
listen = /run/php-fpm.sock
# 方法2 设置
log_level = alert
Add daemon
# PHP源码里有自带的服务脚本,只需要复制到/etc/init.d 目录,加上执行权限就可以了。
# 要注意保持 /usr/local/php7/etc/php-fpm.conf 里面的 pid 文件位置是初始值。原来的是 pid = run/php-fpm.pid
# 在源码目录执行
cp sapi/fpm/init.d.php-fpm /etc/init.d/php-fpm
chmod +x /etc/init.d/php-fpm
systemctl daemon-reload

# 使用方法与上面相同,也可以使用 systemctl
service php-fpm start
service php-fpm stop
service php-fpm restart
service php-fpm status
# 或者
systemctl start php-fpm
systemctl stop php-fpm
systemctl restart php-fpm
systemctl status php-fpm
The above is the detailed content of Compile and install PHP7.4 (ubuntu). For more information, please follow other related articles on the PHP Chinese website!

Hot AI Tools

Undresser.AI Undress
AI-powered app for creating realistic nude photos

AI Clothes Remover
Online AI tool for removing clothes from photos.

Undress AI Tool
Undress images for free

Clothoff.io
AI clothes remover

AI Hentai Generator
Generate AI Hentai for free.

Hot Article

Hot Tools

Notepad++7.3.1
Easy-to-use and free code editor

SublimeText3 Chinese version
Chinese version, very easy to use

Zend Studio 13.0.1
Powerful PHP integrated development environment

Dreamweaver CS6
Visual web development tools

SublimeText3 Mac version
God-level code editing software (SublimeText3)

Hot Topics
 1378
1378
 52
52


