Take you step by step to develop a vscode Baidu translation plug-in
How to carry out vscode plug-in development? This article will help you develop a vscode Baidu translation plug-in. I hope it will be helpful to you!

Every time I give an element a className, I always have to go to Baidu to translate it, which greatly slows down the development speed. This simple version of vscode Baidu translation plug-in , directly write Chinese and select it to easily convert to English with one click, or you can also choose to translate between Chinese and English. [Recommended learning: "vscode introductory tutorial"]
1. Project construction
Official scaffolding can be used directly for project construction.
Install scaffolding
npm install -g yo generator-code
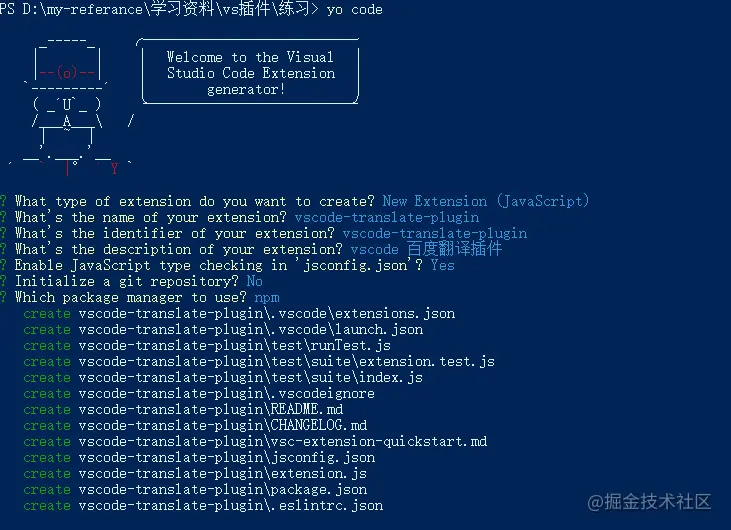
Project generation
yo code

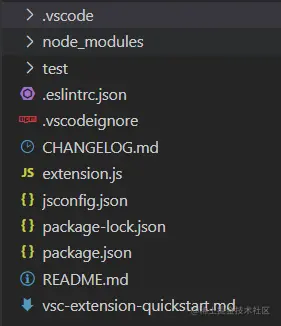
Newly generated project structure As shown in the picture:

Project run
Just press F5 to run. After successful operation, a new vscode window will pop up. The window title will indicate Extension Development Host.
2. Preparation work
Since the plug-in uses Baidu Translation’s API, you first need to log in with a Baidu account Baidu Translation Open Platform and register as a developer. Get APPID and APPKEY.
Access method
By calling the universal translation API, input the content to be translated, and specify the source language to be translated (supports automatic detection of source language) and Target language type, you can get the corresponding translation results.
The request api is as follows:
/*
    q:请求翻译的字段,utf-8编码
    from:翻译源语言,可以设置为auto,自动检测
    to:翻译目标语言
    appid:APP ID
    salt:随机数
    sign:appid+q+salt+密钥的MD5值
*/
https://fanyi-api.baidu.com/api/trans/vip/translate?q=&from=&to=&appid=&salt=&sign=Detailed documents can be viewedUniversal translation API access document
3. Project development
Main The development files are the manifest file package.json and the entry file extension.js
package.json
The configuration is as follows:
{
	// 插件名,必须用全小写无空格的字母组成
	"name": "vscode-translate-plugin",
	// 插件市场所显示的插件名称。
	"displayName": "vscode-translate-plugin",
	// 插件描述
	"description": "vscode 百度翻译插件",
	// 插件版本
	"version": "0.0.1",
	// 插件图标,最小128x128像素
	"icon": "img/icon.png",
	// 插件最低支持的vscode版本支持
	"engines": {
		"vscode": "^1.50.0"
	},
	// 插件应用市场分类,可选值: [Programming Languages, Snippets, Linters, Themes, Debuggers, Formatters, Keymaps, SCM Providers, Other, Extension Packs, Language Packs]
	"categories": [
		"Other"
	],
	// 激活事件数组
	"activationEvents": [
		"onCommand:vscode-translate-plugin.helloWorld"
	],
	// 插件入口
	"main": "./extension.js",
	// 描述插件的发布内容
	"contributes": {
		"commands": [
                        {
                            "command": "vscode-translate-plugin.helloWorld",
                            "title": "Hello World"
                        }
                  ]
         },
	"scripts": {
		"lint": "eslint .",
		"pretest": "npm run lint",
		"test": "node ./test/runTest.js"
	},
	"devDependencies": {
		"@types/vscode": "^1.50.0",
		"@types/glob": "^7.1.3",
		"@types/mocha": "^8.0.0",
		"@types/node": "^12.11.7",
		"eslint": "^7.9.0",
		"glob": "^7.1.6",
		"mocha": "^8.1.3",
		"typescript": "^4.0.2",
		"vscode-test": "^1.4.0"
	}
} Mainly configures the two configuration items activationEvents and contributes
1, activationEvents
The plug-in is not activated by default in VS Code, so how to activate it? It can be configured through activationEvents. Currently, there are the following activation opportunities.
onLanguage:${language}Activates when a specific language file is openedonCommand:${command}Activates the event when the command is calledonDebugActivate before debugging session startsworkspaceContains:${toplevelfilename}After the folder is opened, and the folder contains at least one glob that matches Triggered when the file is in pattern.onFileSystem:${scheme}Triggered when a file or folder opened from the protocol (scheme) is opened. Usually file-protocol, it can also be replaced with a custom file provider function, such as ftp, sshonView:${viewId}Triggered when the specified view id is expandedonUriTriggered when the system-level URI of the plug-in is opened*Triggered when VS Code is started
The translation plug-in Three commands are configured here:
"activationEvents": [
       // 将英文翻译成中文命令
      "onCommand:extension.translateToZh",
       // 将中文翻译成英文命令
      "onCommand:extension.translateToEn",
       // 将中文替换成相应中文的命令
      "onCommand:extension.replaceWithEn"
],2, contributions
The main configurations are as follows
configurationJSON格式的键值对,VS Code为用户提供了良好的设置支持,该配置项中配置的内容会暴露给用户,用户可以从“用户设置”和“工作区设置”中修改你暴露的选项。commands设置命令标题和命令体menus为编辑器或者文件管理器设置命令的菜单项,菜单项至少包含选中时调用的命令和何时显示这个菜单项。也可以为该菜单项设置显示的位置。keybindings快捷键绑定languages配置一门语言,引入一门新的语言或者加强VS Code已有的语言支持。debuggers配置VS Code的调试器breakpoints通常调试器插件会有contributes.breakpoints入口,插件可以在这里面设置哪些语言可以设置断点。grammars为一门语言配置TextMate语法。themes为VS Code添加TextMate主题。snippets为语言添加代码片段。jsonValidation为json文件添加校验器。views为VS Code 添加视图。problemMatchers配置问题定位器的模式。problemPatterns配置可以在问题定位器中可以使用的问题模式的名称。taskDefinitions配置和定义一个object结构,定义系统中唯一的配置任务。colors这些色彩可用于状态栏的编辑器装饰器。
该翻译插件的配置如下:
"contributes": {
    // 命令
    "commands": [
        {
            "command": "extension.translateToZh",
            "title": "translateToZh"
    	},
        {
            "command": "extension.translateToEn",
            "title": "translateToEn"
        },
        {
            "command": "extension.replaceWithEn",
            "title": "replaceWithEn"
        }
     ],
    // 快捷键绑定
    "keybindings":[
        {
           // 命令
           "command": "extension.translateToZh",
           // windows快捷键绑定
            "key": "ctrl+shift+t",
           // mac快捷键绑定
            "mac": "cmd+shift+t",
            "when": "editorTextFocus"
        },
        {
            "command": "extension.translateToEn",
            "key": "ctrl+shift+e",
            "mac": "cmd+shift+e",
            "when": "editorTextFocus"
        },
        {
            "command": "extension.replaceWithEn",
            "key": "ctrl+shift+r",
            "mac": "cmd+shift+r",
            "when": "editorTextFocus"
        }
    ],
    // 菜单
    "menus": {
        // 编辑器上下文菜单,即点击鼠标右键出来的菜单
        "editor/context": [
            {
            	// 编辑器聚焦时
                "when": "editorFocus",
                // 点击菜单项触发的命令
                "command":"extension.translateToZh",
                // 分组排序,navigation组始终在最上方
                "group": "navigation"
            },
            {
                "when": "editorFocus",
                "command":"extension.translateToEn",
                "group": "navigation"
            },
            {
                "when": "editorFocus",
                "command":"extension.replaceWithEn",
                "group": "navigation"
            }
        ]
    },
    // 插件配置项
    "configuration": {
        "type": "object",
        "title": "translate configuration",
        "properties": {
        	// 百度翻译请求api
            "translate.url": {
                "type": "string",
                "default": "****",
                "description": "百度翻译API"
            },
            // 百度翻译appId
            "translate.appId": {
                "type": "string",
                "default": "****",
                "description": "百度翻译appId"
            },
            // 百度翻译appKey
            "translate.appKey": {
                "type": "string",
                "default": "****",
                "description": "百度翻译appKey"
            }
        }
      }
},extension.js
该文件为插件的入口文件,一般包括两个函数activate和deactivate。其中activate函数是插件激活时也就是在注册的activationEvents发生的时候就会执行。deactivate中放的是插件关闭的代码。
我们需要在插件激活的时候注册activationEvents里配置的命令,并且实现该命令的触发函数,然后给插件订阅该命令。
完整代码如下
const vscode = require('vscode');
const request = require('request')
const crypto = require('crypto')
const randomstring = require('randomstring')

// md5函数
function getMD5(content) {
    if (!content) {
    	return content
    }
    let md5 = crypto.createHash('md5')
    md5.update(content)
    let d = md5.digest('hex')
    return d.toLowerCase()
}

// 翻译函数
function translate(targetType) {
    return new Promise((resolve, reject) => {
        // 打开的vscode窗口对象
        const editor = vscode.window.activeTextEditor
        // 若没有打开的窗口,则返回
        if (!editor) {
            console.log('no open text editor')
            return
        }
        // 选中的文本位置
        let selection = editor.selection
        // 获取选中的文本
        let text = editor.document.getText(selection)
        // 没有选中的文本,则返回
        if (!text) {
            console.log('no choosed text')
            return
        }
        // 随机数
        let salt = (new Date()).getTime() + randomstring.generate()
        // 获取package.json里的配置项
        const config = vscode.workspace.getConfiguration()
        // 请求百度翻译api,翻译选中的文本
        request.post({
            url: config.get("translate.url"),
            formData: {
                q: text,
                from: 'auto',
                to: targetType,
                appid: config.get("translate.appId"),
                salt: salt,
                sign: getMD5(config.get("translate.appId") + text + salt + config.get("translate.appKey"))
          }
        }, function (err, res, body) {
            if (err) {
                vscode.window.showInformationMessage('翻译出错了:' + err.message)
                return
            }
            try {
                let msg = JSON.parse(body);
                if (msg.error_code) {
                    vscode.window.showInformationMessage('翻译出错了:' + msg.error_msg);
                } else {
                    // 返回翻译结果
                    resolve((msg.trans_result)[0].dst)
                }
            } catch (e) {
            	vscode.window.showInformationMessage('翻译出错了:' + e.message);
            }
        })
    })
}

// 文本替换函数,将当前选中的文本替换为传进来的val
const insertText = (val) => {
    const editor = vscode.window.activeTextEditor
    if (!editor) {
        vscode.window.showErrorMessage('no open text editor')
        return
    }
    const selection = editor.selection
    const range = new vscode.Range(selection.start, selection.end)

    editor.edit((editBuilder) => {
    	editBuilder.replace(range, val)
    })
}
/**
 * @param {vscode.ExtensionContext} context
 */
// 插件激活时的入口
function activate(context) {
    // 注册命令
    // 翻译成中文
    var transToZhDisposable = vscode.commands.registerCommand('extension.translateToZh', function () {
        translate('zh').then(res =>{
            // vscode窗口右下角显示翻译内容
            vscode.window.showInformationMessage(decodeURIComponent(res));
        })
    })
    // 翻译成英文
    var transToEnDisposable = vscode.commands.registerCommand('extension.translateToEn', function () {
        translate('en').then(res =>{
        	vscode.window.showInformationMessage(decodeURIComponent(res));
        })
    })
    // 将中文替换为英文
    var replaceWithEnDisposable = vscode.commands.registerCommand('extension.replaceWithEn', function () {
        translate('en').then(res =>{
        	// 将选中的中文替换成相应的英文
        	insertText(res)
        })
    })
    // vscode订阅注册的命令
    context.subscriptions.push(transToZhDisposable);
    context.subscriptions.push(transToEnDisposable);
    context.subscriptions.push(replaceWithEnDisposable);
}

exports.activate = activate;

// 插件释放的时候触发
function deactivate() {}

module.exports = {
    activate,
    deactivate
}至此开发完成,按F5即可运行项目。按下Ctrl+Shift+P打开vscode的命令面板,输入插件中注册的命令,即可执行。我们也添加了相应的快捷键和菜单,直接使用快捷键或者点击鼠标右键出现的菜单都可以执行相应的命令。
四、插件发布
插件发布可参考文章《VSCode插件开发全攻略(十)打包、发布、升级》
https://www.cnblogs.com/liuxianan/p/vscode-plugin-publish.html
更多关于VSCode的相关知识,请访问:vscode教程!!
The above is the detailed content of Take you step by step to develop a vscode Baidu translation plug-in. For more information, please follow other related articles on the PHP Chinese website!

Hot AI Tools

Undresser.AI Undress
AI-powered app for creating realistic nude photos

AI Clothes Remover
Online AI tool for removing clothes from photos.

Undress AI Tool
Undress images for free

Clothoff.io
AI clothes remover

Video Face Swap
Swap faces in any video effortlessly with our completely free AI face swap tool!

Hot Article

Hot Tools

Notepad++7.3.1
Easy-to-use and free code editor

SublimeText3 Chinese version
Chinese version, very easy to use

Zend Studio 13.0.1
Powerful PHP integrated development environment

Dreamweaver CS6
Visual web development tools

SublimeText3 Mac version
God-level code editing software (SublimeText3)

Hot Topics
 1386
1386
 52
52
 What computer configuration is required for vscode
Apr 15, 2025 pm 09:48 PM
VS Code system requirements: Operating system: Windows 10 and above, macOS 10.12 and above, Linux distribution processor: minimum 1.6 GHz, recommended 2.0 GHz and above memory: minimum 512 MB, recommended 4 GB and above storage space: minimum 250 MB, recommended 1 GB and above other requirements: stable network connection, Xorg/Wayland (Linux)
 How to define header files for vscode
Apr 15, 2025 pm 09:09 PM
How to define header files using Visual Studio Code? Create a header file and declare symbols in the header file using the .h or .hpp suffix name (such as classes, functions, variables) Compile the program using the #include directive to include the header file in the source file. The header file will be included and the declared symbols are available.
 How to switch Chinese mode with vscode
Apr 15, 2025 pm 11:39 PM
VS Code To switch Chinese mode: Open the settings interface (Windows/Linux: Ctrl, macOS: Cmd,) Search for "Editor: Language" settings Select "Chinese" in the drop-down menu Save settings and restart VS Code
 Common commands for vscode terminal
Apr 15, 2025 pm 10:06 PM
Common commands for VS Code terminals include: Clear the terminal screen (clear), list the current directory file (ls), change the current working directory (cd), print the current working directory path (pwd), create a new directory (mkdir), delete empty directory (rmdir), create a new file (touch) delete a file or directory (rm), copy a file or directory (cp), move or rename a file or directory (mv) display file content (cat) view file content and scroll (less) view file content only scroll down (more) display the first few lines of the file (head)
 How to set vscode in Chinese
Apr 15, 2025 pm 09:27 PM
There are two ways to set up a Chinese language in Visual Studio Code: 1. Install the Chinese language package; 2. Modify the "locale" settings in the configuration file. Make sure Visual Studio Code version is 1.17 or higher.
 vscode Previous Next Shortcut Key
Apr 15, 2025 pm 10:51 PM
VS Code One-step/Next step shortcut key usage: One-step (backward): Windows/Linux: Ctrl ←; macOS: Cmd ←Next step (forward): Windows/Linux: Ctrl →; macOS: Cmd →
 How to solve the problem of vscode Chinese annotations becoming question marks
Apr 15, 2025 pm 11:36 PM
How to solve the problem that Chinese comments in Visual Studio Code become question marks: Check the file encoding and make sure it is "UTF-8 without BOM". Change the font to a font that supports Chinese characters, such as "Song Style" or "Microsoft Yahei". Reinstall the font. Enable Unicode support. Upgrade VSCode, restart the computer, and recreate the source file.
 How to use VSCode
Apr 15, 2025 pm 11:21 PM
Visual Studio Code (VSCode) is a cross-platform, open source and free code editor developed by Microsoft. It is known for its lightweight, scalability and support for a wide range of programming languages. To install VSCode, please visit the official website to download and run the installer. When using VSCode, you can create new projects, edit code, debug code, navigate projects, expand VSCode, and manage settings. VSCode is available for Windows, macOS, and Linux, supports multiple programming languages and provides various extensions through Marketplace. Its advantages include lightweight, scalability, extensive language support, rich features and version


