Detailed explanation of how to install MediaWiki on BT Pagoda
This article is provided by the tutorial column of Pagoda to introduce to you how to install MediaWiki on Alibaba Cloud Server through the BT Pagoda panel. I hope it will be helpful to you if you need it!
The most well-known wiki open source program is MediaWiki. Wonton Shop shares the graphic tutorial method of using Alibaba Cloud ECS cloud server to install MediaWiki source code through BT Pagoda panel:
BT Pagoda Installation MediaWiki graphic tutorial
MediaWiki operating environment: PHP MySQL environment. The LAMP environment of this tutorial is built using the Pagoda panel. Installing the latest version of MediaWiki requires PHP version 7.0 or above, MySQL version 5.5 or above, and the web server uses Apache.
Installation environment:
MediaWiki version: MediaWiki 1.32 stable version
Pagoda environment: PHP70, MySQL5.6, Apache
Server: Alibaba Cloud ECS cloud Server, CentOS 7.2 64-bit operating system
1: Install BT Pagoda Panel
Execute the Pagoda installation command:
yum install -y wget && wget -O install.sh http://download.bt.cn/install/install_6.0.sh && sh install.sh
The Pagoda panel installation method is very simple , I won’t go into details about the wonton shop.
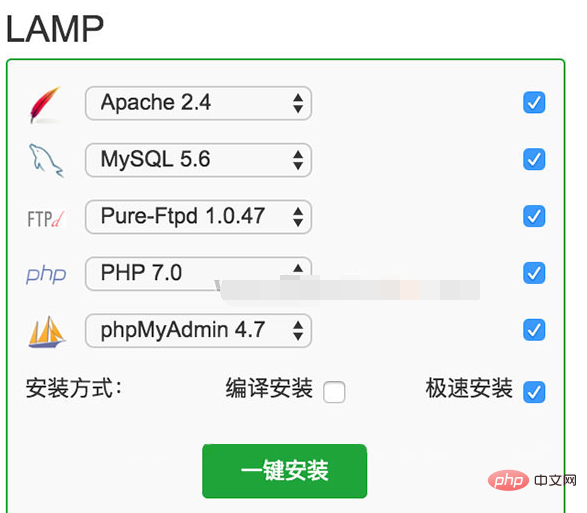
The installation environment of Pagoda in this tutorial is as shown below:

2: PHP installation extension
After installing the LAMP environment of the Pagoda panel, the fileinfo extension is required (MediaWiki requires PHP to install the fileinfo extension):
Log in to the Pagoda panel backend http://your server ip/8888
and click left Sidebar "Software Management"--"Runtime Environment"--find PHP-7.0--click "Settings"
As shown below:

On the PHP-7.0 management page, click "Install Extension" on the left, find fileinfo, and click "Install"

At this point, all the environments required to install MediaWiki have been installed.
3: Add a site to the Pagoda Panel
Log in to the Pagoda Panel backstage
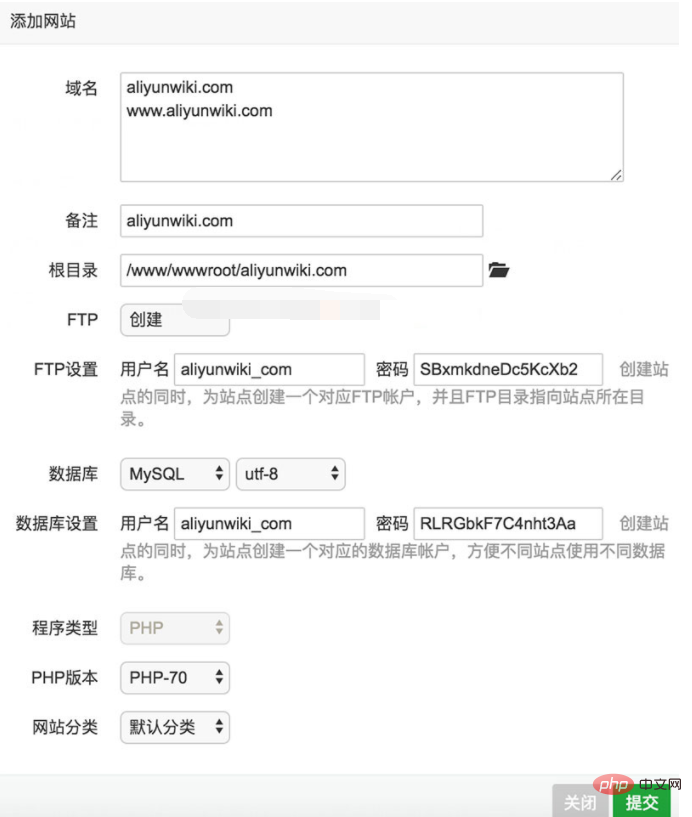
Click on the left column "Website"--"Add Site"

Enter the website domain name and create database information.
Four: Download MediaWiki
Users who have already downloaded can ignore this step. Download address: https://www.mediawiki.org/wiki/Download
5: Upload the MediaWiki installation package file
Upload the downloaded installation package file to the root directory of the new website. You can upload it through FTP, or you can use the "Pagoda panel background" File" upload, and extract it to the root directory of the website after uploading.
The root directory is: /www/wwwroot/under your website domain name
6: Open your URL in the browser
Enter in the browser Your URL, you can see the MediaWiki installation interface, step by step, fill in the website title, login name and database information.
Seven: Upload the LocalSettings.php file
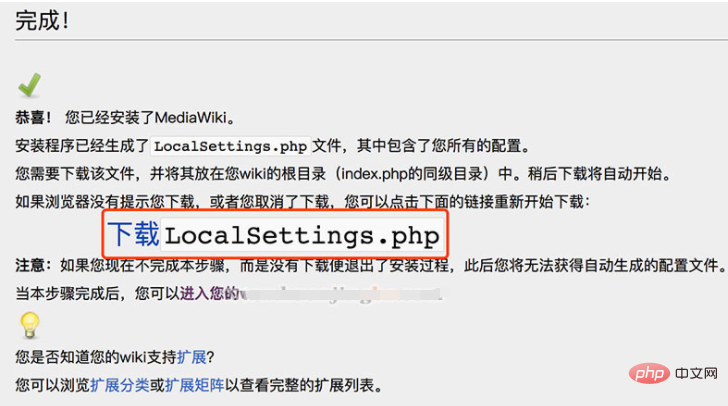
Install the MediaWiki program step by step. After the installation is completed, the system will automatically generate the LocalSettings.php file, as follows As shown in the picture:

Click "Download LocalSettings.php", and then upload the LocalSettings.php file to the root directory of the website.
The above is the detailed content of Detailed explanation of how to install MediaWiki on BT Pagoda. For more information, please follow other related articles on the PHP Chinese website!

Hot AI Tools

Undresser.AI Undress
AI-powered app for creating realistic nude photos

AI Clothes Remover
Online AI tool for removing clothes from photos.

Undress AI Tool
Undress images for free

Clothoff.io
AI clothes remover

AI Hentai Generator
Generate AI Hentai for free.

Hot Article

Hot Tools

Notepad++7.3.1
Easy-to-use and free code editor

SublimeText3 Chinese version
Chinese version, very easy to use

Zend Studio 13.0.1
Powerful PHP integrated development environment

Dreamweaver CS6
Visual web development tools

SublimeText3 Mac version
God-level code editing software (SublimeText3)

Hot Topics
 1375
1375
 52
52
 How to perform website performance stress testing and tuning through the Pagoda Panel
Jun 21, 2023 pm 01:31 PM
With the rapid development of the Internet, website performance has an increasing impact on user experience and SEO rankings. In order to improve the performance of our website, we need to perform performance stress testing and tuning to locate problems and optimize them. As a popular service management panel, Pagoda Panel provides convenient and simple performance stress testing and tuning tools. The following will introduce how to perform website performance stress testing and tuning through the Pagoda Panel. 1. Performance stress testing Performance stress testing is to test the load capacity and response speed of the website by simulating user access. In the Pagoda panel, we can
 Can Pagoda Panel deploy Go language projects?
Mar 23, 2024 pm 06:54 PM
Title: How does the Pagoda panel deploy Go language projects? In today's Internet era, Go language is favored by more and more developers as an efficient, concise and powerful programming language with strong concurrency performance. As a powerful server management tool, Pagoda Panel provides convenient interface operations and various automated deployment functions. So, can the Pagoda panel deploy Go language projects? The answer is yes. Next, we will explain in detail how to deploy Go language projects on the Pagoda panel and provide specific code examples. At first, we
 Pagoda PHP version switching: Interpretation of detailed operation steps
Mar 04, 2024 pm 05:48 PM
Pagoda PHP version switching: Interpretation of detailed operation steps, specific code examples are required. With the continuous development of Internet technology, website development often involves the use of different versions of PHP. Pagoda Panel is a simple and easy-to-use server management software that can help users quickly build and manage server environments. In the process of website development, sometimes it is necessary to switch the PHP version to adapt to different needs. This article will explain in detail how to switch the PHP version in the Pagoda panel, and give specific operating steps and code examples. Step 1: Log in to Pagoda Noodles
 Must-read for Pagoda Linux: PHP5.2.0 version installation tips
Mar 07, 2024 pm 12:33 PM
Pagoda Linux must-read: PHP5.2.0 version installation tips In the process of using the Pagoda Linux panel to build a website, some old versions of the PHP environment may be required, such as PHP5.2.0 version. This article will introduce how to install PHP5.2.0 version on the Pagoda Linux panel, and provide specific code examples to help readers quickly complete the installation process. 1. Install PHP5.2.0 version Step 1: Enter the Pagoda Linux panel. First, enter your server IP address in the browser.
 How to switch between different versions when installing PHP in Pagoda
Jun 19, 2023 am 11:18 AM
The method for installing PHP in Pagoda and switching between versions is: 1. Click "My Website" on the home page of Pagoda Panel; 2. Find the corresponding website and click the "Settings" button on the right; 3. Click "Apache/Nginx" on the left "tab, you can see the PHP version currently in use; 4. Click the "Switch" button behind the PHP version and select the version you want to switch; 5. Restart the relevant services.
 Pagoda Linux Tutorial: Detailed steps to install PHP5.2.0
Mar 06, 2024 pm 02:27 PM
In this article, I will introduce in detail the steps on how to install PHP5.2.0 version on the Pagoda panel, including specific code examples. Although PHP5.2.0 is relatively old, there are still some projects with special needs that need to use this version. Hope this tutorial is helpful to everyone. In the process of using the Pagoda Linux panel, sometimes we encounter situations where we need to install PHP5.2.0. In this tutorial, I will introduce you in detail how to install PHP5 on the Pagoda panel.
 One click to get it done! Guide to installing PHP5.2.0 on Pagoda Linux
Mar 06, 2024 pm 04:33 PM
Title: One click to get it done! Guide to installing PHP5.2.0 on Pagoda Linux In the current Internet era, website development is inseparable from PHP. The PHP5.2.0 version is outdated compared to the current version, but sometimes we still need to install the PHP5.2.0 version on the Pagoda panel, perhaps for compatibility with some old projects or requirements. In this article, we will introduce how to install PHP5.2.0 on Pagoda Linux with one click. We hope it will be helpful to you. step one
 宝塔一键安装PHP,轻松切换各版本
Mar 04, 2024 pm 03:12 PM
宝塔一键安装PHP,轻松切换各版本宝塔是一款网络服务器管理软件,提供了一键安装和管理各种服务器环境的功能,包括PHP、MySQL、Nginx等。本文将介绍如何通过宝塔一键安装PHP,并且演示如何轻松切换各个PHP版本。一、安装宝塔面板首先,我们需要在服务器上安装宝塔面板。可以通过以下命令进行安装:wget-Oinstall.shhttp://downl


