If you use a set to record active users on the day, a lot of space will be wasted when the number of users is very large. Therefore, redis provides a bitmap so that users can operate each bit individually. The following article will take you to understand the bitmaps in redis. I hope it will be helpful to you!

Bitmap is a data structure composed of a large number of bits (each bit can only be 0 and 1 ), mainly suitable for saving space and recording data meaningfully in some scenarios,
For example, a large number of bool type accesses, a user's 365-day check-in record, the number of check-ins is 1, If there is no sign-in, the value is 0. If ordinary key/value is used for storage, when the number of users is large, a large amount of storage space is required.
If you use bitmaps for storage, 365 days in a year can be stored with 365 bits. 365 bits are converted into 46 bytes (a slightly longer string), which saves a lot of time. Storage space,

#The essence of a bitmap is actually an ordinary string, that is, a byte array. You can use get/set to directly obtain and set the contents of the entire bitmap. You can also use getbit/setbit to treat the byte array as a bit array. [Related recommendations: Redis Video Tutorial]
Normally setting strings uses the set command. Below we use setbit sets the bit array, and finally obtains it in the form of a string.
First we get the binary representation of the two ASCII codes h and e as follows,

You can see that the binary code of h is 01101000 and the binary code of e is 01100101. We only need to pay attention to the position where the bit is 1, and then set the bit.

Required Note that the order of the bit array and the bit order of the characters are reversed. According to this principle, we calculate that the position of each 1 of the h character is 1/2/4, and the position of each 1 of the e character is 9/10/13/15. ,

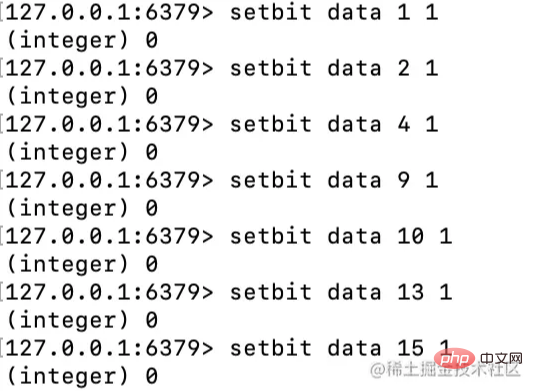
So we will use setbit to set a bit array and set the corresponding bit array at each position (1/2/4/9/10/13/15) 1.
setbit data 1 1
setbit data 2 1
setbit data 4 1
setbit data 9 1
setbit data 10 1
setbit data 13 1
setbit data 15 1
Zero deposit and round sum

Finally get the data key directly and you will find that it is just right Get he,

The combination of setbit get is called zero deposit and integer retrieval. Zero deposit is the setting of bit by bit. Retrieval is to get all directly through the key name. Data,
Similarly, we can also perform zero storage and zero retrieval, and whole storage and zero retrieval. The whole storage is to directly use the string to set the entire bit array, and the zero retrieval is to obtain the bit through the position of the bit. .
Zero deposit and zero take
#As you can see, we set the bits of the bit array with key called w according to setbit, and only set The value of the three positions 1/2/4 is 1. In the figure below, there is getbit w 3, which gets the value of the third position. The default is 0 at this time. If triggered from a business perspective, it can be understood as a total of 4 days of check-in. , there was no sign-in on the third day,

Deposit in whole and withdraw in small amounts
As shown in the afternoon, we For the key of w, an h character is directly set, and then each bit in the bit array of w is obtained through getbit. You can see that the obtained content is the same as the binary content of the h character above. The 1/2/4 position is 1, the rest are 0

Note
The bit array of redis is Automatic expansion. If a set offset position exceeds the existing content range, the bit array will be automatically expanded by zero, that is, the expanded bits will have a value of 0 by default.
If the byte of the corresponding bit is an unprintable character, redis-cli will display the hexadecimal form of the character.
A byte is 8 bits (bits), and bytes and bits must be distinguished.
redis provides the statistics instruction bitcount and the bitmap search instruction bitpos,
bitcount is used to count the number of 1's in the specified position range, and bitpos is used to find the first 0 or 1 that appears in the specified range.
我们可以通过bitcount统计用户一共签到了多少天,通过bitpos指令查找用户从哪一天开始第一次签到,
如果指定了范围参数[start, end],就可以统计在某个时间范围内用户签到了多少天以及用户自某天以后的哪天开始签到,
但是需要注意的是,start和end参数是字节索引,也就是说,指定的位范围必须是8的倍数,
而不能任意指定,所以我们无法直接计算某个月内用户签到了多少天,如果需要计算的话,
可以使用getrange命令取出该月覆盖的字节内容,然后在内存中进行统计,例如2月覆盖了10-12个字节,就使用 getrange w 8 12 。
127.0.0.1:6379> set w hello

OK

127.0.0.1:6379> bitcount w      # 所有字符中有多少个1

(integer) 21

127.0.0.1:6379> bitcount w 0 0   # 第一个字符中 1 的位数

(integer) 3

127.0.0.1:6379> bitcount w 0 1   # 前两个字符中 1 的位数

(integer) 7

127.0.0.1:6379> bitpos w 0       # 第一个 0 位

(integer) 0

127.0.0.1:6379> bitpos w 1       # 第一个 1 位

(integer) 1

127.0.0.1:6379> bitpos w 1 1 1       # 从第二个字符算起,第一个1位

(integer) 9

127.0.0.1:6379> bitpos w 1 2 2       # 从第三个字符算起,第一个1位

(integer) 17
之前介绍的 setbit / getbit 指定位的值都是单个位,如果要一次操作多个位,就必须使用管道来处理,
在redis3.2以后,提供了bitfield指令,可以一次对多个位进行操作,bitfield有三个子指令,分别是get/set/incrby, 都可以对指定位片段进行读写,
但是最多只能处理64个连续的位,如果超过64位,就需要使用多个子指令,bitfield可以一次执行多个子指令。
示例
下面对下图的位数组使用 bitfield 做一些操作

127.0.0.1:6379> bitfield w get u4 0   # 从第1个位开始取4个位,结果是无符号数(u)

1) (integer) 6

127.0.0.1:6379> bitfield w get u3 2   # 从第3个位开始取3个位,结果是无符号数(u)

1) (integer) 5

127.0.0.1:6379> bitfield w get i4 0   # 从第1个位开始取4个位,结果是有符号数(i)

1) (integer) 6

127.0.0.1:6379> bitfield w get i3 2   # 从第3个位开始取3个位,结果是有符号数(i)

1) (integer) -3
有符号数是指获取的位数组中的第一个位是符号位,剩下的才是值,如果第一位是1,就是负数,
无符号数表示非负数,没有符号位,获取的位数组全部都是值,有符号数最多可以获取64位,
无符号数只能获取63位,因为redis协议中的integer是有符号数,最大64位,不能传递64位的无符号值,
如果超出位数限制,redis就会告诉你参数错误。
上面的指令可以合并成一条指令,可以看到得到的结果是一样的,
bitfield w get u4 0 get u3 2 get i4 0 get i3 2

set修改
我们从第9个位开始,用8个无符号数替换已经存在的8个位,其实就是把第二个字符替换了,由e变成a(它的ASCII码是97),可以看到结果也变成了 hallo
127.0.0.1:6379> bitfield w set u8 8 97

1) (integer) 101

127.0.0.1:6379> get w

"hallo"
incrby
incrby对指定范围的位进行自增操作,即++,这可能会发生溢出,如果增加了正数,会出现上溢出,如果增加的是负数,会出现下溢出,
redis默认的处理是折返,即如果出现了溢出,就将溢出的符号位丢掉,例如,如果是8位无符号数255,加1后就全部变成0,如果是8位有符号数127,加1后就溢出变成-128。

依然根据hello字符,来演示一下 incrby
127.0.0.1:6379> set w hello

OK

127.0.0.1:6379> bitfield w get u4 2     # 从第3位开始取4个无符号整数,第一次是10

1) (integer) 10

127.0.0.1:6379> bitfield w incrby u4 2 1

1) (integer) 11

127.0.0.1:6379> bitfield w incrby u4 2 1

1) (integer) 12

127.0.0.1:6379> bitfield w incrby u4 2 1

1) (integer) 13

127.0.0.1:6379> bitfield w incrby u4 2 1

1) (integer) 14

127.0.0.1:6379> bitfield w incrby u4 2 1

1) (integer) 15
127.0.0.1:6379> bitfield w incrby u4 2 1   #到这里的时候,已经溢出折返成0了

1) (integer) 0
bitfield指令提供溢出策略子指令 overflow,用户可以选择溢出行为,默认是折返(wrap),还可以选择失败(fail) 即报错不执行,还有饱和截断(sat) 即超过范围就停留在最大或最小值,
overflow指令只影响接下来的第一条指令,这条指令执行完以后,溢出策略就会变成默认值 折返(wrap)。
饱和截断
127.0.0.1:6379> set w hello

OK

127.0.0.1:6379> bitfield w overflow sat incrby u4 2 1

1) (integer) 11

127.0.0.1:6379> bitfield w overflow sat incrby u4 2 1

1) (integer) 12

127.0.0.1:6379> bitfield w overflow sat incrby u4 2 1

1) (integer) 13

127.0.0.1:6379> bitfield w overflow sat incrby u4 2 1

1) (integer) 14

127.0.0.1:6379> bitfield w overflow sat incrby u4 2 1

1) (integer) 15

127.0.0.1:6379> bitfield w overflow sat incrby u4 2 1 # 接下来的都将是保持最大值

1) (integer) 15

127.0.0.1:6379> bitfield w overflow sat incrby u4 2 1

1) (integer) 15

127.0.0.1:6379> bitfield w overflow sat incrby u4 2 1

1) (integer) 15
失败不执行
127.0.0.1:6379> set w hello

OK

127.0.0.1:6379> bitfield w overflow fail incrby u4 2 1

1) (integer) 11

127.0.0.1:6379> bitfield w overflow fail incrby u4 2 1

1) (integer) 12

127.0.0.1:6379> bitfield w overflow fail incrby u4 2 1

1) (integer) 13

127.0.0.1:6379> bitfield w overflow fail incrby u4 2 1

1) (integer) 14

127.0.0.1:6379> bitfield w overflow fail incrby u4 2 1

1) (integer) 15

127.0.0.1:6379> bitfield w overflow fail incrby u4 2 1 # 接下来的都是失败

1) (nil)

127.0.0.1:6379> bitfield w overflow fail incrby u4 2 1

1) (nil)

127.0.0.1:6379> bitfield w overflow fail incrby u4 2 1

1) (nil)
get/set/incrby一起执行
127.0.0.1:6379> bitfield w set u4 1 0 get u4 1 incrby u4 2 1

1) (integer) 0

2) (integer) 0

3) (integer) 1

127.0.0.1:6379> get w

"\x04ello"
更多编程相关知识,请访问:编程视频!!
The above is the detailed content of This article will take you to understand the bitmap in redis (bitmap). For more information, please follow other related articles on the PHP Chinese website!
 Commonly used database software
 What are the in-memory databases?
 Which one has faster reading speed, mongodb or redis?
 How to use redis as a cache server
 How redis solves data consistency
 How do mysql and redis ensure double-write consistency?
 What data does redis cache generally store?
 What are the 8 data types of redis