How to solve mysql error 1053 problem
Solution to mysql error 1053: 1. Open the cmd console and execute the command "mysqld-nt remove mysqlservice"; 2. Enter the command "mysqld-nt install mysqlservice"; 3. Re-register the service and restart mysql .
The operating environment of this article: Windows 7 system, Mysql version 5.7, Dell G3 computer.
How to solve the mysql error 1053 problem?
Mysql fails to start. It is a common thing. The environment variables have been configured according to the online tutorials, but the startup still fails. , let me talk about my two personal solutions. For specific operation steps, please see the following operations
The first method:
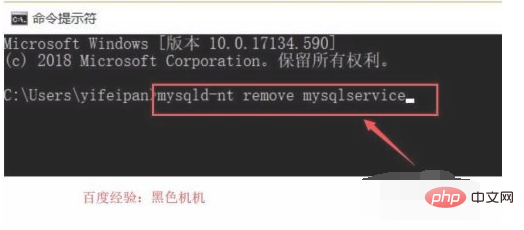
The first step, Open the cmd console on the computer and enter the command: mysqld-nt remove mysqlservice. This method uninstalls the service. It prompts that the uninstallation is successful. The word "success" will appear in English (which means success in English), indicating that it has been successfully uninstalled, as shown in the following command
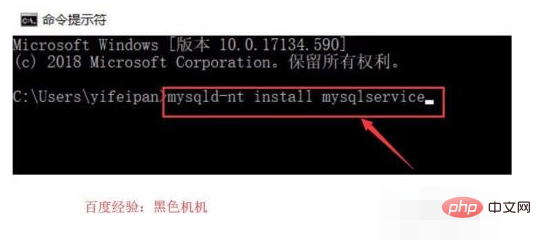
The second step is to follow the cmd console of the previous step, enter the command: mysqld-nt install mysqlservice, re-register the service, and everything will return to normal. (Success will also be displayed in English) success is successful, as shown in the following command
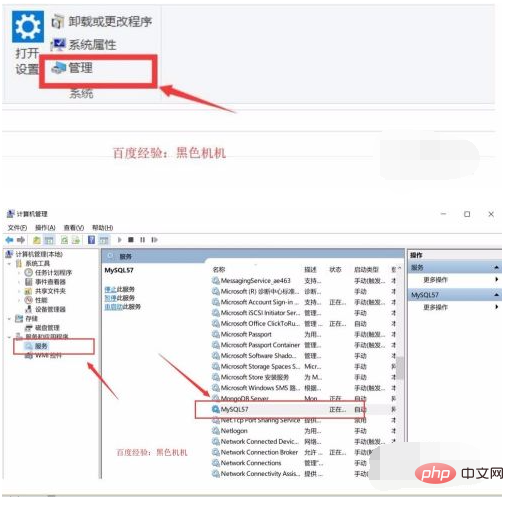
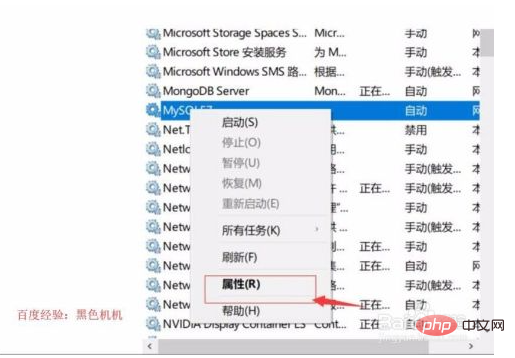
The third step is to right-click my computer, find management, enter the service module, and then find the mysql service. Right-click to close and restart to complete. The details are as shown below
The second method:
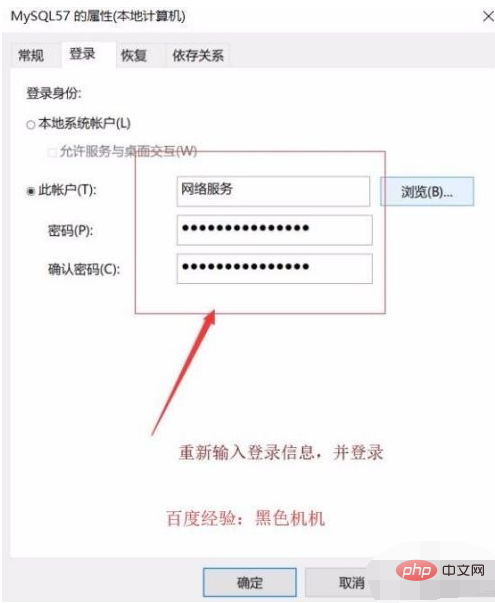
The first step, Right-click my computer, find management, enter the service module, then find the mysql service, right-click
"Properties", the details are as shown below
mysql video Tutorial》
The above is the detailed content of How to solve mysql error 1053 problem. For more information, please follow other related articles on the PHP Chinese website!

Hot AI Tools

Undresser.AI Undress
AI-powered app for creating realistic nude photos

AI Clothes Remover
Online AI tool for removing clothes from photos.

Undress AI Tool
Undress images for free

Clothoff.io
AI clothes remover

AI Hentai Generator
Generate AI Hentai for free.

Hot Article

Hot Tools

Notepad++7.3.1
Easy-to-use and free code editor

SublimeText3 Chinese version
Chinese version, very easy to use

Zend Studio 13.0.1
Powerful PHP integrated development environment

Dreamweaver CS6
Visual web development tools

SublimeText3 Mac version
God-level code editing software (SublimeText3)

Hot Topics
 1377
1377
 52
52
 MySQL: The Ease of Data Management for Beginners
Apr 09, 2025 am 12:07 AM
MySQL is suitable for beginners because it is simple to install, powerful and easy to manage data. 1. Simple installation and configuration, suitable for a variety of operating systems. 2. Support basic operations such as creating databases and tables, inserting, querying, updating and deleting data. 3. Provide advanced functions such as JOIN operations and subqueries. 4. Performance can be improved through indexing, query optimization and table partitioning. 5. Support backup, recovery and security measures to ensure data security and consistency.
 Can I retrieve the database password in Navicat?
Apr 08, 2025 pm 09:51 PM
Navicat itself does not store the database password, and can only retrieve the encrypted password. Solution: 1. Check the password manager; 2. Check Navicat's "Remember Password" function; 3. Reset the database password; 4. Contact the database administrator.
 How to create navicat premium
Apr 09, 2025 am 07:09 AM
Create a database using Navicat Premium: Connect to the database server and enter the connection parameters. Right-click on the server and select Create Database. Enter the name of the new database and the specified character set and collation. Connect to the new database and create the table in the Object Browser. Right-click on the table and select Insert Data to insert the data.
 MySQL: Simple Concepts for Easy Learning
Apr 10, 2025 am 09:29 AM
MySQL is an open source relational database management system. 1) Create database and tables: Use the CREATEDATABASE and CREATETABLE commands. 2) Basic operations: INSERT, UPDATE, DELETE and SELECT. 3) Advanced operations: JOIN, subquery and transaction processing. 4) Debugging skills: Check syntax, data type and permissions. 5) Optimization suggestions: Use indexes, avoid SELECT* and use transactions.
 How to view database password in Navicat for MariaDB?
Apr 08, 2025 pm 09:18 PM
Navicat for MariaDB cannot view the database password directly because the password is stored in encrypted form. To ensure the database security, there are three ways to reset your password: reset your password through Navicat and set a complex password. View the configuration file (not recommended, high risk). Use system command line tools (not recommended, you need to be proficient in command line tools).
 How to execute sql in navicat
Apr 08, 2025 pm 11:42 PM
Steps to perform SQL in Navicat: Connect to the database. Create a SQL Editor window. Write SQL queries or scripts. Click the Run button to execute a query or script. View the results (if the query is executed).
 How to create a new connection to mysql in navicat
Apr 09, 2025 am 07:21 AM
You can create a new MySQL connection in Navicat by following the steps: Open the application and select New Connection (Ctrl N). Select "MySQL" as the connection type. Enter the hostname/IP address, port, username, and password. (Optional) Configure advanced options. Save the connection and enter the connection name.
 Navicat connects to database error code and solution
Apr 08, 2025 pm 11:06 PM
Common errors and solutions when connecting to databases: Username or password (Error 1045) Firewall blocks connection (Error 2003) Connection timeout (Error 10060) Unable to use socket connection (Error 1042) SSL connection error (Error 10055) Too many connection attempts result in the host being blocked (Error 1129) Database does not exist (Error 1049) No permission to connect to database (Error 1000)


