
 Web Front-end
JS Tutorial
JS CSS realizes the classic left vertical sliding menu effect_javascript skills
Web Front-end
JS Tutorial
JS CSS realizes the classic left vertical sliding menu effect_javascript skills
JS CSS realizes the classic left vertical sliding menu effect_javascript skills

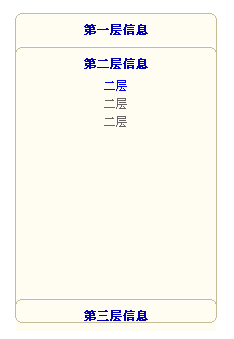
The example in this article describes how to implement the classic left vertical sliding menu effect with JS CSS. Share it with everyone for your reference. The details are as follows:
This is a modified left vertical sliding menu, based on JavaScript CSS, without too many modifications. It mainly wants to achieve the animation effect of the menu. Friends who want to use it, beautify it yourself.
The screenshot of the running effect is as follows:
The online demo address is as follows:
http://demo.jb51.net/js/2015/js-css-jd-left-v-hd-menu-style-codes/
The specific code is as follows:
<!DOCTYPE html PUBLIC "-//W3C//DTD XHTML 1.0 Transitional//EN">
<html xmlns="http://www.w3.org/1999/xhtml">
<title>经过改造的左侧竖向滑动菜单</title>
<style type="text/css">
body{
 margin:10px;
 padding:10px;
}
a:link { text-decoration: none;color: blue}
a:active { text-decoration:blink}
a:hover { text-decoration:underline;color: red}
a:visited { text-decoration: none;color: green}
body,td,div,span,li{
 font-size:12px;
}
.title01,.title02{
 color:#00b;
 font-weight:bold;
}
#DoorP{
 width:200px;
 height:300px;
 padding:0px;
 background:#FFFCF2;
}
.title01{
 width:100%;
 height:25px;
 background:#FFFCF2;
 cursor:pointer;
}
.title02{
 width:100%;
 height:25px;
 background:#FFFCF2;
 cursor:pointer;
}
.content{
 background:#FFFCF2;
 border-bottom:2px solid #fff;
 overflow:hidden;
 color:#666;
 padding-left:4px;
 padding-right:4px;
 line-height:18px;
}
.curved {
 width:202px;
 }
.curved .b1, .curved .b2, .curved .b3, .curved .b4 {
 font-size:1px;
 display:block;
 background:#FFFCF2;
overflow: hidden;
}
.curved .b1, .curved .b2, .curved .b3 {
 height:1px;
 }
.curved .b2, .curved .b3, .curved .b4 {
 background:#FFFCF2;
 border-left:1px solid #C7BC98;
 border-right:1px solid #C7BC98;
 }
.curved .b1 {
 margin:0 4px;
 background:#C7BC98;
 }
.curved .b2 {
 margin:0 2px;
 border-width:0 2px;
 }
.curved .b3 {
 margin:0 1px;
 }
.curved .b4 {
 height:2px;
 margin:0;
 }
.curved .c1 {
 margin:0 5px;
 background:#C7BC98;
 }
.curved .c2 {
 margin:0 3px;
 border-width:0 2px;
 }
.curved .c3 {
 margin:0 2px;
 }
.curved .c4 {
 height:2px;
 margin: 0 1px;
 }
.curved .boxcontent {
 display:block;
 background:transparent;
 border-left:1px solid #C7BC98;
 border-right:1px solid #C7BC98;
 font-size:0.9em;
 text-align:justify;
 }
</style>
<div class="curved">
 <b class="b1 c1"></b>
 <b class="b2 c2"></b>
 <b class="b3 c3"></b>
 <b class="b4 c4"></b>
 <div class="boxcontent">
<div id="DoorP">
 <table>
 <tr>
  <td align="center">
   第一层信息
  </td>
 </tr>
 </table>
 <div class="content" align="center">
 <a href="#">二层</a><br/>
 二层<br/>
 二层<br/>
 </div>
  <b class="b1"></b>
  <b class="b2"></b>
  <b class="b3"></b>
  <b class="b4"></b>
 <table>
 <tr>
  <td align="center">
  第二层信息
  </td>
 </tr>
 </table>
<div class="content" align="center">
 <a href="#">二层</a><br/>
 二层<br/>
 二层<br/>
 </div>
  <b class="b1"></b>
  <b class="b2"></b>
  <b class="b3"></b>
  <b class="b4"></b>
 <table>
 <tr>
  <td align="center">
  第三层信息
  </td>
 </tr>
 </table>
<div class="content" align="center">
 <a href="#">二层</a><br/>
 二层<br/>
 二层<br/>
 </div>
</div></div>
 <b class="b4 c4"></b>
 <b class="b3 c3"></b>
 <b class="b2 c2"></b>
 <b class="b1 c1"></b>
<script type="text/javascript">
 var open = 2;
 var openState = new Array();
 var closeState = new Array();
 var dH = 220;
 function $(id){
 if(document.getElementById(id))
 {
  return document.getElementById(id);
 }
 else
 {
  alert("没有找到!");
 }
 }
 function $tag(id,tagName){
 return $(id).getElementsByTagName(tagName)
 }
 function closeMe(Cid,Oid){
 var h = parseInt(Ds[Cid].style.height);
 //alert(h);
 if(h > 2)
 {
  h = h - Math.ceil(h/3);
  Ds[Cid].style.height = h+"px";
 }
 else
 {
  openMe(Oid);
  clearTimeout(closeState[Cid]);
  return false;
 }
 closeState[Cid] = setTimeout("closeMe("+Cid+","+Oid+")");
 }
 function openMe(Oid){
 var h = parseInt(Ds[Oid].style.height);
 //alert(h);
 if(h < dH)
 {
  h = h + Math.ceil((dH-h)/3);
  Ds[Oid].style.height = h+"px";
 }
 else
 {
  clearTimeout(openState[Oid]);
  return false;
 }
 openState[Oid] = setTimeout("openMe("+Oid+")");
 }
 var Ds = $tag("DoorP","div");
 var Ts = $tag("DoorP","table");
 if(Ds.length != Ts.length)
 {
 alert("标题和内容数目不相同!");
 }
 for(var i = 0 ; i < Ds.length ; i++)
 {
 if(i==open)
 {
  Ds[i].style.height = dH+"px";
  Ts[i].className="title01";
 }
 else
 {
  Ds[i].style.height = "0px";
  Ts[i].className="title02";
 }
 Ts[i].value = i;
 Ts[i].onclick = function(){
  if(open==this.value)
  {
  return false;
  }
  Ts[open].className="title02";
  Ts[this.value].className="title01";
  for(var i = 0 ; i < openState.length ; i++)
  {
  clearTimeout(openState[i]);
  clearTimeout(closeState[i]);
  }
  closeMe(open,this.value);
  //openMe(this.value);
  open = this.value;
 }
 }
 function showDiv(id){
 Ds[id].style.height=dH+"px";
 Ds[open].style.height="0px";
 open = id;
 }
</script>
I hope this article will be helpful to everyone’s JavaScript programming.

Hot AI Tools

Undresser.AI Undress
AI-powered app for creating realistic nude photos

AI Clothes Remover
Online AI tool for removing clothes from photos.

Undress AI Tool
Undress images for free

Clothoff.io
AI clothes remover

AI Hentai Generator
Generate AI Hentai for free.

Hot Article
Hot Tools

Notepad++7.3.1
Easy-to-use and free code editor

SublimeText3 Chinese version
Chinese version, very easy to use

Zend Studio 13.0.1
Powerful PHP integrated development environment

Dreamweaver CS6
Visual web development tools

SublimeText3 Mac version
God-level code editing software (SublimeText3)
Hot Topics
 1376
1376
 52
52

 How to use bootstrap button
Apr 07, 2025 pm 03:09 PM
How to use bootstrap button
Apr 07, 2025 pm 03:09 PM
How to use the Bootstrap button? Introduce Bootstrap CSS to create button elements and add Bootstrap button class to add button text
 How to resize bootstrap
Apr 07, 2025 pm 03:18 PM
How to resize bootstrap
Apr 07, 2025 pm 03:18 PM
To adjust the size of elements in Bootstrap, you can use the dimension class, which includes: adjusting width: .col-, .w-, .mw-adjust height: .h-, .min-h-, .max-h-
 How to view the date of bootstrap
Apr 07, 2025 pm 03:03 PM
How to view the date of bootstrap
Apr 07, 2025 pm 03:03 PM
Answer: You can use the date picker component of Bootstrap to view dates in the page. Steps: Introduce the Bootstrap framework. Create a date selector input box in HTML. Bootstrap will automatically add styles to the selector. Use JavaScript to get the selected date.
 How to insert pictures on bootstrap
Apr 07, 2025 pm 03:30 PM
How to insert pictures on bootstrap
Apr 07, 2025 pm 03:30 PM
There are several ways to insert images in Bootstrap: insert images directly, using the HTML img tag. With the Bootstrap image component, you can provide responsive images and more styles. Set the image size, use the img-fluid class to make the image adaptable. Set the border, using the img-bordered class. Set the rounded corners and use the img-rounded class. Set the shadow, use the shadow class. Resize and position the image, using CSS style. Using the background image, use the background-image CSS property.
 How to write split lines on bootstrap
Apr 07, 2025 pm 03:12 PM
How to write split lines on bootstrap
Apr 07, 2025 pm 03:12 PM
There are two ways to create a Bootstrap split line: using the tag, which creates a horizontal split line. Use the CSS border property to create custom style split lines.
 How to set up the framework for bootstrap
Apr 07, 2025 pm 03:27 PM
How to set up the framework for bootstrap
Apr 07, 2025 pm 03:27 PM
To set up the Bootstrap framework, you need to follow these steps: 1. Reference the Bootstrap file via CDN; 2. Download and host the file on your own server; 3. Include the Bootstrap file in HTML; 4. Compile Sass/Less as needed; 5. Import a custom file (optional). Once setup is complete, you can use Bootstrap's grid systems, components, and styles to create responsive websites and applications.
 How to verify bootstrap date
Apr 07, 2025 pm 03:06 PM
How to verify bootstrap date
Apr 07, 2025 pm 03:06 PM
To verify dates in Bootstrap, follow these steps: Introduce the required scripts and styles; initialize the date selector component; set the data-bv-date attribute to enable verification; configure verification rules (such as date formats, error messages, etc.); integrate the Bootstrap verification framework and automatically verify date input when form is submitted.
 How to set the bootstrap navigation bar
Apr 07, 2025 pm 01:51 PM
How to set the bootstrap navigation bar
Apr 07, 2025 pm 01:51 PM
Bootstrap provides a simple guide to setting up navigation bars: Introducing the Bootstrap library to create navigation bar containers Add brand identity Create navigation links Add other elements (optional) Adjust styles (optional)
