
 WeChat Applet
Mini Program Development
How to elegantly catch exceptions in asynchronous methods in small programs
WeChat Applet
Mini Program Development
How to elegantly catch exceptions in asynchronous methods in small programs
How to elegantly catch exceptions in asynchronous methods in small programs

How to elegantly catch exceptions in asynchronous methods in native applet? The following article will introduce to you the elegant use of async await asynchronous programming in small programs. I hope it will be helpful to you!

Recently I started writing an open source cloud development community applet. In the process of writing, I slowly explored some tricks that are helpful in the development and testing process. Yin Qiao. This article talks about how to elegantly catch exceptions from asynchronous methods in native applet.
Traditional method
After ES7, we often use the async await syntax for asynchronous programming. If we want to catch exceptions, there are generally two methods:
try catch
async func(){
     //do something
}
try {
    const res = await func()
} catch (error) {
    //handle error
}The first is try catch to catch exceptions. It is really convenient to use try catch To handle exceptions, it can also prevent the subsequent methods from proceeding. However, during the development process, we often have more than one asynchronous method. Extensive use of try catch is not only unpleasant to write, but also definitely not elegant.
Promise.catch()
async func(){
     //do something
}

const res = await func().catch(error=>{
    //handle error
}) Inside the Promise object try catch, we can use chain calls method to handle exceptions. Compared with try catch, Promise.catch() is certainly much easier to write and looks more elegant.
But when we want to stop the continued execution of the method after catching the error, then Promise.catch() There is no way to do it. The following example
async func(){
     //do something
}

const res = await func().catch(error=>{
    // 即使return也无效
    return
})
// 如果有错误的话我就不执行了is elegant Way
await-to-js github link
https://github.com/scopsy/await-to-js
await-to-js This library should be familiar to many people. It is a wrapper for asynchronous requests. It can be used to handle errors in asynchronous requests. According to our above needs, it is modified to use await-to- The example of js is as follows
import to from 'await-to-js';

async func(){
     //do something
}

const [err,res] = await to(func())
if(err){
    //handle error
    return
}
// 如果有错误的话我就不执行了By using our asynchronous method as the parameter of the to() method, the return value is obtained through an array destructuring, and the array No. One value is the caught error, and the second value is the return value from normal execution. The implementation principle of
await-to-js is also very simple, that is, use Promise.catch() to obtain the exception and then return the result in an array. The source code is as follows
export function to<T, U = Error> (
	promise: Promise<T>,
	errorExt?: object
  ): Promise<[U, undefined] | [null, T]> {
	return promise
	  .then<[null, T]>((data: T) => [null, data])
	  .catch<[U, undefined]>((err: U) => {
		if (errorExt) {
		  const parsedError = Object.assign({}, err, errorExt);
		  return [parsedError, undefined];
		}

		return [err, undefined];
	  });
  }

export default to;Used in small programs
In small programs, it is not convenient for us to use npm packages, so we can directly take out the source code and use it alone, and then modify it. Asynchronous programming is done elegantly. My own transformation method is as follows.
// lib/awaitTo.js
module.exports = function to(promise, description="unknown") {
	const pages = getCurrentPages()
	const route = pages[pages.length - 1].route||'unknown'
	description = `[${route}]---[${description}]`
	console.time(description)
	return promise
		.then(function (data) {
			console.timeEnd(description)
			return [null, data];
		})
		.catch(function (err) {
			wx.showToast({
				title: '请求失败',
				icon: "none"
			})
			return [err, undefined];
		});
}I used getCurrentPages() to get the corresponding page route when the asynchronous method is executed, and then changed the second parameter to my ownA description of the asynchronous method, every time an asynchronous method is called, the execution time will be output on the console. Actual examples of use are as follows:
const to = require("../../lib/awaitTo")
const [err, res] = await to(db.collection("post").add({
        data: form
}),"addPost")
if (err) {
        // 处理我的错误
        return
}
// 成功后执行的逻辑The execution time output printed by the console is as follows, the printing format is
[Routing page]---[Method description]: Execution time

Of course, my encapsulation method is for my own code. You can also modify it according to your actual business, such as a unified entrance for buried points, etc. It can greatly improve development efficiency!
Summary
When using cloud development, you have to use native language to write for the development experience. The relatively closed environment makes many web-side methods unusable. In recent explorations I have also found many ways to improve the native applet development experience, which will be updated in the future.
[Related learning recommendations: 小program development tutorial]
The above is the detailed content of How to elegantly catch exceptions in asynchronous methods in small programs. For more information, please follow other related articles on the PHP Chinese website!

Hot AI Tools

Undresser.AI Undress
AI-powered app for creating realistic nude photos

AI Clothes Remover
Online AI tool for removing clothes from photos.

Undress AI Tool
Undress images for free

Clothoff.io
AI clothes remover

Video Face Swap
Swap faces in any video effortlessly with our completely free AI face swap tool!

Hot Article
Hot Tools

Notepad++7.3.1
Easy-to-use and free code editor

SublimeText3 Chinese version
Chinese version, very easy to use

Zend Studio 13.0.1
Powerful PHP integrated development environment

Dreamweaver CS6
Visual web development tools

SublimeText3 Mac version
God-level code editing software (SublimeText3)
Hot Topics
 1387
1387
 52
52

 Is async for es6 or es7?
Jan 29, 2023 pm 05:36 PM
Is async for es6 or es7?
Jan 29, 2023 pm 05:36 PM
async is es7. async and await are new additions to ES7 and are solutions for asynchronous operations; async/await can be said to be syntactic sugar for co modules and generator functions, solving js asynchronous code with clearer semantics. As the name suggests, async means "asynchronous". Async is used to declare that a function is asynchronous; there is a strict rule between async and await. Both cannot be separated from each other, and await can only be written in async functions.
 Develop WeChat applet using Python
Jun 17, 2023 pm 06:34 PM
Develop WeChat applet using Python
Jun 17, 2023 pm 06:34 PM
With the popularity of mobile Internet technology and smartphones, WeChat has become an indispensable application in people's lives. WeChat mini programs allow people to directly use mini programs to solve some simple needs without downloading and installing applications. This article will introduce how to use Python to develop WeChat applet. 1. Preparation Before using Python to develop WeChat applet, you need to install the relevant Python library. It is recommended to use the two libraries wxpy and itchat here. wxpy is a WeChat machine
 Can small programs use react?
Dec 29, 2022 am 11:06 AM
Can small programs use react?
Dec 29, 2022 am 11:06 AM
Mini programs can use react. How to use it: 1. Implement a renderer based on "react-reconciler" and generate a DSL; 2. Create a mini program component to parse and render DSL; 3. Install npm and execute the developer Build npm in the tool; 4. Introduce the package into your own page, and then use the API to complete the development.
 Implement card flipping effects in WeChat mini programs
Nov 21, 2023 am 10:55 AM
Implement card flipping effects in WeChat mini programs
Nov 21, 2023 am 10:55 AM
Implementing card flipping effects in WeChat mini programs In WeChat mini programs, implementing card flipping effects is a common animation effect that can improve user experience and the attractiveness of interface interactions. The following will introduce in detail how to implement the special effect of card flipping in the WeChat applet and provide relevant code examples. First, you need to define two card elements in the page layout file of the mini program, one for displaying the front content and one for displaying the back content. The specific sample code is as follows: <!--index.wxml-->&l
 Alipay launched the 'Chinese Character Picking-Rare Characters' mini program to collect and supplement the rare character library
Oct 31, 2023 pm 09:25 PM
Alipay launched the 'Chinese Character Picking-Rare Characters' mini program to collect and supplement the rare character library
Oct 31, 2023 pm 09:25 PM
According to news from this site on October 31, on May 27 this year, Ant Group announced the launch of the "Chinese Character Picking Project", and recently ushered in new progress: Alipay launched the "Chinese Character Picking-Uncommon Characters" mini program to collect collections from the society Rare characters supplement the rare character library and provide different input experiences for rare characters to help improve the rare character input method in Alipay. Currently, users can enter the "Uncommon Characters" applet by searching for keywords such as "Chinese character pick-up" and "rare characters". In the mini program, users can submit pictures of rare characters that have not been recognized and entered by the system. After confirmation, Alipay engineers will make additional entries into the font library. This website noticed that users can also experience the latest word-splitting input method in the mini program. This input method is designed for rare words with unclear pronunciation. User dismantling
 How uniapp achieves rapid conversion between mini programs and H5
Oct 20, 2023 pm 02:12 PM
How uniapp achieves rapid conversion between mini programs and H5
Oct 20, 2023 pm 02:12 PM
How uniapp can achieve rapid conversion between mini programs and H5 requires specific code examples. In recent years, with the development of the mobile Internet and the popularity of smartphones, mini programs and H5 have become indispensable application forms. As a cross-platform development framework, uniapp can quickly realize the conversion between small programs and H5 based on a set of codes, greatly improving development efficiency. This article will introduce how uniapp can achieve rapid conversion between mini programs and H5, and give specific code examples. 1. Introduction to uniapp unia
 Tutorial on writing a simple chat program in Python
May 08, 2023 pm 06:37 PM
Tutorial on writing a simple chat program in Python
May 08, 2023 pm 06:37 PM
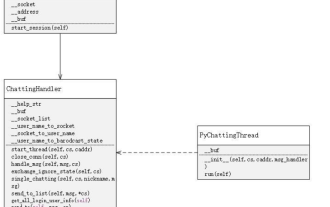
Implementation idea: Establishing the server side of thread, so as to process the various functions of the chat room. The establishment of the x02 client is much simpler than the server. The function of the client is only to send and receive messages, and to enter specific characters according to specific rules. To achieve the use of different functions, therefore, on the client side, you only need to use two threads, one is dedicated to receiving messages, and the other is dedicated to sending messages. As for why not use one, that is because, only
 How to operate mini program registration
Sep 13, 2023 pm 04:36 PM
How to operate mini program registration
Sep 13, 2023 pm 04:36 PM
Mini program registration operation steps: 1. Prepare copies of personal ID cards, corporate business licenses, legal person ID cards and other filing materials; 2. Log in to the mini program management background; 3. Enter the mini program settings page; 4. Select " "Basic Settings"; 5. Fill in the filing information; 6. Upload the filing materials; 7. Submit the filing application; 8. Wait for the review results. If the filing is not passed, make modifications based on the reasons and resubmit the filing application; 9. The follow-up operations for the filing are Can.
