How to install and build Homestead 2.0 environment on Mac
How to set up a Homestead environment on Mac? The following article will introduce to you how to install and build the Homestead 2.0 environment under the Mac version. I hope it will be helpful to you!
Homestead is one of Laravel's officially recommended development environments. It consists of a Homestead script that customizes VagrantHow to install and build Homestead 2.0 environment on Mac and a Vagrant box that contains PHP development-related software.
Note: This document is a note on installing Homestead 2.0 under Mac version 10.10. It requires a certain understanding of Homestead when reading. For instructions on Homestead, please see (https://learnku.com/laravel/ t/256).
Installation
1. Install Virtual Box
##Download (https://www.virtualbox.org/wiki/ Downloads) and install Virtual Box.2. Install Vagrant
Download (http://www.vagrantup.com/downloads.html) and install Vagrant.3. Download and add homestead box
Command line operation$ vagrant box add laravel/homestead

$ vagrant box add laravel/homestead /path/to/virtualbox.box
4. Install homestead command
composer global require "laravel/homestead=~2.0"
Please make sureAfter the installation is complete, execute the following command to test:~/. The composer/vendor/bin
directory is in your PATH.
homestead
1. Initializing homestead
$ homestead init
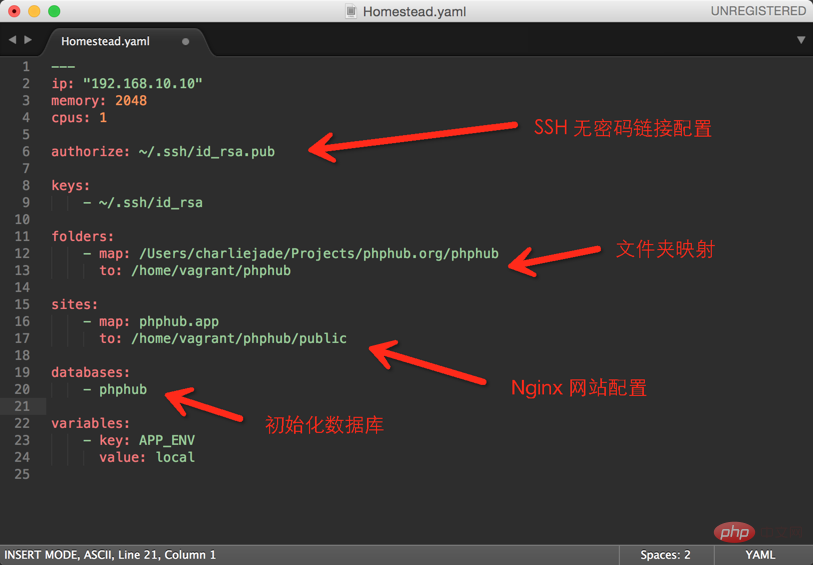
~/.homestead/Homestead.yaml How to install and build Homestead 2.0 environment on Mac
2. Configure Homestead.yaml
Run the following command to edit the~/.homestead/Homestead.yaml How to install and build Homestead 2.0 environment on Mac
$ homestead edit

3. Add hosts
Execute the following command$ sudo vi /etc/hosts
192.168.10.10 phphub.app
4. Initialize the homestead virtual machine
$ homestead up
Port mapping
Local address127.0.0.1Port corresponding
- SSH: 2222 → Forwards To 22
- HTTP: 8000 → Forwards To 80
- MySQL: 33060 → Forwards To 3306
- Postgres: 54320 → Forwards To 5432
Connect to the database
The authentication for MySQL and Postgres is: homestead/secretLog in to the virtual machine
$ homestead ssh
The above is the detailed content of How to install and build Homestead 2.0 environment on Mac. For more information, please follow other related articles on the PHP Chinese website!

Hot AI Tools

Undresser.AI Undress
AI-powered app for creating realistic nude photos

AI Clothes Remover
Online AI tool for removing clothes from photos.

Undress AI Tool
Undress images for free

Clothoff.io
AI clothes remover

Video Face Swap
Swap faces in any video effortlessly with our completely free AI face swap tool!

Hot Article

Hot Tools

Notepad++7.3.1
Easy-to-use and free code editor

SublimeText3 Chinese version
Chinese version, very easy to use

Zend Studio 13.0.1
Powerful PHP integrated development environment

Dreamweaver CS6
Visual web development tools

SublimeText3 Mac version
God-level code editing software (SublimeText3)

Hot Topics
 1387
1387
 52
52
 How to get the return code when email sending fails in Laravel?
Apr 01, 2025 pm 02:45 PM
Method for obtaining the return code when Laravel email sending fails. When using Laravel to develop applications, you often encounter situations where you need to send verification codes. And in reality...
 Laravel schedule task is not executed: What should I do if the task is not running after schedule: run command?
Mar 31, 2025 pm 11:24 PM
Laravel schedule task run unresponsive troubleshooting When using Laravel's schedule task scheduling, many developers will encounter this problem: schedule:run...
 In Laravel, how to deal with the situation where verification codes are failed to be sent by email?
Mar 31, 2025 pm 11:48 PM
The method of handling Laravel's email failure to send verification code is to use Laravel...
 How to implement the custom table function of clicking to add data in dcat admin?
Apr 01, 2025 am 07:09 AM
How to implement the table function of custom click to add data in dcatadmin (laravel-admin) When using dcat...
 Laravel Redis connection sharing: Why does the select method affect other connections?
Apr 01, 2025 am 07:45 AM
The impact of sharing of Redis connections in Laravel framework and select methods When using Laravel framework and Redis, developers may encounter a problem: through configuration...
 Laravel multi-tenant extension stancl/tenancy: How to customize the host address of a tenant database connection?
Apr 01, 2025 am 09:09 AM
Custom tenant database connection in Laravel multi-tenant extension package stancl/tenancy When building multi-tenant applications using Laravel multi-tenant extension package stancl/tenancy,...
 Laravel Eloquent ORM in Bangla partial model search)
Apr 08, 2025 pm 02:06 PM
LaravelEloquent Model Retrieval: Easily obtaining database data EloquentORM provides a concise and easy-to-understand way to operate the database. This article will introduce various Eloquent model search techniques in detail to help you obtain data from the database efficiently. 1. Get all records. Use the all() method to get all records in the database table: useApp\Models\Post;$posts=Post::all(); This will return a collection. You can access data using foreach loop or other collection methods: foreach($postsas$post){echo$post->
 Which is better, Django or Laravel?
Mar 28, 2025 am 10:41 AM
Both Django and Laravel are full-stack frameworks. Django is suitable for Python developers and complex business logic, while Laravel is suitable for PHP developers and elegant syntax. 1.Django is based on Python and follows the "battery-complete" philosophy, suitable for rapid development and high concurrency. 2.Laravel is based on PHP, emphasizing the developer experience, and is suitable for small to medium-sized projects.


