

What does vue component development mean?

In Vue, component development refers to splitting complex business into multiple components, and the CSS, JS, templates, pictures and other resources that each component depends on are developed and maintained together. Because components are independent of resources, they can be reused within the system, greatly simplifying the amount of code, and are more friendly to later demand changes and maintenance.

The operating environment of this tutorial: windows7 system, vue2.9.6 version, DELL G3 computer.
Vue component development
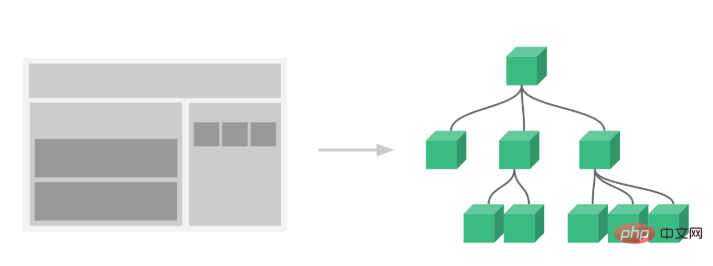
What is componentization
vue.js has two major One magic weapon is data-driven and the other is componentization. So the question is, what is componentization and why is it necessary? Next, I will answer these two questions one by one. The so-called componentization is to split the page into multiple components, and the CSS, JS, templates, pictures and other resources that each component depends on are developed and maintained together. . Because components are independent of resources, they can be reused within the system, and components can be nested. If the project is complex, the amount of code can be greatly simplified, and later demand changes and maintenance will be easier. friendly.
1. Component-based development refers to splitting complex business into components one after another
2. Components developed through component-based development generally need to be flexible
3. Component development involves Vue’s js component encapsulation, and you need to master the basics of Vue, Vue instance methods and properties, Vue.extend, Vue plug-ins, etc.
How to carry out component development
First look at the picture below:

This is an error in vue.js. The reason is that an unregistered component lx-xxx is used. This error tells us a truth: You must register before using a custom component.
So how to register a component? Vue.js provides two ways to register components, global registration and local registration.
1. Global registration
In vue.js we can use Vue.component(tagName, options) for global registration, such as
Vue.component('my-component', {
  // 选项
})2. Partial registration
Vue.js also supports partial registration. We can use the components option inside a component to do partial registration of the component, for example:
import HelloWorld from './components/HelloWorld'

export default {
  components: {
    HelloWorld
  }
}Difference : Global components are mounted under Vue.options.components, while local components are mounted under vm.$options.components, which are also globally registered components. can be used arbitrarily.
Essential knowledge for component development
It is said that if you want to do your job well, you must first sharpen your tools. Before formally developing a component, we must first To master some necessary knowledge, I will only briefly introduce it here. Please refer to the official website for details.
name
The name of the component, required
<lx-niu/> <lx-niu></lx-niu/> name: 'lxNiu'
Use camel case commands in js, kebab-case for HTML name.
props
Component properties, used for parent-child component communication, can be accessed through this.msg
<div>{{msg}}</div>
props: {
msg: {
type: String,
default: ''
}
}
show: Boolean // 默认false
msg: [String, Boolean] // 多种类型computed
Process the attributes in data or props and return a new attribute
<div>{{newMsg}}</div>
computed: {
newMsg() {
return 'hello ' + this.msg
}
},Note: Because props, data and computed will be used as vm during the compilation phase The attributes are merged, so the name cannot be repeated
render
Use the render function to describe the h in template
<lx-niu tag='button'>hello world</lx-niu>
<script type="text/javascript">
export default {
name: 'lxNiu',
props: {
tag: {
type: String,
default: 'div'
},
},
// h: createElement
render(h) {
return h(this.tag,
{class: 'demo'},
this.$slots.default)
}
}
</script>render In fact It is createElement, which accepts three parameters and returns a vnode
h Parameter explanation:
args1: {string | Function | Object} is used to provide the html content of the DOM
args2: {Object} sets the DOM style, Properties, binding events, etc.
args3: {array} is used to set the distributed content
Note: vue compilation sequence: template–> compile --> render --> vnode -- > patch --> DOM
slot
##
<lx-niu>
<div slot='header'>header</div>
<div class="body" slot='body'>
<input type="text">
</div>
<div slot='footer'>footer</div>
<button class='btn'>button</button>
</lx-niu>
<template>
<div>
<slot name='header'></slot>
<slot name='body'></slot>
<slot name='footer'></slot>
<slot></slot>
</div>
</template>
<script>
export default {
name: 'lxNiu',
mounted() {
this.$slots.header // 包含了slot="foo"的内容
this.$slots.default // 得到一个vnode,没有被包含在具名插槽中的节点,这里是button
}
}
</script>class
Define the class name of the subcomponent// 父组件
<lx-niu round type='big'/>
// 子组件
<div :class="[
type ? 'lx-niu__' + type : '',
{'is-round': round},
]">控制</div>
//真实DOM
<div class='lx-niu__big is-round'>hello</div>style
Transfer style to the subcomponent// 父组件
<lx-niu :bodyStyle='{color: "red"}'/>
// 子组件
<template>
<div :style='bodyStyle'>hello world</div>
</template>
<script>
export default {
name: 'lxNiu',
props: {
bodyStyle: {},
},
}
</script>Other attributes
$attrs
v-bind="$attrs" will be removed Attributes outside class and style are added to the parent component, such as defining input:<input v-bind="$attrs">
v-once
The component is only rendered once, even if the data changes later. It will be re-rendered. For example, in the example, val will not become 456<template>
<div>
<button @click="show = !show">button</button>
<button @click="val = '456'">button</button>
<div v-once v-if="show">
<span>{{val}}</span>
</div>
</div>
</template>
<script>
export default {
data() {
return{
show: false,
val: '123'
}
},
};
</script>mixins
// mixin.js
export default {
  data() {
    return{
       msg: 'hello world'
    }
  },
  methods: {
    clickBtn() {
      console.log(this.msg)
    }
  },
}

// index.vue
<button @click="clickBtn">button</button>

import actionMixin from "./mixin.js";
export default {
  methods: {},
  mixins: [actionMixin]
}实例演示
比如我们要注册一个 lx-button 这样一个组件,那么目录和伪代码如下:
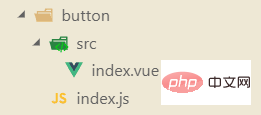
index.vue
<template>
<button>lxButton</button>
</template>
<script>
export default {
name: 'lxButton'
}
</script>index.js
import lxButton from './src/index'

lxButton.install = (Vue) => {
  Vue.component(lxButton.name, lxButton)
}

export default lxButton其中 install 是 Vue.js 提供了一个公开方法,这个方法的第一个参数是 Vue 构造器,第二个参数是一个可选的选项对象。MyPlugin.install = function (Vue, options){}
参考: 开发插件
https://cn.vuejs.org/v2/guide/plugins.html#%E5%BC%80%E5%8F%91%E6%8F%92%E4%BB%B6
watch-弹窗实现原理
<button @click="dialogVisible = true">显示</button>
<lx-niu :visible.sync="dialogVisible"></lx-niu>
<script>
export default {
data() {
return {
dialogVisible: false
}
},
watch: {
dialogVisible(val) {
console.log('father change', val)
}
}
}
</script>定义组件
<template>
<div v-show="visible">
<button @click="hide">关闭</button>
</div>
</template>
<script>
export default {
name: 'lxNiu',
props: {
visible: Boolean
},
watch: {
visible(val) {
console.log('child change:', val)
}
},
methods: {
hide() {
this.$emit('update:visible', false);
}
},
}
</script>点击父组件中的显示按钮,改变传入子组件中的值,点击子组件中的关闭,改变父组件中值。
注:@click=“dialogVisible = true” 点击时将dialogVisible的值改为true
注::visible.sync: 双向数据绑定,配合update:visible使用,实现子组件修改父组件中的值
官网解释: sync
col组件实例
export default {
  name: 'ElCol',

  props: {
    span: {
      type: Number,
      default: 24
    },
    tag: {
      type: String,
      default: 'div'
    },
    offset: Number,
    pull: Number,
    push: Number,
    xs: [Number, Object],
    sm: [Number, Object],
    md: [Number, Object],
    lg: [Number, Object],
    xl: [Number, Object]
  },

  computed: {
    gutter() {
      let parent = this.$parent;
      while (parent && parent.$options.componentName !== 'ElRow') {
        parent = parent.$parent;
      }
      return parent ? parent.gutter : 0;
    }
  },
  render(h) {
    let classList = [];
    let style = {};

    if (this.gutter) {
      style.paddingLeft = this.gutter / 2 + 'px';
      style.paddingRight = style.paddingLeft;
    }

    ['span', 'offset', 'pull', 'push'].forEach(prop => {
      if (this[prop] || this[prop] === 0) {
        classList.push(
          prop !== 'span'
            ? `el-col-${prop}-${this[prop]}`
            : `el-col-${this[prop]}`
        );
      }
    });

    ['xs', 'sm', 'md', 'lg', 'xl'].forEach(size => {
      if (typeof this[size] === 'number') {
        classList.push(`el-col-${size}-${this[size]}`);
      } else if (typeof this[size] === 'object') {
        let props = this[size];
        Object.keys(props).forEach(prop => {
          classList.push(
            prop !== 'span'
              ? `el-col-${size}-${prop}-${props[prop]}`
              : `el-col-${size}-${props[prop]}`
          );
        });
      }
    });

    return h(this.tag, {
      class: ['el-col', classList],
      style
    }, this.$slots.default);
  }
};col组件使用render函数,而不是template来实现组件,原因有两个:
该组件有大量的类判断,如果采用template代码比较冗余,使用js代码更加简洁
直接render描述性能更好
官网解释: render-function
button组件实例
<template>
<button
class="el-button"
@click="handleClick"
:disabled="buttonDisabled || loading"
:autofocus="autofocus"
:type="nativeType"
:class="[
type ? 'el-button--' + type : '',
buttonSize ? 'el-button--' + buttonSize : '',
{
'is-disabled': buttonDisabled,
'is-loading': loading,
'is-plain': plain,
'is-round': round,
'is-circle': circle
}
]"
>
<i class="el-icon-loading" v-if="loading"></i>
<i :class="icon" v-if="icon && !loading"></i>
<span v-if="$slots.default"><slot></slot></span>
</button>
</template>
<script>
export default {
name: 'ElButton',
inject: {
elForm: {
default: ''
},
elFormItem: {
default: ''
}
},
props: {
type: {
type: String,
default: 'default'
},
size: String,
icon: {
type: String,
default: ''
},
nativeType: {
type: String,
default: 'button'
},
loading: Boolean,
disabled: Boolean,
plain: Boolean,
autofocus: Boolean,
round: Boolean,
circle: Boolean
},
computed: {
_elFormItemSize() {
return (this.elFormItem || {}).elFormItemSize;
},
buttonSize() {
return this.size || this._elFormItemSize || (this.$ELEMENT || {}).size;
},
buttonDisabled() {
return this.disabled || (this.elForm || {}).disabled;
}
},
methods: {
handleClick(evt) {
this.$emit('click', evt);
}
}
};
</script>局部组件实例
<template>
<div class="login">
<login-header />
<login-request />
<login-footer />
</div>
</template>
<script>
import loginHeader from './login-header';
import loginRequest from './login-request';
import loginFooter from './login-footer';
export default {
components: {
[loginHeader.name]: loginHeader,
[loginRequest.name]: loginRequest,
[loginFooter.name]: loginFooter
}
};
</script>8. 分享总结
- 首先介绍了什么是组件化开发,以及为什么要进行组件化
- 其次介绍了组件开发的两种方式和适用场景,以及进行组件化开发的必备知识
- 最后实例演示了全局组件和局部组件的开发
【相关推荐:《vue.js教程》】
The above is the detailed content of What does vue component development mean?. For more information, please follow other related articles on the PHP Chinese website!

Hot AI Tools

Undresser.AI Undress
AI-powered app for creating realistic nude photos

AI Clothes Remover
Online AI tool for removing clothes from photos.

Undress AI Tool
Undress images for free

Clothoff.io
AI clothes remover

Video Face Swap
Swap faces in any video effortlessly with our completely free AI face swap tool!

Hot Article
Hot Tools

Notepad++7.3.1
Easy-to-use and free code editor

SublimeText3 Chinese version
Chinese version, very easy to use

Zend Studio 13.0.1
Powerful PHP integrated development environment

Dreamweaver CS6
Visual web development tools

SublimeText3 Mac version
God-level code editing software (SublimeText3)
Hot Topics
 1386
1386
 52
52

 How to use bootstrap in vue
Apr 07, 2025 pm 11:33 PM
How to use bootstrap in vue
Apr 07, 2025 pm 11:33 PM
Using Bootstrap in Vue.js is divided into five steps: Install Bootstrap. Import Bootstrap in main.js. Use the Bootstrap component directly in the template. Optional: Custom style. Optional: Use plug-ins.
 How to add functions to buttons for vue
Apr 08, 2025 am 08:51 AM
How to add functions to buttons for vue
Apr 08, 2025 am 08:51 AM
You can add a function to the Vue button by binding the button in the HTML template to a method. Define the method and write function logic in the Vue instance.
 How to reference js file with vue.js
Apr 07, 2025 pm 11:27 PM
How to reference js file with vue.js
Apr 07, 2025 pm 11:27 PM
There are three ways to refer to JS files in Vue.js: directly specify the path using the <script> tag;; dynamic import using the mounted() lifecycle hook; and importing through the Vuex state management library.
 How to use watch in vue
Apr 07, 2025 pm 11:36 PM
How to use watch in vue
Apr 07, 2025 pm 11:36 PM
The watch option in Vue.js allows developers to listen for changes in specific data. When the data changes, watch triggers a callback function to perform update views or other tasks. Its configuration options include immediate, which specifies whether to execute a callback immediately, and deep, which specifies whether to recursively listen to changes to objects or arrays.
 What does vue multi-page development mean?
Apr 07, 2025 pm 11:57 PM
What does vue multi-page development mean?
Apr 07, 2025 pm 11:57 PM
Vue multi-page development is a way to build applications using the Vue.js framework, where the application is divided into separate pages: Code Maintenance: Splitting the application into multiple pages can make the code easier to manage and maintain. Modularity: Each page can be used as a separate module for easy reuse and replacement. Simple routing: Navigation between pages can be managed through simple routing configuration. SEO Optimization: Each page has its own URL, which helps SEO.
 How to return to previous page by vue
Apr 07, 2025 pm 11:30 PM
How to return to previous page by vue
Apr 07, 2025 pm 11:30 PM
Vue.js has four methods to return to the previous page: $router.go(-1)$router.back() uses <router-link to="/" component window.history.back(), and the method selection depends on the scene.
 How to query the version of vue
Apr 07, 2025 pm 11:24 PM
How to query the version of vue
Apr 07, 2025 pm 11:24 PM
You can query the Vue version by using Vue Devtools to view the Vue tab in the browser's console. Use npm to run the "npm list -g vue" command. Find the Vue item in the "dependencies" object of the package.json file. For Vue CLI projects, run the "vue --version" command. Check the version information in the <script> tag in the HTML file that refers to the Vue file.
 How to use function intercept vue
Apr 08, 2025 am 06:51 AM
How to use function intercept vue
Apr 08, 2025 am 06:51 AM
Function interception in Vue is a technique used to limit the number of times a function is called within a specified time period and prevent performance problems. The implementation method is: import the lodash library: import { debounce } from 'lodash'; Use the debounce function to create an intercept function: const debouncedFunction = debounce(() => { / Logical / }, 500); Call the intercept function, and the control function is called at most once in 500 milliseconds.
