 Web Front-end
 CSS Tutorial
 You must understand the 20,000-word CSS technology that the backend must also know
You must understand the 20,000-word CSS technology that the backend must also know
This article brings you a summary of CSS knowledge, including a systematic explanation of how to use CSS from scratch. I hope it will be helpful to everyone.
Part One: Basic Use of CSS
(1) What is CSS?
CSS full name is Cascading Style Sheets, translation: cascading (cascading) style sheets.
If HTML is the structure of a web page, then CSS is the makeup artist of the web page.
(2) Where is the CSS written?
There are three ways to write CSS:
- Written directly in the tag
- Written in the style tag
- Use external .css file
(Corresponding to the three ways of writing CSS, there are three ways to introduce CSS, see below:)
(3) The three major ways to introduce CSS:
1. Write directly in the tag (set directly in the tag)
nbsp;html>


    <meta>
    <title>CSS的引入方式1</title>


<!--第一种引入方式:行内样式-->
<!--注意:只能写在开始标签或者自闭合标签里,不能写在结束标签里哦-->
<!-- 直接给标签添加style属性,style的属性值里书写样式——样式与样式之间用分号隔开;样式的名称与样式值用冒号隔开! -->
<!-- 注意:嵌套标签设置了最外层的样式,其内所有标签都会应用此样式! -->
<p>我是段落标签</p>

<!-- 优势:直观,很容易区分是给哪个标签添加的样式 -->
<!-- 劣势:代码冗余,样式过多的话,代码的可读性很差-->
<!-- 一般用于测试,不用于实际开发页面中  -->
Little knowledge points:
When setting the attribute color attribute, as shown below, you can make a more intuitive and detailed selection of the color: 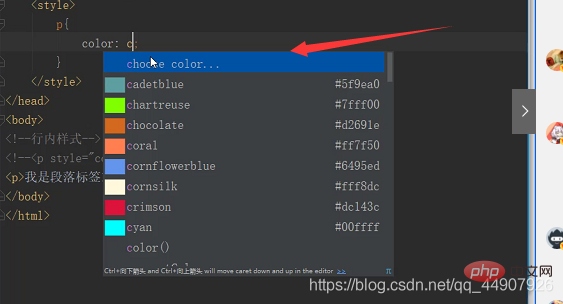
2. Write it in the style tag (add the tag to the tag to set it)
nbsp;html>
    <meta>
    <title>CSS的引入方式2</title>
        <!--第二种引入方式:内部样式-->
        <!-- 优势:实现了标签和样式的分离,让代码的可读性更高 -->
    <style>
        p{
            color: #c481ff
        }
</style><p>我是段落标签</p>3. Use external. css file sets the css text, such as 1.css
The first way: use @import "1.css" to introduce the css file;
The second way: through css file is imported.
The content of the 1.css file used here: 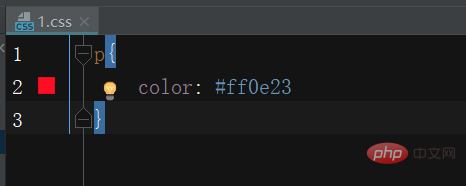
nbsp;html>
    <meta>
    <title>CSS的引入方式3</title>

    <!--第一种:链接式(建议使用)-->
    <!--rel属性(relation)是当前这个HTML页面与链接进来的样式表之间的关系,在此链接进来的是本页面的样式表
        href属性写样式表的路径-->
    <link>

    <!--第二种:导入式(不建议使用)-->
    <style>
        @import "1.css";
</style><!--第三种引入方式:外部样式(有两种)--><!--小提示:新建.css文件的方法,在pycharm中是新建Stylesheet文件--><!-- 优势:实现了html文件和样式的分离,让代码的可读性更高,而且让代码的复用性也更高! --><p>我是段落标签2</p>Little knowledge points:
@import import is not recommended. Because there is a flaw: loading the .CSS file after the entire web page is loaded. If the web page file is too large, an unstyled page will appear first, and then the styled web page will appear after flickering.
It is recommended to use because it loads the .css file first and then the web page
Summary - the similarities and differences of the above three introduction methods:
在实际开发中我们不使用行内样式!
使用最多的是外部样式。

一般写demo的时候使用内部样式————因为给别人发demo的时候,只发一个文件即可。


无论是外部样式,内部样式还是行内样式,都会生效,它们共同为标签添加样式。

如果一个标签通过外部样式,内部样式设置了同一类样式(值不同),会产生覆盖效果————覆盖的原则:后写的样式覆盖先写的样式!
Part 2: Selector
(1) Selector weight:
In real life - whoever has more power listens to whoever has more power. In the same way, the selector weight is the same. , whose weight value is higher, which one should be applied. The weight here is judged by accuracy. The higher the accuracy, the greater the weight.
(2) The use of selectors:
is used to accurately select elements (that is, tags in HTML) and assign styles.
1. Tag selector:
| Function: Find tags based on their names; |
| Note: It will find all tags with the same name. |
nbsp;html>
    <meta>
    <title>标签选择器</title>

    <style>
        /*标签选择器。直接把页面中的标签当做一个选择器进行选择*/
        p{
            color: chartreuse;

        }
    </style>
<p>我是段落标签1</p><p>我是段落标签2</p>Note:
You can understand that the whole picture below is called a selector! ! ! 
2. Class selector (class selector)
| Select the corresponding element through the class attribute of the tag, with the help of The concept of a class is defined in one place and can be used in many places. |
| Usage scenario: Its function is to set styles for multiple tags (often requiring the same style). |
| A label can set multiple class values. The values are separated by spaces. This label will have all class values included. style. |
nbsp;html>
    <meta>
    <title>类选择器</title>

    <style>
        /*类选择器,也称class选择器。通过.进行选择*/
        .p1{
            color:red;
        }
</style><p>我是段落标签</p>Tips:
You can select multiple class selectors because the class attribute is not unique;
But the id selector only You can choose one because the id is unique.
3.id selector
| Select the corresponding element through the id attribute of the tag. |
nbsp;html>
    <meta>
    <title>id选择器</title>

    <style>
         /*第三种选择器:id选择器  通过#进行选择*/
        #p2{
            color:cadetblue;
        }
</style><p>我是段落标签</p>小tip:
以上三个选择器的权重: id选择器 > 类选择器 >标签选择器
拓展:如果一个标签同时通过id选择器和类选择器设置了同一个样式,而我们想要其类选择器设置的样式(background-color)生效,但是看上面选择器权重——类选择器的权重是低于id选择器的,应该是id选择器设置的样式生效。但是我们可以通过在指定样式后添加!import来使其生效!!!
!important是权重最大的!!!
注意:!important只能作用于单个样式的值,它不是选择器!
4.群组选择器
| 群组选择器是可以同时选择多个标签的选择器。 |
nbsp;html>
    <meta>
    <title>群组选择器</title>

    <style>
        /*第四种选择器:群组选择器  不同选择器之间用逗号隔开。*/
        p,span{
            color: #ff82c1;
        }
</style><p>我是段落标签</p><span>我是文本标签</span><h1 id="我是一级标签">我是一级标签</h1>5.全选择器
| 顾名思义,选择所有标签! |
nbsp;html>
    <meta>
    <title>全选择器</title>

    <style>
        /*第五种选择器:全选择器 通过*选择此页面的所有元素,进行统一的样式设置*/
        *{
            color: #a3ff50
        }
</style><p>我是段落标签</p><h1 id="我是一级标题">我是一级标题</h1><h2 id="我是二级标签">我是二级标签</h2><span>我是文本标签</span>6.层次选择器(分为后代,子代,相邻和兄弟四种选择器)
注 意:块状标签可以嵌套内联标签和其他块状标签;内联标签只能嵌套文本和其他内联标签,但不能嵌套块状标签。
有个特例:p标签和h标签不能嵌套块状标签,也不能嵌套本身,只能嵌套内联标签!!!
(1)后代选择器
nbsp;html>
    <meta>
    <title>后代选择器</title>

    <style>
        /*层次选择器第一种:后代选择器  用空格隔开*/
        /*后代是它里面嵌套的所有标签*/
        /*此例就是p标签里的所有的ol标签,不管ol里嵌套多少ol,都是p的后代*/
        p ol{
            list-style: none;
        }
    </style>
    <p>
    </p><ol>
        <li>我是有序列表1</li>
        <li>我是有序列表2</li>
        <li>我是有序列表3            <ol>
                <li>我是有序列表111</li>
                <li>我是有序列表222</li>
            </ol>
        </li>
</ol>(2)子代选择器(可以往里一层一层的选)
nbsp;html>
    <meta>
    <title>子代选择器</title>

    <style>
        /*层次选择器第二种:子代选择器 用>隔开*/
        /*子代选择器只能选择他的儿子,在此就是选择id为ul1的无序列表的儿子*/
        /* 上述语法格式中的选择器可以是id选择器,class选择器也可以是标签名选择器 */
        #ul1>li{
            list-style: none;       /*这个属性作用是去除列表的样式,代表去掉无序列表前面的小圆圈*/
        }
</style><!--子代选择器 颜色,字体等等在子代选择器里会继承。所以此处用list-style属性进行观察-->- 1
- 2
- 3
- 11
- 22
- 33
(3)兄弟选择器
nbsp;html>
    <meta>
    <title>兄弟选择器</title>

    <style>
        /*层次选择器第三种:兄弟选择器  用~进行选择*/
        /*只要是有同一个父亲的就称为兄弟*/
        /*在本例中,id为p2的父亲是body,所以body里都是他的兄弟
        又因为代码是从上向下执行的,所以不会选中  我是段落标签1*/
        #p2~p{
            color:#ff8971        }
</style><p>我是段落标签1</p><p>我是段落标签2</p><p>我是段落标签3</p><p>我是段落标签4</p>(4)相邻选择器(相邻兄弟选择器)
nbsp;html>
    <meta>
    <title>相邻兄弟选择器</title>

    <style>
        /*层次选择器第四种:相邻选择器(相邻兄弟选择器)  用+进行选择*/
        /*先是找兄弟,然后选择其中相邻的*/
        /*在本例中,因为代码是从上向下执行的,所以不会选中  我是段落标签1*/
        #p2+p{
            color:#ff8971
        }
</style><p>我是段落标签1</p><p>我是段落标签2</p><p>我是段落标签3</p><p>我是段落标签4</p>7.属性选择器
nbsp;html>
    <meta>
    <title>属性选择器</title>

    <style>
        /*属性选择器  选中所有p标签里有name属性的   常用于Input里
           如果只想选中   我是段落标签1  ,那么就改为p[name="p1"]即可*/
        p[name]{
            color: red;
        }
</style><p>我是段落标签1</p><p>我是段落标签2</p><p>我是段落标签3</p><p>我是段落标签4</p>选择器的一个使用总结:
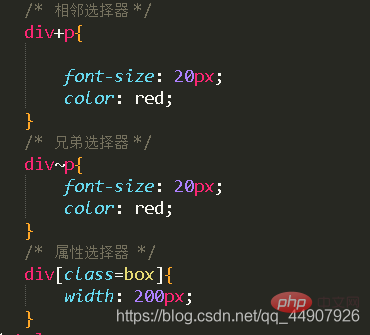
权重大小比较总结一句话:越具体(就是一开始说的准确度)权重越大;越模糊权重越小!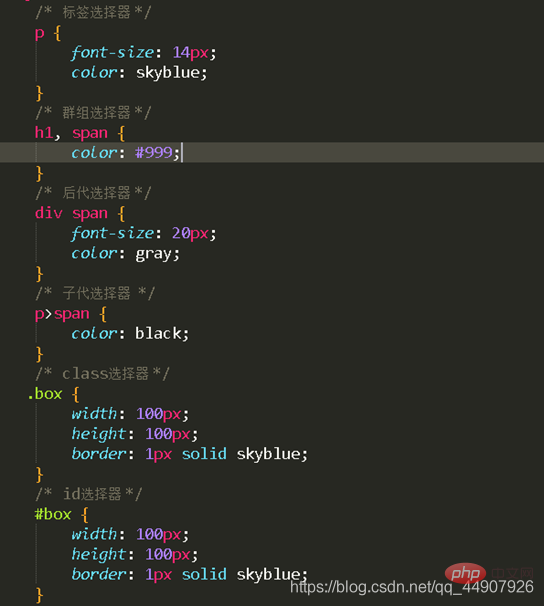
8.伪类选择器
nbsp;html>
    <meta>
    <title>伪类选择器</title>

    <!--伪类选择器-->
    <!-- 语法格式——  选择器:伪类名 -->
    <!-- 如果要给一个元素加4个伪类,一定要遵守一个顺序(link  visited  hover   active) -->
    <style>
        /*未访问超链接时的样式    有超链接地址时(仅适用于a标签)*/
        a:link{
            color: #ff25ec;
        }
        /*鼠标悬浮时的样式     适用于所有标签*/
        a:hover{
            color: #3b29ff;
        }
        /*激活状态时,即点击的时候    适用于所有标签*/
        a:active{
            color: #ff9d47;

        }
        /* 访问过后,点击完超链接之后 (仅适用于a标签)*/
        a:visited{
            color:green;
        }
    </style>
<!--#表示空链接--><a>我是超链接</a>第三部分:常用的字体的样式
nbsp;html>
    <meta>
    <title>字体的常用样式</title>
    <style>
        p{
            /*字体的类型(例如:黑体,宋体,仿宋...)*/
            font-family: 黑体;

            /*字体的大小(默认字号是16px)*/
            font-size: 30px;

            /*字体的样式(斜体italic  或者   正常normal)*/
            font-style: italic;

            /*字体的粗细(默认粗细是normal——400)    bold是粗体*/
            font-weight: bold;

            /*字体的小大写  把英文小写字母变为大写字母  大小不变*/
            font-variant: small-caps;

            /*字体的复合样式,要注意顺序,其实就是上面样式的一个总写
            顺序为:style variant weight size/height family  可以少写!*/
            font:italic small-caps normal 50px 黑体;
        }
</style><p>我是段落标签</p><p>HELLO</p><p>hello</p>第四部分:文本的常用样式
nbsp;html>
    <meta>
    <title>文本常用样式</title>
    <style>
        p{
            /*用于设置标签内的文本的对齐方式————left(左对齐,默认);center(居中对齐);right(右对齐)*/
            text-align: left;

			/* 用于设置标签内单行文本的高度*/
			line-height:40px;

            /*首行缩进  em是一个中文字距  也可以用px单位   1em=16px*/
            text-indent:2em;

            /*文本线   underline是下划线;  line-through称为删除线  overline(上划线)  none为去除文本线*/
            text-decoration: underline;

            /*字与字之间的距离*/
            letter-spacing: 1em;

            /*词距  在底下p标签里写文本,空格隔开就是一个单词*/
            word-spacing:50px;

            /*行高     可以撑起高度*/
            /*撑起高度就是可以通过设置行高把元素的高度撑到行高那么高*/
            /*有个应用:单行文本垂直居中(在垂直方向居中):高度=行高*/
            line-height: 50px;

			/* 用于设置换行模式————normal(默认,满了一行后正常换行);nowrap(不换行)*/
			white-space: normal;

			/* 用于设置内容超出标签的处理办法————hidden(超出部分隐藏);*/
			overflow: hidden;

			/* 用于设置文本溢出标签时,文本要做什么事情————ellipsis(用于设置显示省略号) */
			text-overflow: ellipsis;
        }

        a{
            /*用于设置文本的装饰模式————underline(下划线);line-through(中划线);overline(上划线)*/
            /* 可以通过设置为none去除超链接下的下划线! */
            text-decoration: none;
        }

    </style><!--注意:如果是内联标签,比如span是内联标签,始终都是居中状态,改对齐方式没用。
因为内联元素设置宽高无效,只与内容有关。--><p>我是一个段落标签</p><p>中国 上海 河南</p><a>111</a>行高的应用之实现单行文本垂直居中:
nbsp;html>
    <meta>
    <title>行高的一个应用</title>
    <style>
        p{
            /*通过让行高=高度,实现单行文本的垂直居中*/
            height: 200px;  /*高度*/
            line-height: 200px;  /*行高*/
        }
</style><p>我是段落标签</p>第五部分:背景的常用样式
nbsp;html>
    <meta>
    <title>背景的常用样式</title>
    <style>
        p{
            /*设置p的宽高*/
            /* 行元素无法设置宽高;块元素或者行级块元素可以设置宽高。如果不设置宽高,那么使用默认宽度——和父标签的宽度一样;如果不设置高度,那么使用默认高度是由内容撑起!  */
            width:300px;
            height:300px;

            /*设置背景颜色*/
            /* 背景颜色的写法:1.代表颜色的英文单词(例如:red,yellow...);
            				2.#加6位16进制数(6位中前两位是红,中间两位是绿,后两位是蓝。红绿蓝的取值范围是00~FF/ff)————开发中最常用的写法;
            				3.rgb(红,绿,蓝)函数获取一个颜色————一般用于JS代码;
            				4.rgba(红,绿,蓝,不透明度)函数获取一个颜色————一般用于JS代码  */
            background-color: #a3ff50;

            /*背景图片 url写图片的路径*/
            background-image: url("");

            /*设置背景的大小  也可使用百分比,是参照它的容器*/
            background-size:100px 100px;

            /*背景平铺  不平铺 平铺意思:如果背景图很小,那么就可以在这个p上放多个。不平铺就是只放一个*/
            background-repeat: no-repeat;

            /*背景定位  可以使用百分比定位(两个百分比数据,第一个是相对于左,第二个是相对于上)*/
            background-position: center;

            /*复合样式 也要按照顺序(中间空格隔开,如果不想定位而设置大小,将定位的那个属性值写为0)
            属性的顺序是:background-color bacfground-image background-repeat background-position/background-size */
            background:red url("")  ;

        }
</style><p></p>小拓展:使用CSS实现渐变色:
(1)渐变色之线性渐变
nbsp;html>
    <meta>
    <title>渐变色之线性渐变</title>
    <style>
        #p1{
            width:300px;
            height: 300px;
            /*linear-gradient()函数用于实现线性渐变*/
            /*注意:颜色的渐变实现是靠渐变的图像实现的,在函数里可以放多个颜色实现渐变*/
            /*渐变的效果默认是从上往下渐变填入的颜色
            to right,to left,to top,to buttom right(从左上往右下渐变)
            也可以以一定角度进行渐变,格式为:度数deg,比如:90deg */
            background-image: linear-gradient(to left,skyblue,pink);
        }
</style><p></p>(2)渐变色之径向渐变
nbsp;html>
    <meta>
    <title>渐变色之径向渐变</title>
    <style>
        #p1{
            width: 200px;
            height: 300px;
            /*radial-gradient()函数用于实现径向渐变*/
            /*注意:颜色的渐变实现都是靠渐变的图像实现的*/
            /*默认是从最中心向外发散进行渐变(ellipse是椭圆形状的渐变)
                						circle(形状变为圆)*/
            background-image: radial-gradient(ellipse,skyblue,pink,white);

        }
</style><p></p>(3)拓展一个文本渐变色的实现:
nbsp;html>
    <meta>
    <title>渐变色之文字渐变</title>
    <style>
        span{
            /*给背景设置渐变色*/
            /*默认文字的颜色渐变是从上往下渐变的
                改渐变的方向的话在颜色前面加,比如:to right*/
            background-image: linear-gradient(to right,blue,black);
            /*规定这个背景渐变色绘制的区域 在此设置为文本那个区域*/
            -webkit-background-clip: text;
            /*把原本的文字设置为透明的*/
            color: transparent;
        }
</style><!--文字本身是不能设置渐变的,我们是通过设置背景的渐变来实现文字的渐变的--><span>我是渐变的文字,我超级帅!</span>(学习视频分享:css视频教程)
The above is the detailed content of You must understand the 20,000-word CSS technology that the backend must also know. For more information, please follow other related articles on the PHP Chinese website!

Hot AI Tools

Undresser.AI Undress
AI-powered app for creating realistic nude photos

AI Clothes Remover
Online AI tool for removing clothes from photos.

Undress AI Tool
Undress images for free

Clothoff.io
AI clothes remover

AI Hentai Generator
Generate AI Hentai for free.

Hot Article

Hot Tools

Notepad++7.3.1
Easy-to-use and free code editor

SublimeText3 Chinese version
Chinese version, very easy to use

Zend Studio 13.0.1
Powerful PHP integrated development environment

Dreamweaver CS6
Visual web development tools

SublimeText3 Mac version
God-level code editing software (SublimeText3)

Hot Topics
 1378
1378
 52
52
 How to write split lines on bootstrap
Apr 07, 2025 pm 03:12 PM
There are two ways to create a Bootstrap split line: using the tag, which creates a horizontal split line. Use the CSS border property to create custom style split lines.
 How to insert pictures on bootstrap
Apr 07, 2025 pm 03:30 PM
There are several ways to insert images in Bootstrap: insert images directly, using the HTML img tag. With the Bootstrap image component, you can provide responsive images and more styles. Set the image size, use the img-fluid class to make the image adaptable. Set the border, using the img-bordered class. Set the rounded corners and use the img-rounded class. Set the shadow, use the shadow class. Resize and position the image, using CSS style. Using the background image, use the background-image CSS property.
 How to resize bootstrap
Apr 07, 2025 pm 03:18 PM
To adjust the size of elements in Bootstrap, you can use the dimension class, which includes: adjusting width: .col-, .w-, .mw-adjust height: .h-, .min-h-, .max-h-
 The Roles of HTML, CSS, and JavaScript: Core Responsibilities
Apr 08, 2025 pm 07:05 PM
HTML defines the web structure, CSS is responsible for style and layout, and JavaScript gives dynamic interaction. The three perform their duties in web development and jointly build a colorful website.
 How to use bootstrap in vue
Apr 07, 2025 pm 11:33 PM
Using Bootstrap in Vue.js is divided into five steps: Install Bootstrap. Import Bootstrap in main.js. Use the Bootstrap component directly in the template. Optional: Custom style. Optional: Use plug-ins.
 How to set up the framework for bootstrap
Apr 07, 2025 pm 03:27 PM
To set up the Bootstrap framework, you need to follow these steps: 1. Reference the Bootstrap file via CDN; 2. Download and host the file on your own server; 3. Include the Bootstrap file in HTML; 4. Compile Sass/Less as needed; 5. Import a custom file (optional). Once setup is complete, you can use Bootstrap's grid systems, components, and styles to create responsive websites and applications.
 How to use bootstrap button
Apr 07, 2025 pm 03:09 PM
How to use the Bootstrap button? Introduce Bootstrap CSS to create button elements and add Bootstrap button class to add button text
 How to view the date of bootstrap
Apr 07, 2025 pm 03:03 PM
Answer: You can use the date picker component of Bootstrap to view dates in the page. Steps: Introduce the Bootstrap framework. Create a date selector input box in HTML. Bootstrap will automatically add styles to the selector. Use JavaScript to get the selected date.


