

How to install mysql5.6 from centos source code

How to install mysql5.6 from centos source code: 1. Download the source code package; 2. Pass "[root@localhost ~]# tar zxvf mysql-5.6.41.tar.gz [root@localhost... "Wait for the command to compile and install mysql.

centos source code installation method for mysql5.6
Mysql version introductionWhen preparing to install MySQL, please decide which version and release format to use ( binary or source). First, decide whether to install a development version or a General Availability (GA) version. Development versions have the latest features but are not recommended for production use. Ga release, also called production or stable release, means for production use. We recommend using the latest GA version.
The naming scheme in MySQL 5.6 uses a release name consisting of three numbers and an optional suffix; for example, mysql-5.6.1-m1. The numbers in the release name are explained as follows:
- The first number (5) is the major version number.
- The second number (6) is the minor version number. Taken together, the major and minor numbers make up the issue series number. Serial numbers describe a stable set of characteristics.
- The third number (1) is the version number in the release series. For every new bug fix release, this value will be increased. In most cases, the latest version in a series is the best choice.
- mN (for example, M1, M2, M3) represents a milestone number. MySQL development uses a milestone model, where each milestone introduces a small set of thoroughly tested features. After a milestone is released, development continues with another small set of releases focusing on the next set of features. From one milestone to the next, functional interfaces may change, or even be removed, based on feedback provided by community members who experimented with these early versions. Features in milestone releases may be considered pre-production quality features.
- rc indicates a Release Candidate (RC). Release candidates are considered stable and have passed all MySQL's internal testing. New features may still be introduced in the RC version, but the focus shifts to fixing bugs to stabilize features introduced earlier in this series.
- No suffix indicates General Availability (GA) or production releases. GA releases are stable, successfully passed the early release phase, and are considered reliable, free of serious bugs, and suitable for use in production systems.
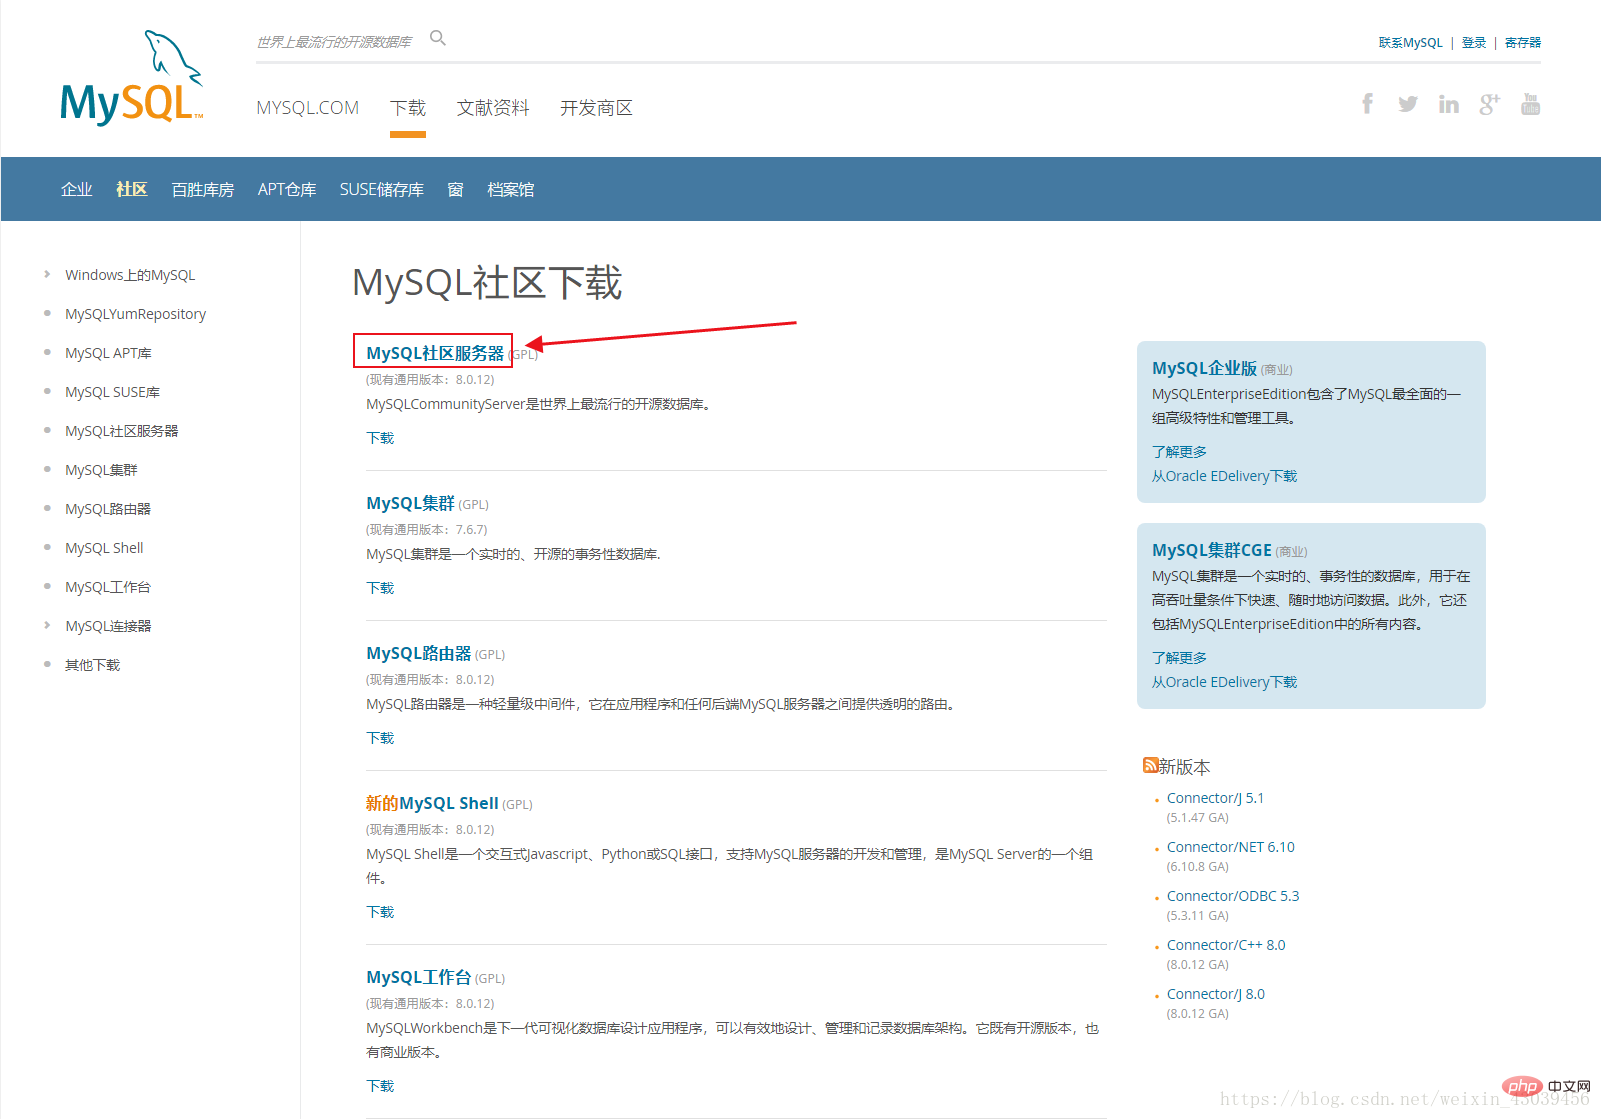
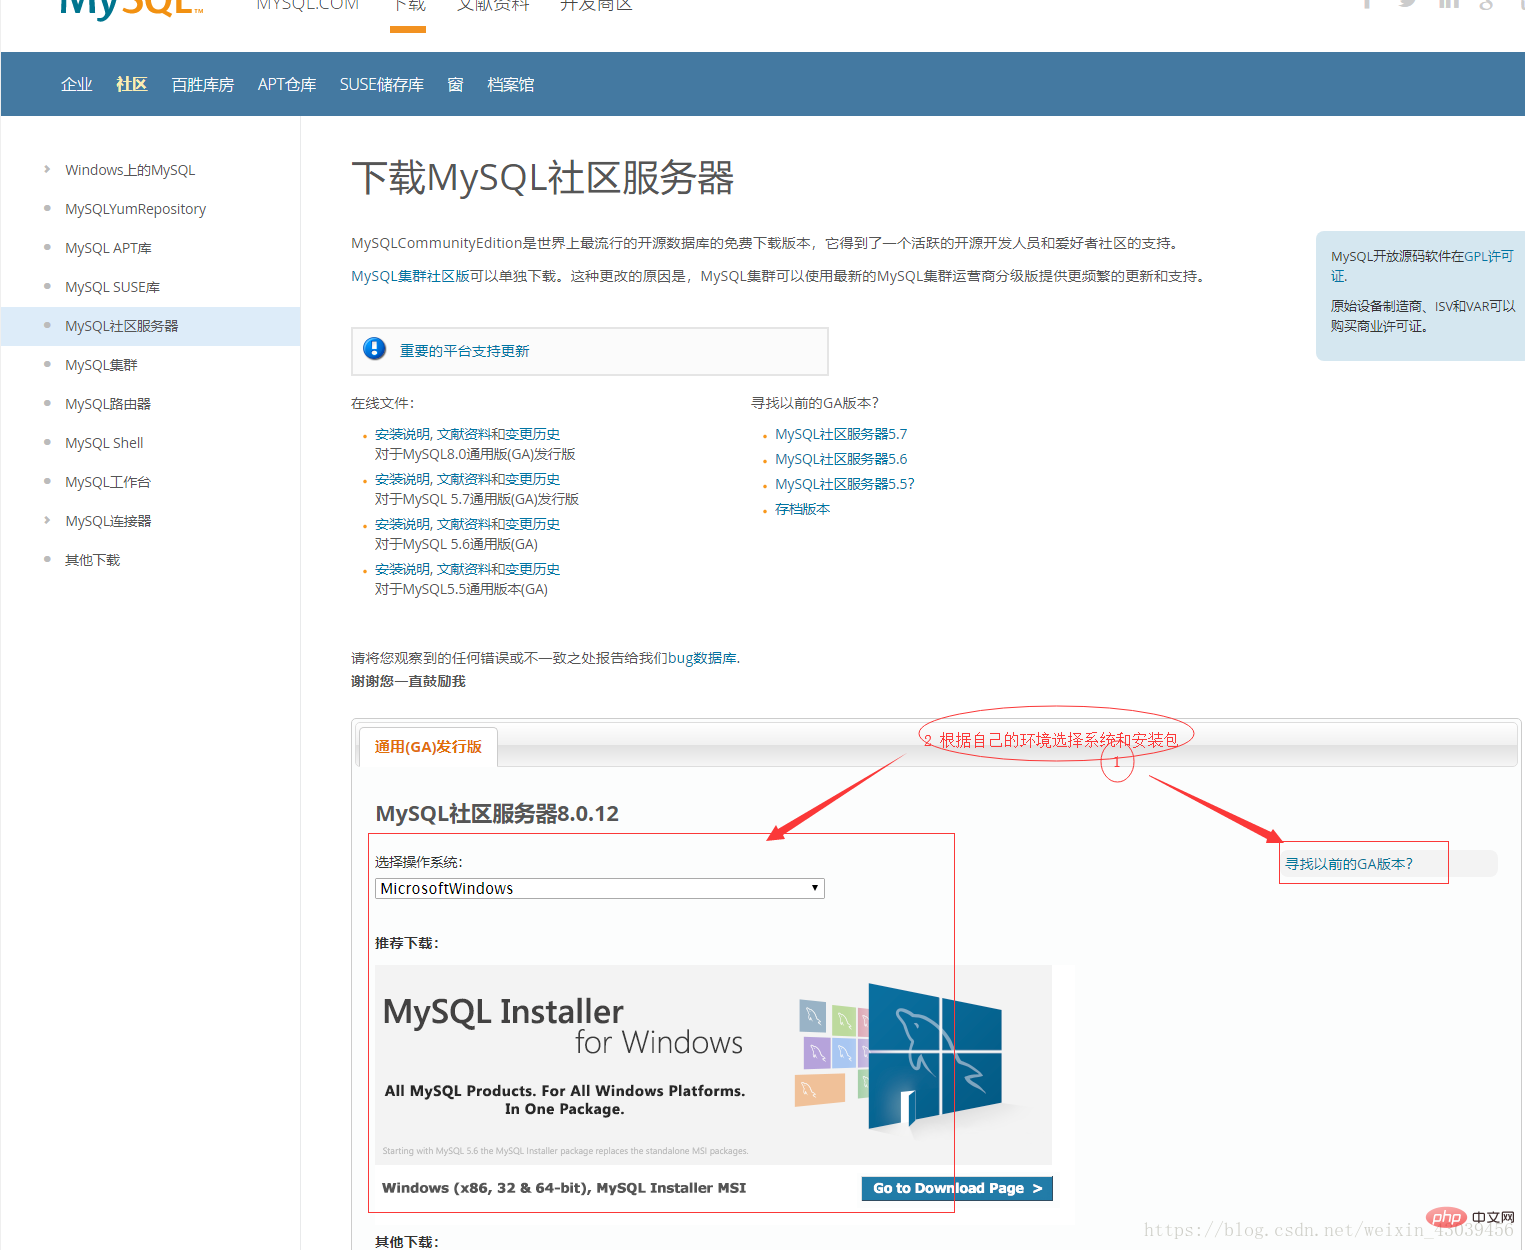
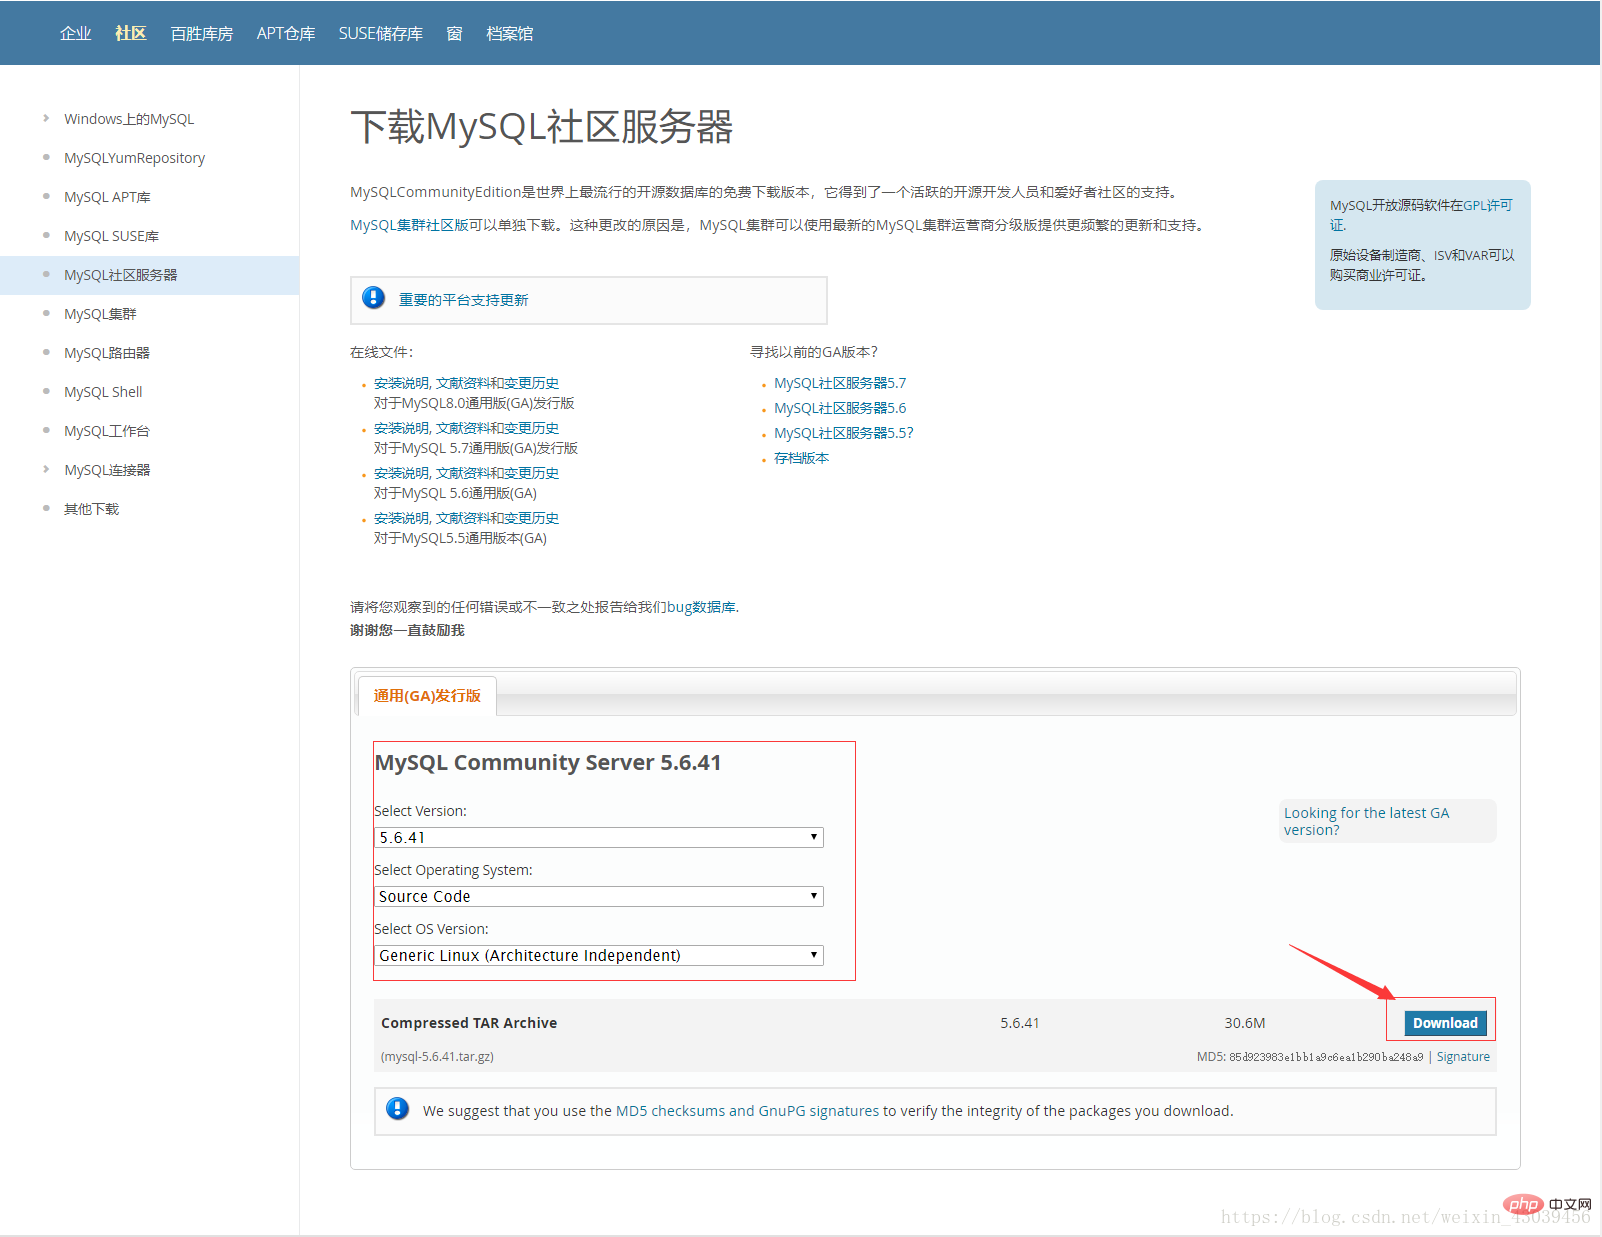
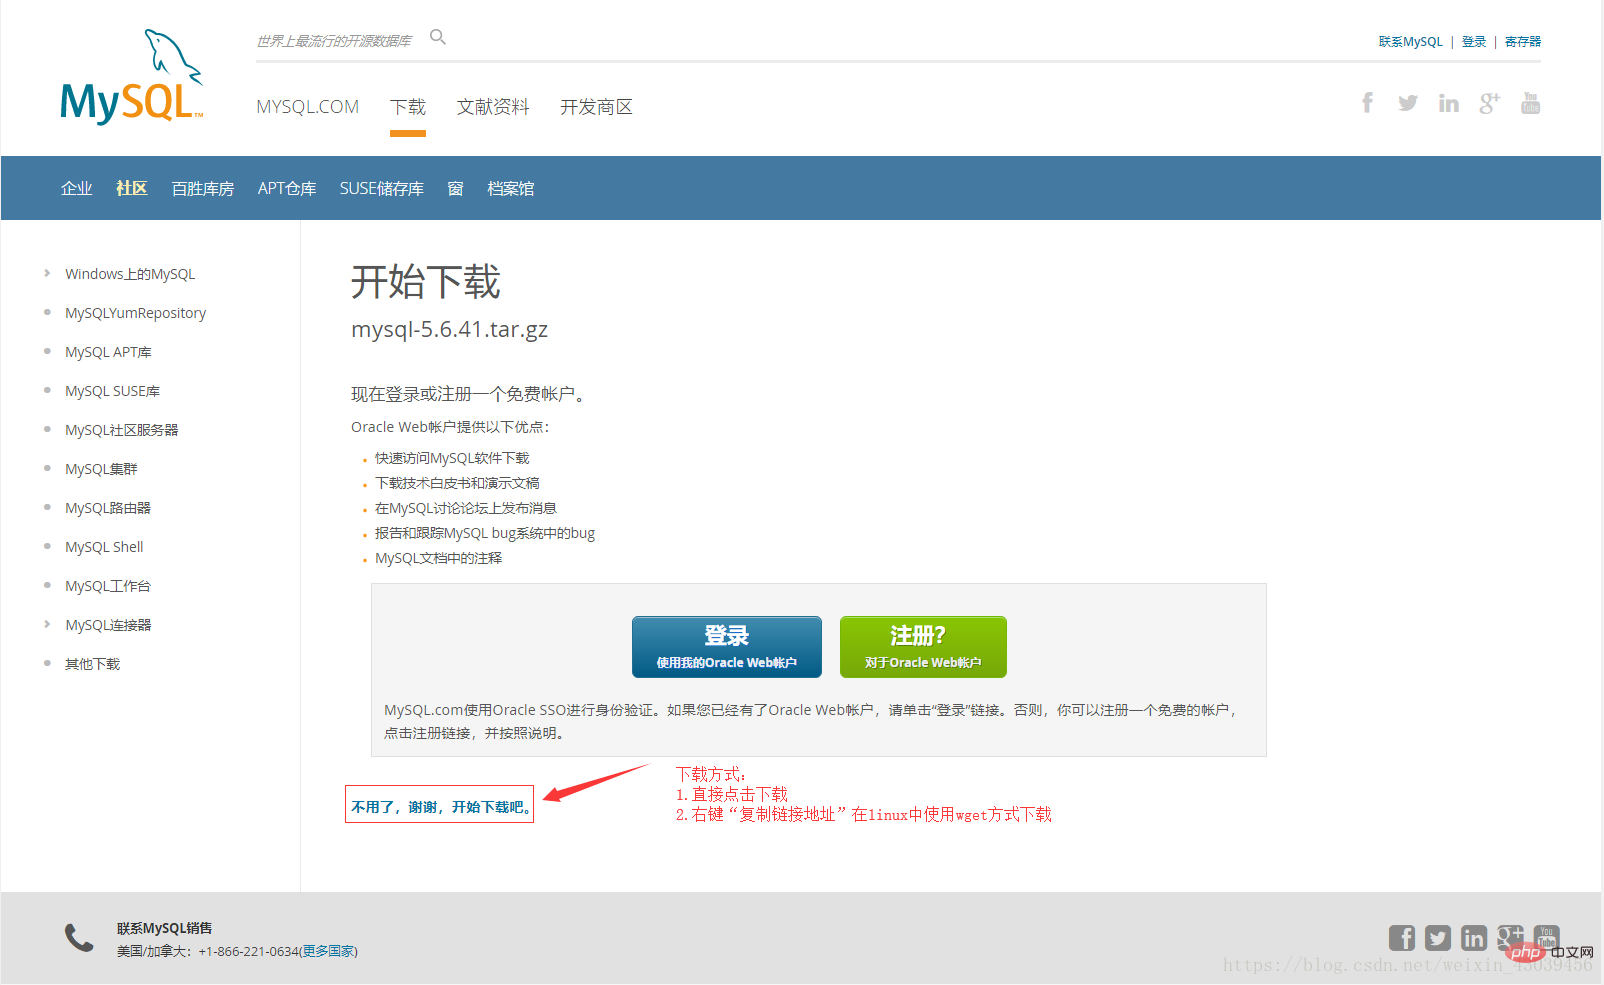
https://dev.mysql.com/downloads/
 ## Recommended study: "
1. Close selinux and iptables
[root@localhost ~]# /etc/init.d/iptables stopiptables:将链设置为政策 ACCEPT:filter                    [确定]
iptables:清除防火墙规则:                                 [确定]
iptables:正在卸载模块:                                   [确定]
[root@localhost ~]# setenforce 0setenforce: SELinux is disabled
2. Uninstall mysql-server and mysql in rpm
[root@localhost ~]# rpm -qa | grep mysqlmysql-libs-5.1.73-8.el6_8.x86_64
如果安装了mysql-server使用rpm -e命令将其卸载
3. Install mysql dependency package
[root@localhost ~]# yum install -y cmake gcc gcc-c++ ncurses-devel bison zlib openssl
4. Create mysql user and related folders
[root@localhost ~]# groupadd msyql[root@localhost ~]# useradd -g mysql -s /sbin/nologin mysql[root@localhost ~]# mkdir -p /public/mysql/data
Compile and install mysql
[root@localhost ~]# tar zxvf mysql-5.6.41.tar.gz
[root@localhost mysql-5.6.41]# cd mysql-5.6.41
[root@localhost mysql-5.6.41]# cmake \
-DCMAKE_INSTALL_PREFIX=/public/mysql \
-DINSTALL_DATADIR=/public/mysql/data  \
-DDEFAULT_CHARSET=utf8 \
-DDEFAULT_COLLATION=utf8_general_ci \
-DEXTRA_CHARSETS=all \
-DWITH_EMBEDDED_SERVER=1 \
-DENABLED_LOCAL_INFILE=1 \
-DWITH_MYISAM_STORAGE_ENGINE=1 \
-DWITH_INNOBASE_STORAGE_ENGINE=1 \
-DWITH_ARCHIVE_STORAGE_ENGINE=1 \
-DWITH_BLACKHOLE_STORAGE_ENGINE=1 \
-DWITH_FEDERATED_STORAGE_ENGINE=1 \
-DWITH_PARTITION_STORAGE_ENGINE=1 \
-DMYSQL_UNIX_ADDR=/tmp/mysql.sock \
-DMYSQL_TCP_PORT=3306 \
-DENABLED_LOCAL_INFILE=1 \
-DSYSCONFDIR=/public/mysql
[root@localhost mysql-5.6.41]# make && make install
Instructions
-DCMAKE_INSTALL_PREFIX=/usr/local/mysql          \    #安装路径
-DMYSQL_DATADIR=/usr/local/mysql/data            \    #数据文件存放位置
-DSYSCONFDIR=/etc                                \    #my.cnf路径
-DWITH_MYISAM_STORAGE_ENGINE=1                   \    #支持MyIASM引擎
-DWITH_INNOBASE_STORAGE_ENGINE=1                 \    #支持InnoDB引擎
-DWITH_MEMORY_STORAGE_ENGINE=1                   \    #支持Memory引擎
-DWITH_READLINE=1                                \    #快捷键功能(我没用过)
-DMYSQL_UNIX_ADDR=/tmp/mysqld.sock               \    #连接数据库socket路径
-DMYSQL_TCP_PORT=3306                            \    #端口
-DENABLED_LOCAL_INFILE=1                         \    #允许从本地导入数据
-DWITH_PARTITION_STORAGE_ENGINE=1                \    #安装支持数据库分区
-DEXTRA_CHARSETS=all                             \    #安装所有的字符集
-DDEFAULT_CHARSET=utf8                           \    #默认字符
-DDEFAULT_COLLATION=utf8_general_ci
Post-installation optimization operations
[root@localhost mysql-5.6.41]# chown -R mysql:mysql /public/mysql   \   #修改msyql安装目录的属主与属组
[root@localhost mysql-5.6.41]# cp support-files/mysql.server /etc/init.d/mysqld
[root@localhost ~]# echo "PATH=$PATH:/public/mysql/bin" > /etc/profile.d/mysql.sh
[root@localhost ~]# source /etc/profile.d/mysql.sh
[root@localhost ~]# chkconfig mysqld on        \   #开机自启
[root@localhost ~]# vim /public/mysql/my.cnf
[mysqld]
basedir = /public/mysql
datadir = /public/mysql/data
port    = 3306
server_id       = 11
socket  = /tmp/mysql.sock

sql_mode=NO_ENGINE_SUBSTITUTION,STRICT_TRANS_TABLES
my.cnf temporarily With this configuration, you can start the database and have time to organize an article on my.cnf
#my.cnf文件优先顺序[root@localhost ~]# mysql --help | grep my.cnf
                      order of preference, my.cnf, $MYSQL_TCP_PORT,
/etc/my.cnf /etc/mysql/my.cnf /public/mysql/my.cnf ~/.my.cnfInitialize the database and set the password
[root@localhost ~]# /public/mysql/scripts/mysql_install_db --user=mysql --basedir=/public/mysql --datadir=/public/mysql/data   \   #初始化数据库
[root@localhost ~]# mysqladmin -u root password 'Aa123456' \   #设置root密码(需先启动mysql)
Mysql operation
#启动、停止、重启、状态
[root@localhost ~]# /etc/init.d/mysqld start
[root@localhost ~]# /etc/init.d/mysqld stop
[root@localhost ~]# /etc/init.d/mysqld restart
[root@localhost ~]# /etc/init.d/mysqld status
[root@localhost ~]# netstat -utpln | grep mysqld
#登录mysql
[root@localhost ~]# mysql -u root -pAa123456   \   #-p后面的密码不要有空格
utpln | grep mysqld#Log in to mysql[root@localhost ~]# mysql -u root -pAa123456 \ #-The password after #-p should not have spaces
The above is the detailed content of How to install mysql5.6 from centos source code. For more information, please follow other related articles on the PHP Chinese website!

Hot AI Tools

Undresser.AI Undress
AI-powered app for creating realistic nude photos

AI Clothes Remover
Online AI tool for removing clothes from photos.

Undress AI Tool
Undress images for free

Clothoff.io
AI clothes remover

AI Hentai Generator
Generate AI Hentai for free.

Hot Article
Hot Tools

Notepad++7.3.1
Easy-to-use and free code editor

SublimeText3 Chinese version
Chinese version, very easy to use

Zend Studio 13.0.1
Powerful PHP integrated development environment

Dreamweaver CS6
Visual web development tools

SublimeText3 Mac version
God-level code editing software (SublimeText3)
Hot Topics
 1378
1378
 52
52

 Explain InnoDB Full-Text Search capabilities.
Apr 02, 2025 pm 06:09 PM
Explain InnoDB Full-Text Search capabilities.
Apr 02, 2025 pm 06:09 PM
InnoDB's full-text search capabilities are very powerful, which can significantly improve database query efficiency and ability to process large amounts of text data. 1) InnoDB implements full-text search through inverted indexing, supporting basic and advanced search queries. 2) Use MATCH and AGAINST keywords to search, support Boolean mode and phrase search. 3) Optimization methods include using word segmentation technology, periodic rebuilding of indexes and adjusting cache size to improve performance and accuracy.
 How do you alter a table in MySQL using the ALTER TABLE statement?
Mar 19, 2025 pm 03:51 PM
How do you alter a table in MySQL using the ALTER TABLE statement?
Mar 19, 2025 pm 03:51 PM
The article discusses using MySQL's ALTER TABLE statement to modify tables, including adding/dropping columns, renaming tables/columns, and changing column data types.
 How do I configure SSL/TLS encryption for MySQL connections?
Mar 18, 2025 pm 12:01 PM
How do I configure SSL/TLS encryption for MySQL connections?
Mar 18, 2025 pm 12:01 PM
Article discusses configuring SSL/TLS encryption for MySQL, including certificate generation and verification. Main issue is using self-signed certificates' security implications.[Character count: 159]
 When might a full table scan be faster than using an index in MySQL?
Apr 09, 2025 am 12:05 AM
When might a full table scan be faster than using an index in MySQL?
Apr 09, 2025 am 12:05 AM
Full table scanning may be faster in MySQL than using indexes. Specific cases include: 1) the data volume is small; 2) when the query returns a large amount of data; 3) when the index column is not highly selective; 4) when the complex query. By analyzing query plans, optimizing indexes, avoiding over-index and regularly maintaining tables, you can make the best choices in practical applications.
 What are some popular MySQL GUI tools (e.g., MySQL Workbench, phpMyAdmin)?
Mar 21, 2025 pm 06:28 PM
What are some popular MySQL GUI tools (e.g., MySQL Workbench, phpMyAdmin)?
Mar 21, 2025 pm 06:28 PM
Article discusses popular MySQL GUI tools like MySQL Workbench and phpMyAdmin, comparing their features and suitability for beginners and advanced users.[159 characters]
 How do you handle large datasets in MySQL?
Mar 21, 2025 pm 12:15 PM
How do you handle large datasets in MySQL?
Mar 21, 2025 pm 12:15 PM
Article discusses strategies for handling large datasets in MySQL, including partitioning, sharding, indexing, and query optimization.
 Difference between clustered index and non-clustered index (secondary index) in InnoDB.
Apr 02, 2025 pm 06:25 PM
Difference between clustered index and non-clustered index (secondary index) in InnoDB.
Apr 02, 2025 pm 06:25 PM
The difference between clustered index and non-clustered index is: 1. Clustered index stores data rows in the index structure, which is suitable for querying by primary key and range. 2. The non-clustered index stores index key values and pointers to data rows, and is suitable for non-primary key column queries.
 Can I install mysql on Windows 7
Apr 08, 2025 pm 03:21 PM
Can I install mysql on Windows 7
Apr 08, 2025 pm 03:21 PM
Yes, MySQL can be installed on Windows 7, and although Microsoft has stopped supporting Windows 7, MySQL is still compatible with it. However, the following points should be noted during the installation process: Download the MySQL installer for Windows. Select the appropriate version of MySQL (community or enterprise). Select the appropriate installation directory and character set during the installation process. Set the root user password and keep it properly. Connect to the database for testing. Note the compatibility and security issues on Windows 7, and it is recommended to upgrade to a supported operating system.
