
In git, a branch refers to being separated from the main line to perform other operations. It does not affect the main line, and the main line can continue to do its work. It can be used to solve temporary needs; when the branch is completed It can be merged into the main line, and the branch can be deleted after the task is completed.
The operating environment of this tutorial: Windows 7 system, Git version 2.30.0, Dell G3 computer.
What are the branches of git
As the name suggests, a branch is separated from the main line to perform additional operations without affecting the main line. You can continue to do its work, isn't it a bit like a thread? After the final branch is completed, it is merged into the main line and the task of the branch is completed and can be deleted. Isn't this very convenient? The main line continues to do its thing, and the branches are used to solve temporary needs. The two have nothing to do with each other.
The branch function of git is particularly powerful. It does not need to copy all the data. It only needs to re-create a branch pointer pointing to where you need to start creating the branch's submission object (commit), and then modify it and submit it. , then the pointer of the new branch will point to your latest commit object, and the pointer of the original branch will point to the location of your original development. When you develop on which branch, HEAD points to the latest commit object commt of that branch. It doesn’t matter if you don’t understand it clearly. There is such a concept first, and you will gradually understand it later.
Creation and merging of branches
We can use the command git branch to check how many branches our git warehouse has, and we are currently working Which branch we are on, the one with an * in front of it is the branch we are currently on. We can create a branch by commanding git branch name, and the pointer of this branch points to the latest commit object, which points to the same object as HEAD. We can switch to the destination branch through the command git checkout name. Our default main branch is master. When creating and switching branches, it is actually just a simple matter of creating a pointer to find the pointer, and then finding the commit object pointed to by the found pointer, and then restoring the workspace to the file snapshot pointed to by the commit object for us to work. When submitted once, the pointer will point to the latest submitted object again, which is very simple.
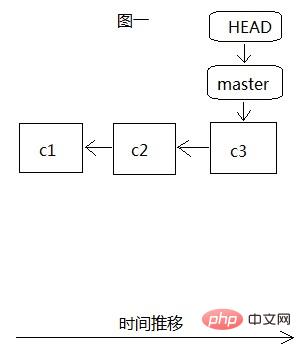
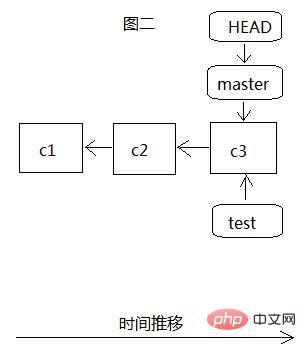
When we create the branch teset, there is only one master branch, as shown in Figure 1. All our development is on this branch, and HEAD points to The most recent commit object c3, c3 has two previous commits c1 and c2. At this time, we create the test branch through git branch test, as shown in Figure 2. At this time, HEAD still points to the most recent commit c3 of the master branch. When git checkout After test switches to the test branch, HEAD points to the latest commit c3 of the test branch. At this time, in fact, all the files in .git point to the same data c3.
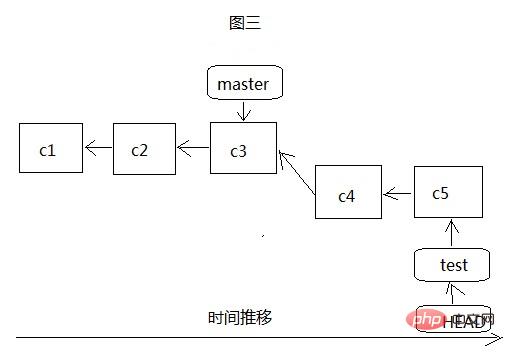

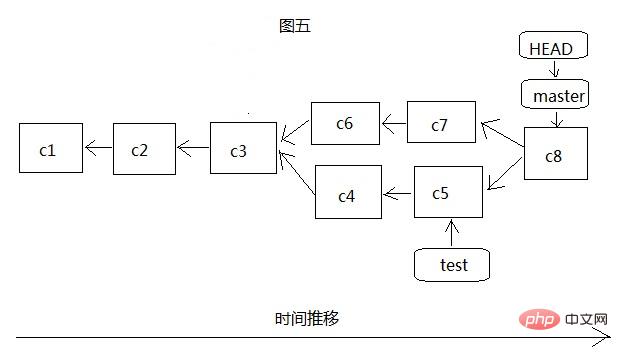
As shown in Figure 5, we first switch to the master branch, and then merge the test branch to the master branch through git merge test. At this time, git is no longer simply moving the pointer, because there is development on both sides, so git must The latest commits c5 and c7 of the two branches, as well as the common ancestor commit object c3 of the two branches, perform a simple three-party merge, generate a new file snapshot and record it with the new commit object c8. You don’t need to pay too much attention to this merge process. If a conflict occurs, that is, two branches have modified the same file, then git will stop the merge operation and let you handle the conflict, then submit (c8), and then merge. At this time, both master and HEAD point to c8, but test has not been moved. At this time, you can continue to develop on test and then merge it into master. If test is no longer of use value, you can delete it.
Local branch, tracking branch and remote branch
There are three concepts here. The local branch is the branch we can view through git branch. That is, we can use all branches owned by our own git warehouse. The remote branch is an index of the branch of the remote warehouse. It is actually a local branch, but we cannot move it. We must interact with the central server and move it based on the code updated locally by the server. The function of the remote branch is that we last interacted with it. The latest version obtained by the central server's interactive update is also a pointer. Tracking branch is difficult to understand. It is also a local branch, but it corresponds to a remote branch. If one of our local branches corresponds to a specific remote branch, then it is a tracking branch. For example, our original master branch is a tracking branch. Branch, which corresponds to the remote branch origin/master, where origin is the name of the remote warehouse. When we perform updates (fetch, pull) or push (push) in the master branch, without specifying a branch, the default is origin/ The master branch is updated or submitted to the origin/mster branch.

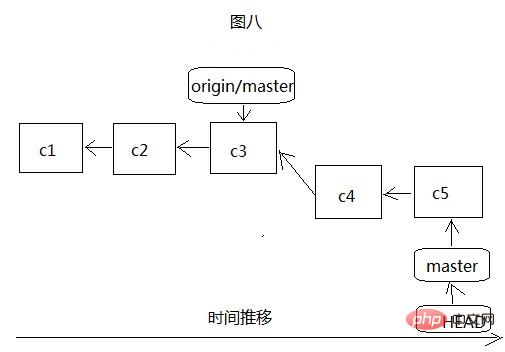
It is easy to see from Figure 7 and Figure 8 that it is very similar to our local branch creation, except that the origin/master remote branch can only be connected to the server And update the server code to the local before moving, as shown in Figure 9:
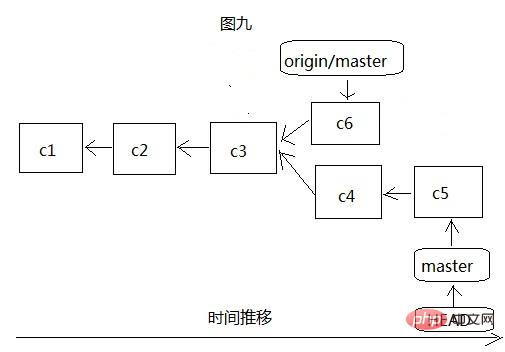
There are two commands to update the remote code to the local, fetch and pull, fetch is to The remote code is updated locally, but the merge operation will not be performed. We need to check it ourselves, resolve conflicts, etc., and then execute merge ourselves to merge the updated code into our own branch, but pull combines these two operations. In one step, directly update the server code and merge it into the local designated branch. Of course, if you encounter conflicts, you must resolve them yourself. Therefore, we generally use fetch to implement updates. Although it is a bit troublesome, it is not prone to problems.
Push the local code to the remote warehouse, that is, the central server. Generally, the data we push is git push origin master:master. Here we specify the remote warehouse name, local branch name and remote branch, that is, our local The data of the master branch is pushed to the master branch of the remote warehouse origin. If the local master branch is a tracking branch, it will find the corresponding branch in the remote warehouse to push the data unless specified. Or we directly perform the git push origin operation and only specify the remote warehouse name. Then git will push the data based on the branch we are currently on and the branch of its corresponding remote warehouse, provided that the branch we are currently on must be a tracking branch. Of course, if it is git push origin:master, the local branch name here is empty. This operation is to push the empty branch to the master branch of the remote warehouse, and the result is to delete the master branch.
Since tracking branches are so easy to use, how do we create tracking branches? There are two ways. The first way is to eradicate remote branches and create tracking branches. If you do not specify the name of the tracking branch, the default is remote. The branch names of the warehouse are the same: git checkout --track origin/test, so we create a tracking branch named test. If we rename the tracking branch: git checkout -b name origin/test, we create A tracking branch named name, which corresponds to the test branch of the remote repository. The second method is that a local branch already exists, and you want it to correspond to a remote branch and become a tracking branch. There are also two commands you can use, git branch --set-upstream test origin/test or git branch -f - -track test origin/test Here we let our local existing test branch track the remote test branch.
git branch management
It is so simple and fast to create branches and merge branches with git, so we can use branches crazily during our development process, and one of the core gameplays of git is branching. The use of branches is highly recommended, but can we use it unscrupulously? As for branches, how do we manage when we create so many branches? It’s not about too many branches but just the right amount. If too many branches are created, it will be troublesome to manage. Therefore, we recommend a branch management strategy, git-flow, and also recommend a branch management strategy. Read this article to learn about this strategy: http://nvie.com/posts/a-successful-git-branching-model/ to make your use of git more convenient.
Recommended study: "Git Tutorial"
The above is the detailed content of What does branch mean in git?. For more information, please follow other related articles on the PHP Chinese website!