
 Operation and Maintenance
Docker
Installation and use of docker in Win10 (detailed explanation with pictures and text)
Operation and Maintenance
Docker
Installation and use of docker in Win10 (detailed explanation with pictures and text)
Installation and use of docker in Win10 (detailed explanation with pictures and text)

This article brings you relevant knowledge about how to install and use docker on win10. I hope it will be helpful to you.

##1.Docker installation
Environment preparation
Docker for Windows is a Docker Community Edition (CE) application. The Docker for Windows installation package contains everything you need to run Docker on Windows systems. If you don't want to install a virtual machine and want to install and learn to use Docker directly in your Windows operating system, then you must first check whether your system meets the installation and use requirements of Docker for Windows.- The current version of Docker for Windows runs on 64-bit Windows 10 Pro, Pro, Enterprise and Education editions (1607 Anniversary Update, version 14393 or later). Ps: The home version is not possible. If you are a home version, then the first is to upgrade to the professional version. The recommended address to crack the professional version is: http://blog.csdn.net/SONGCHUNHONG/article/details/78006389. The second is to install it. Docker Toolbox, self-service online Baidu http://blog.csdn.net/tina_ttl/article/details/51372604
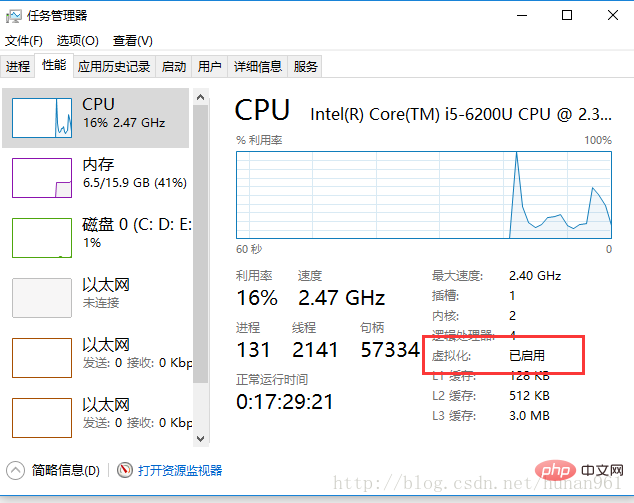
- If you meet the environmental conditions for Docker for Windows, then first check the computer Whether virtualization is enabled: Enter the task manager (ctrl alt delete), click Performance->cpu, check whether virtualization is enabled, if virtualization is disabled, then you need to restart the computer and enter bios to enable virtualization (we All notebook CPUs supported by our company support virtualization. When restarting, enter bios and press esc -> and then press f12 -> to enable virtualization)
- After restarting, enable virtualization. Go into Task Manager to see if virtualization is enabled.
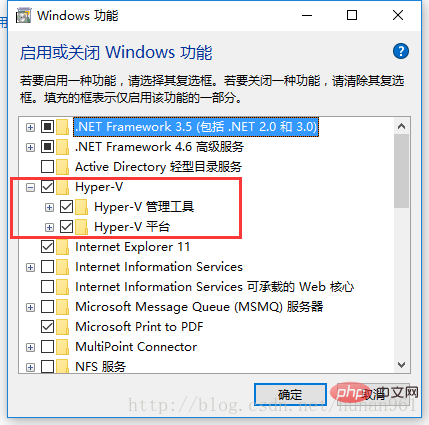
 ##Then enter the computer’s control panel->Programs->Turn Windows features on or off->check Hyper-v and enable it The computer will restart, and you can download and install Docker for Windows later.
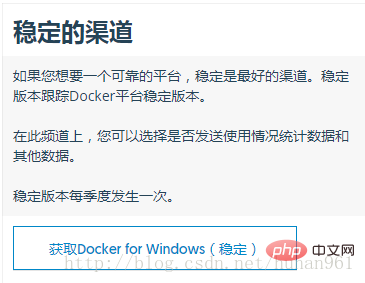
- Enter the URL https://docs.docker.com/ docker-for-windows/install/#download-docker-for-windows Download and install. I installed the stable version. There is nothing to note during the installation process.
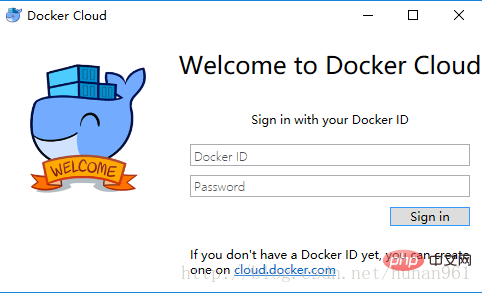
- After startup, it will appear in the lower right corner of the desktop. When the mouse is placed on it, it will display Docker is running, indicating that the startup is successful. It seems that a pop-up will appear after the first installation and activation. Docker Cloud login interface, register and log in, the use is somewhat similar to git, you can pull images, etc.
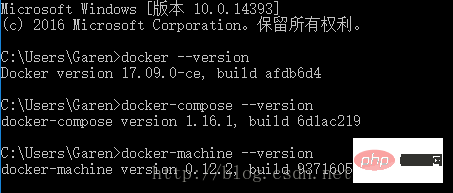
- 2. Getting started with docker
- Check the versions of Docker, Compose and Machine
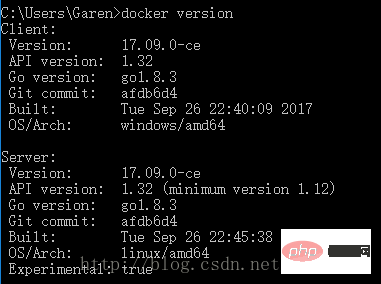
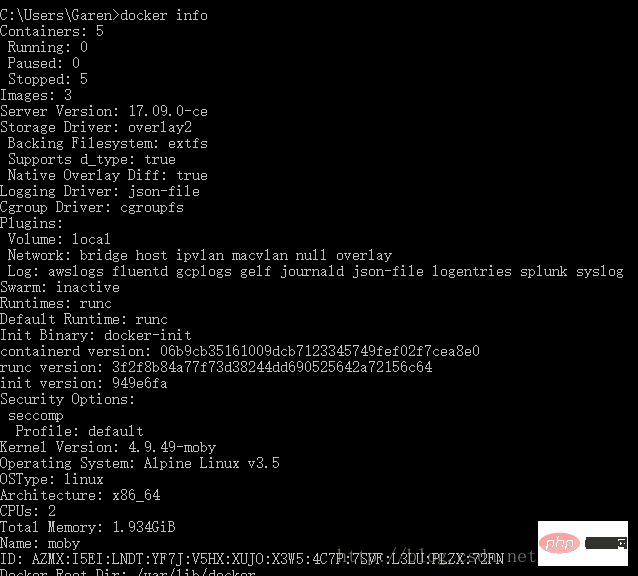
- Check version information , and make sure the docker command is working
-
# Run docker run hello-world to test pulling from Docker Hub Get the image and start the container -
Use the command docker run -it ubuntu bash to run an Ubuntu container. I have pulled this container before, probably dozens Mega, so enable it directly. Enter the exit command to stop the container -
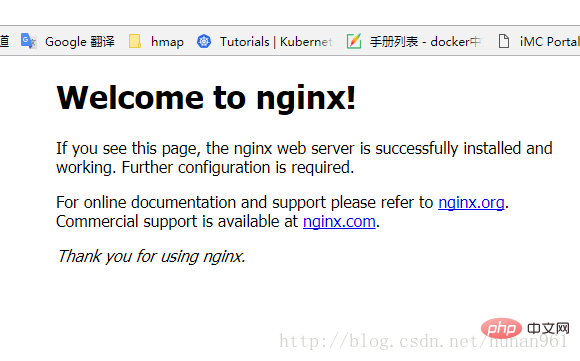
Run the command docker run -d -p 80:80 –name webserver nginx to start a Dockerized webserver Will download the nginx container image and start it, then open the browser and type http://localhost - ##Run docker ps command to check the details of the container
Stop or remove containers and images. If you want to stop the web server, type: docker stop webserver and then restart docker start webserver. To stop and delete a running container with a single command, type: docker rm -f webserver. This will delete the container, but not the nginx image. You can list local images docker images. You may want to keep some images so you don't have to pull them out of Docker Hub again. To delete images that are no longer needed, use docker rmi followed by the image ID or image name. For example, docker rmi nginx


 ##Run docker ps command to check the details of the container
Set tab key auto-completion in PowerShell (its practical Both are cmd.exe)
- Start a PowerShell (that is, run as an administrator). Search for PowerShell, right-click and select Run as administrator. At the PowerShell prompt type:
-
Set-ExecutionPolicy RemoteSigned To check that the policy settings are correct, run: - get-executionpolicy
To install the posh-dockerPowerShell module to automate Docker commands, type: - Install-Module posh-docker
Alternatively, to install the module only for the current user, type:
Install -Module -Scope CurrentUser posh-docker After the installation is complete, the auto-complete function can only be enabled for the current PowerShell, enter: - Import-Module posh-docker
-
if (-Not (Test-Path $PROFILE)) {
    New-Item $PROFILE –Type File –Force}Add-Content $PROFILE "`nImport-Module posh-docker"
Copy after login
$PROFILE if it does not exist and will Add this line to the file:
Import-Module posh-docker To check if the file was created correctly, or just edit it manually, type the following in PowerShell:
Notepad $PROFILE Open a new PowerShell session. Docker commands such as start, stop, run and their options as well as container and image names should now auto-complete when you press the Tab key after the first few letters of typing. 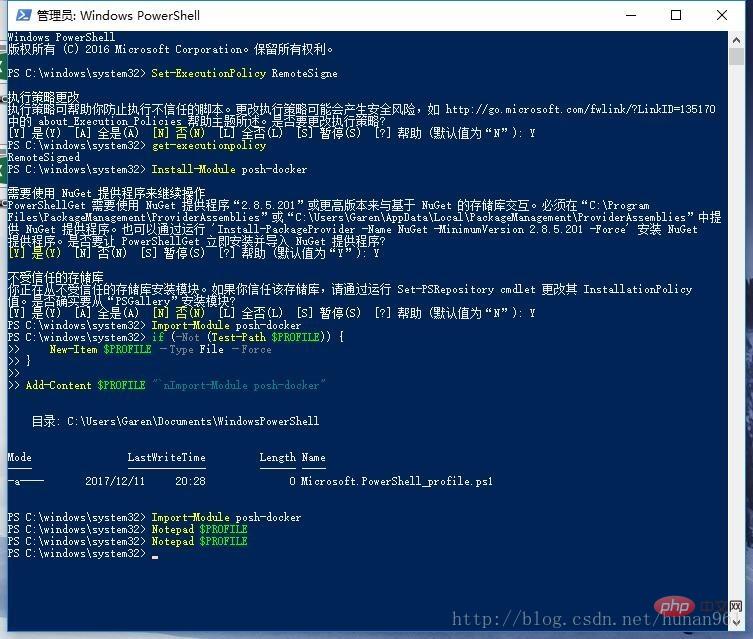
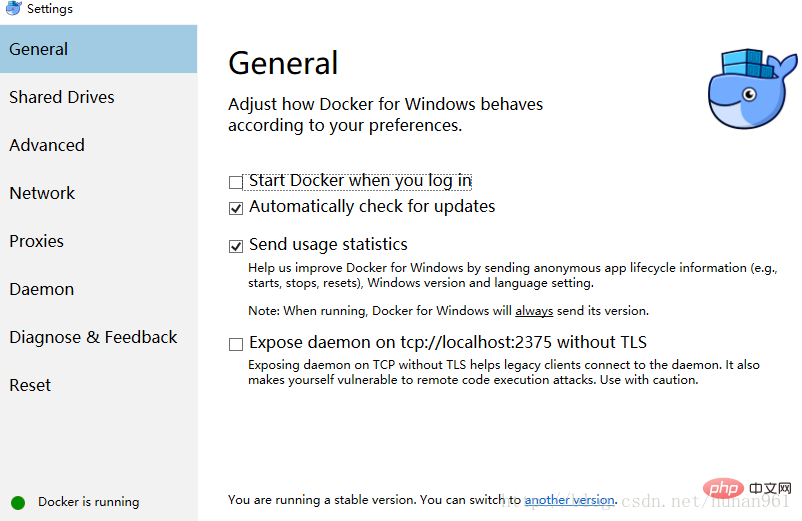
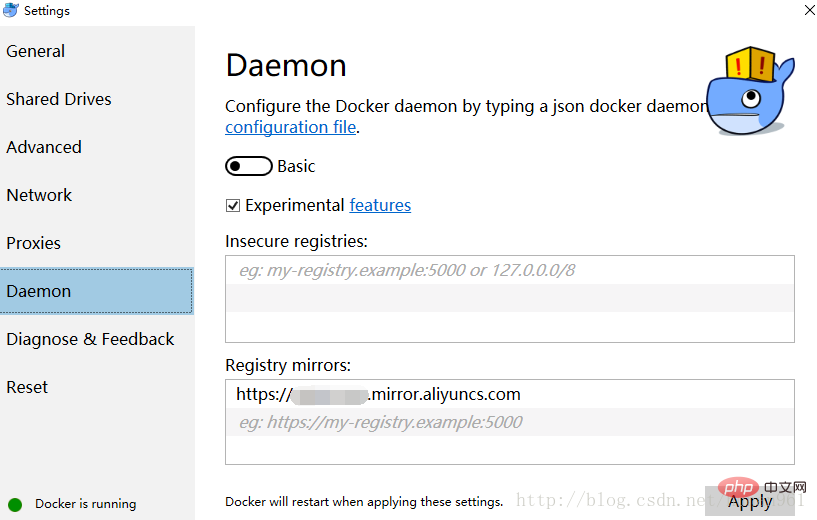
Settings
Find the docker icon in the lower right corner, right-click and select settings- General :Here is to set docker to start automatically when booting, check for updates when the application starts, and publish usage statistics
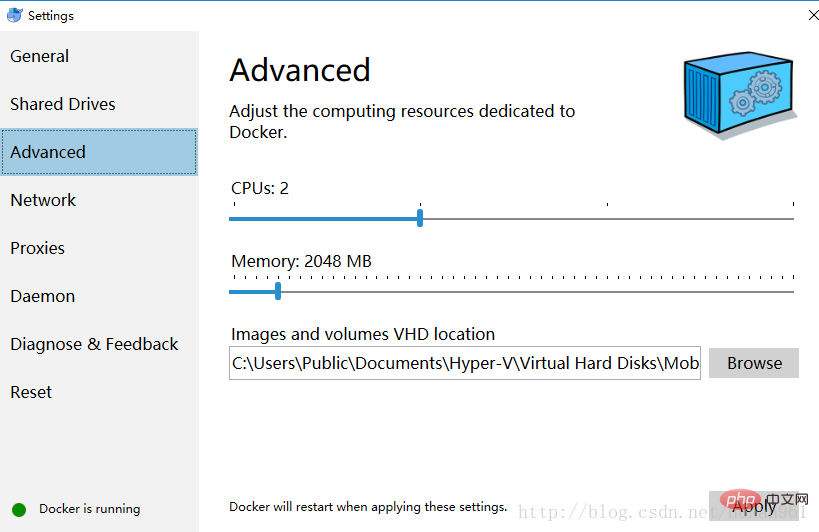
- Advanced: Allocate the number of CPUs and memory
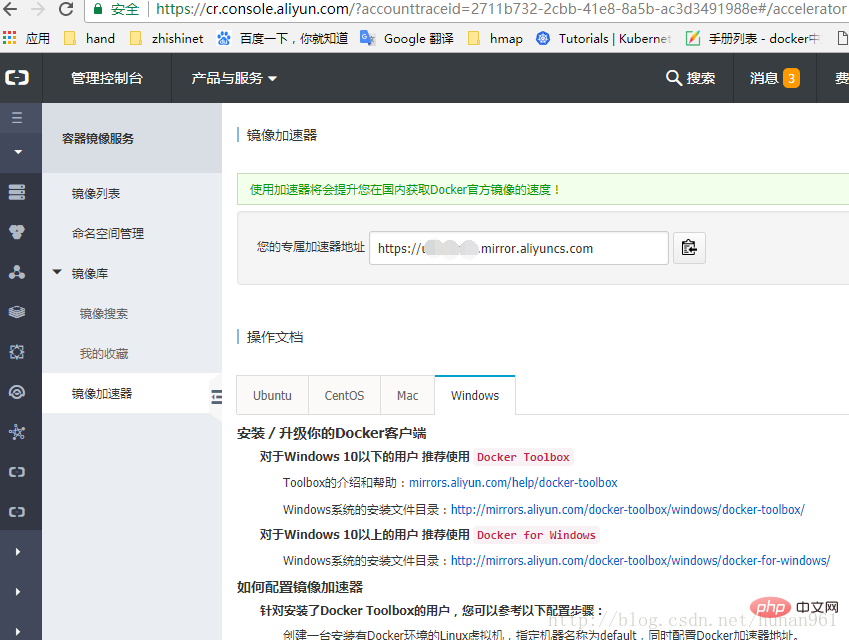
- Daemon: Docker for windows10 can configure Alibaba Cloud image, go to https://cr.console.aliyun.com/ to register an account, log in and then select the accelerator from the list , copy and paste your exclusive accelerator address into Daemon's Registry mirrors
Using Docker, you can use a portable Python runtime as an image, no installation required. Your build can then include the base Python image along with your application code, ensuring your application, dependencies, and runtime all run together.
These portable images are defined by something called a Dockerfile
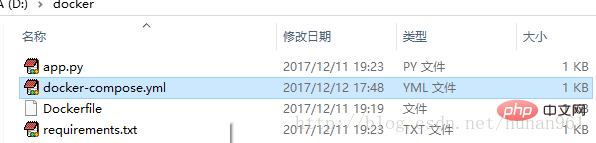
New directory file
Create an empty directory, I named it docker, Then create three new files in it: Dockerfile, app.py, requirements.txt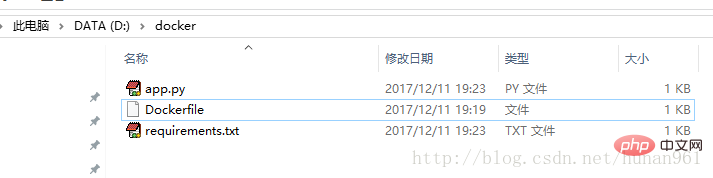
1.Dockerfile:# Use an official Python runtime as a parent imageFROM python:2.7-slim# Set the working directory to /appWORKDIR /app# Copy the current directory contents into the container at /appADD . /app# Install any needed packages specified in requirements.txtRUN pip install --trusted-host pypi.python.org -r requirements.txt# Make port 80 available to the world outside this containerEXPOSE 80# Define environment variableENV NAME World# Run app.py when the container launchesCMD ["python", "app.py"]2.app.py:
from flask import Flask
from redis import Redis, RedisError
import os
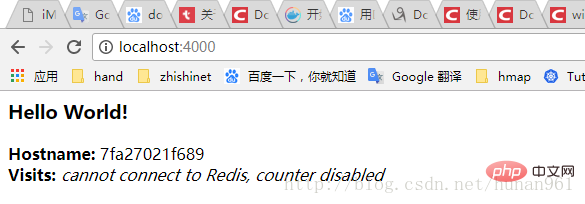
import socket# Connect to Redisredis = Redis(host="redis", db=0, socket_connect_timeout=2, socket_timeout=2)app = Flask(__name__)@app.route("/")def hello():
try:
visits = redis.incr("counter")
except RedisError:
visits = "<i>cannot connect to Redis, counter disabled</i>"
html = "<h3 id="Hello-name">Hello {name}!</h3>" \ "<b>Hostname:</b> {hostname}<br>" \ "<b>Visits:</b> {visits}"
return html.format(name=os.getenv("NAME", "world"), hostname=socket.gethostname(), visits=visits)if __name__ == "__main__":
app.run(host='0.0.0.0', port=80)3. requirements.txt:
Flask
Redis构建镜像
在docker目录下打开cmd.exe运行命令(确保能够找到Dockerfile文件,镜像取名叫friendlyhello): docker build -t friendlyhello .
ps:千万不要落了上面那行后面的那个点,曾经入过坑的。。命令包括后面的那个点 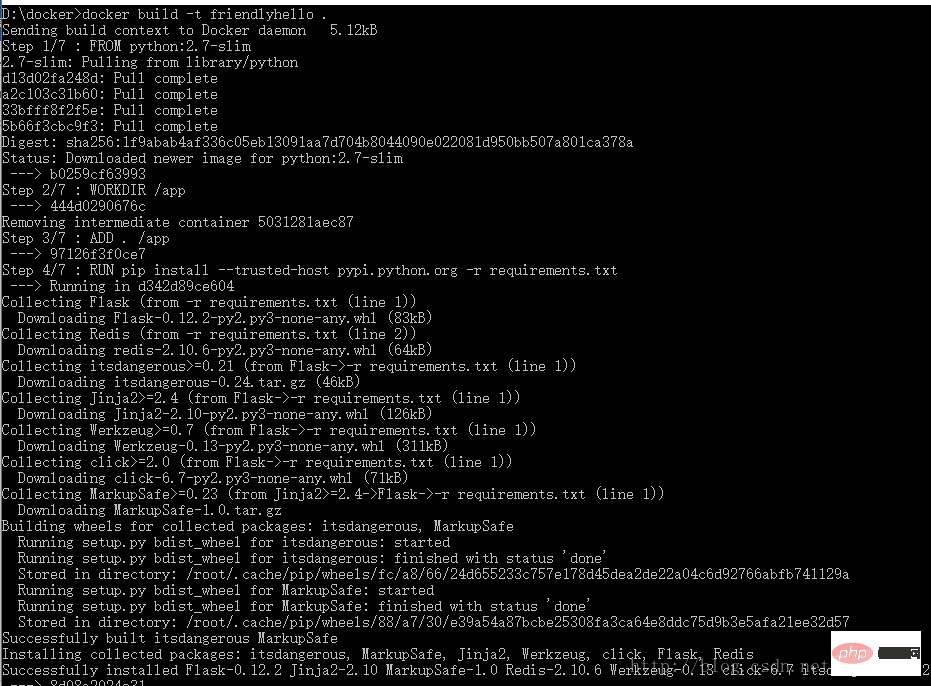
然后再执行命令:
docker images 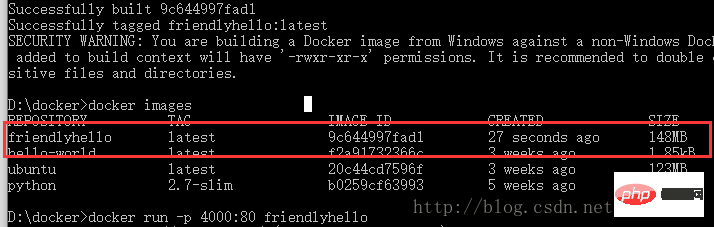
运行镜像程序:
docker run -p 4000:80 friendlyhello 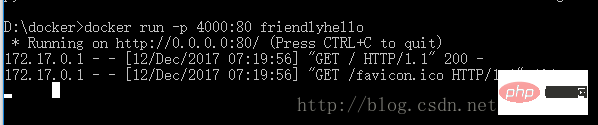
可以看到Python正在为应用程序提供消息的http://0.0.0.0:80。但是,这个消息来自容器内部,它不知道我们将该容器的端口80映射到4000,从而打开URL: http://localhost:4000 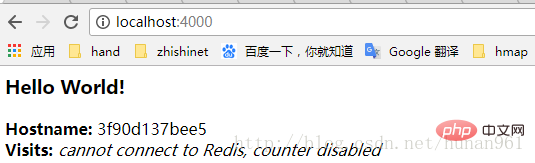
停止容器运行
首先在接着上面的操作步骤后按下ctrl+c在终端退出,这并不意味着镜像停止运行了
键入docker container ls 列出正在运行的容器 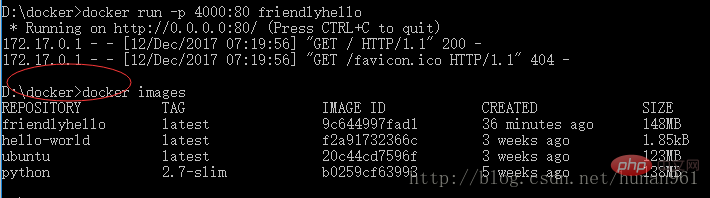

运行命令: docker container stop <container name or id></container>
停止容器。否则,在下一步中重新运行容器时,将会收到错误响应。 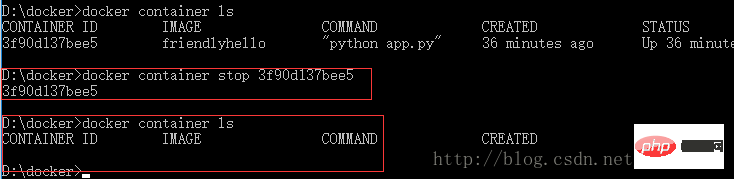
5.联系Docker Hub的常用操作
登录到Docker Hub
前面已经说过了,docker和git的操作有类似之处,所以docker也
有远程仓库,如果前面已经注册过并登录了docker cloud,那么
访问网址:https://hub.docker.com 在里面创建存储库,否则先
注册吧。 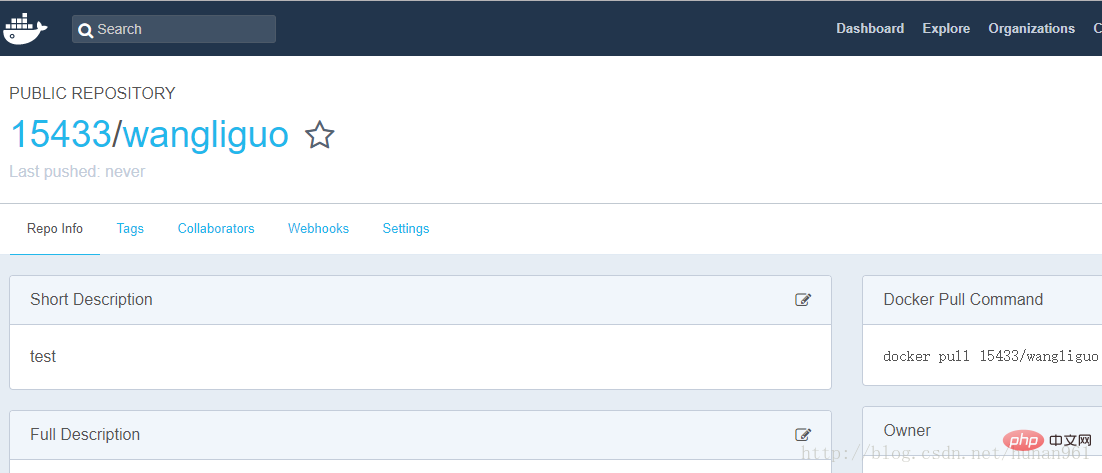
push镜像
前面在本地创建了一个friendlyhello的镜像,现在要把它push到
自己的docker hub的存储库中去,首先:
1. 登录docker hub (我已经登录过了。。再登录一次吧) 
2. 标记镜像:
把镜像放入wangliguo存储库并标记为test 
3. 查看镜像: 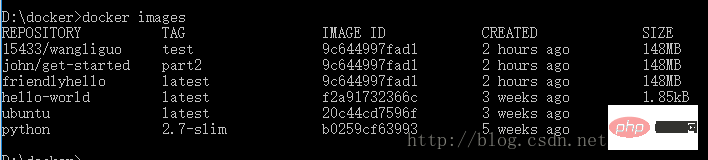
4. 发布镜像(推送镜像) 
5. Docker Hub上查看镜像: 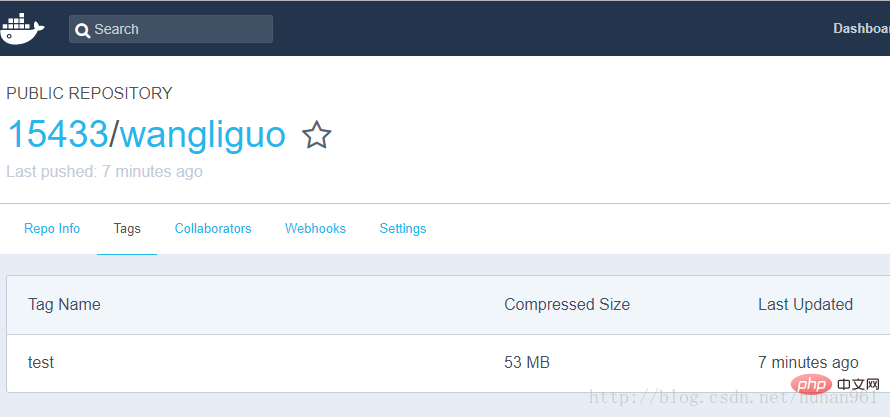
6. 从远程存储库中提取并运行镜像:现在当远程存储库有了镜像后,就可以从远程存储库提取并运行了 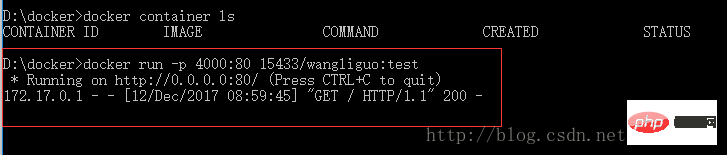
6.服务
在分布式应用程序中,应用程序的不同部分被称为“服务”。例如,想象一个视频共享站点,它可能包括用于将应用程序数据存储在数据库中的服务,用于用户上传东西的视频转码服务,为前端服务等等。
服务实际上只是“生产中的容器”。服务只运行一个镜像,但它编码镜像运行的方式 - 应该使用哪个端口,容器应该运行多少个副本,以便服务具有所需的容量,以及等等。缩放服务会更改运行该软件的容器实例的数量,从而为流程中的服务分配更多的计算资源。
使用Docker平台定义,运行和扩展服务非常简单 - 只需编写一个docker-compose.yml文件即可。
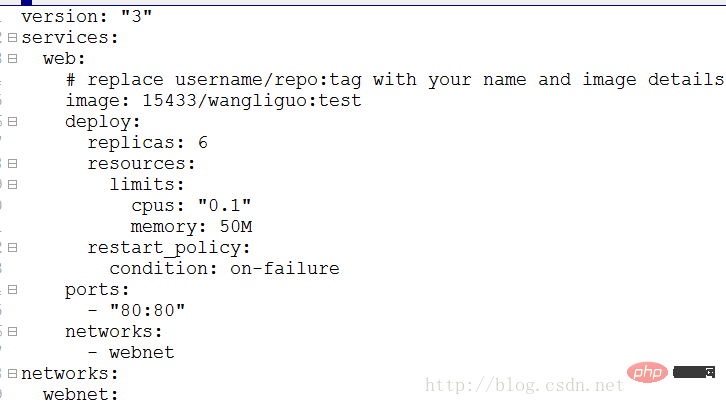
创建一个docker-compose.yml文件
键入:
version: "3"services:
  web:
    # replace username/repo:tag with your name and image details
    image: 15433/wangliguo:test
    deploy:
      replicas: 5
      resources:
        limits:
          cpus: "0.1"
          memory: 50M
      restart_policy:
        condition: on-failure
    ports:
      - "80:80"
    networks:
      - webnet
networks:
  webnet:
拉取的是上个步骤中的存储库的tag。
运行该镜像的5个实例作为一个服务调用web,限制每个使用,最多10%的CPU(跨所有核心)和50MB的RAM。
如果一个失败,立即重新启动容器。
将主机上的端口80映射到web端口80。
指导web容器通过一个负载平衡的网络共享80端口webnet。(在内部,容器本身将web在临时端口上发布到 端口80)。
webnet使用默认设置(这是一个负载平衡覆盖网络)定义网络。
运行新的负载均衡应用程序
先运行命令:docker swarm init 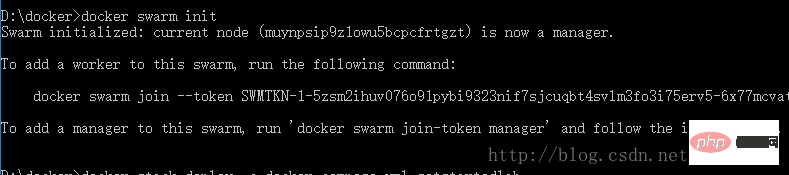
然后再运行命令:docker stack deploy -c docker-compose.yml getstartedlab
给它取名叫getstartedlab 
服务堆栈在这台主机上运行了5个部署镜像的容器实例
运行命令查看:docker service ls 
在服务中运行的单个容器称为任务,可以看到上面有个getstartedlab_web的服务
运行命令docker service ps getstartedlab_web 查看此服务下的任务: 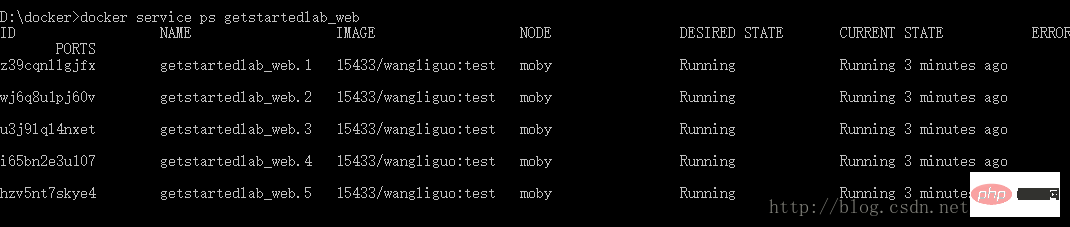
如果只列出系统中的所有容器,也会显示任务,但不会被服务过滤:
运行命令:docker container ls -q 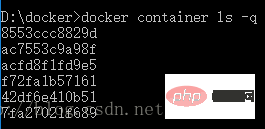
然后打开浏览器,键入http://localhost 
点击刷新多次,可以发现Hostname的更改,以循环方式选择5个任务中的一个来响应。容器ID将与前一个命令(docker container ls -q)的输出相匹配。
更改应用程序
比如更改docker-compose.yml中的replicas值,保存更改并重新运行docker stack deploy命令来更新应用程序: 
运行命令:
docker stack deploy -c docker-compose.yml getstartedlab 
Docker会做一个就地更新,然后重新运行docker container ls -q以查看重新配置的已部署实例 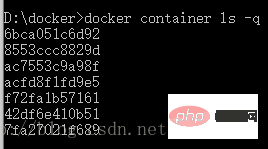
可以看到之前是6个,现在是7个,刚好多了一个任务
ps:电脑中还运行这之前步骤中从docker hub中拉取并运行着的那个任务,所以会看到6个和7个
Close the application and the group
Close the application docker stack rm getstartedlab 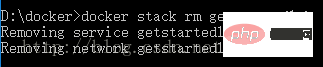
Close the group docker swarm leave –force 
Now all the tasks in the service are closed and then run the command:
docker container ls -q 
This is what was pulled and run from docker hub in the previous step. That task
7. Cluster
Understanding the cluster
swarm is a group of machines that run Docker and join a cluster. But now they will be executed on the cluster by the cluster manager. Machines in a swarm can be physical or virtual. After joining a group, they are called nodes.
Swarm managers can use several strategies to run containers, such as "emptiest node" - which fills the least used machines with containers. or "global", which ensures that each machine only gets one instance of a given container. You can instruct the swarm manager to use these policies in the Compose file.
The group manager is the only machine in the group that can execute your commands, or authorize other machines to join the group as workers. Workers provide capabilities and have no authority to tell any other machine what it can and cannot do.
Until now, Docker has been used in single-host mode on the local machine. But Docker can also switch to cluster mode, which is why clustering is used. Enabling swarm mode makes the current machine the swarm manager. Docker will then run the commands executed on the cluster you are managing, not just on the current machine.
Create a cluster
A cluster consists of multiple nodes, which can be physical machines or virtual machines. The basic concept is simple: run docker swarm init to enable swarm mode, making the current machine the swarm manager, and then run docker swarm join on the other machines to join the swarm as workers. Below we will use virtual machines to quickly create a two-machine cluster and turn it into a cluster.
Steps:
1. Run cmd.exe as an administrator. This must be run by an administrator, otherwise the permissions for subsequent operations will not be sufficient. 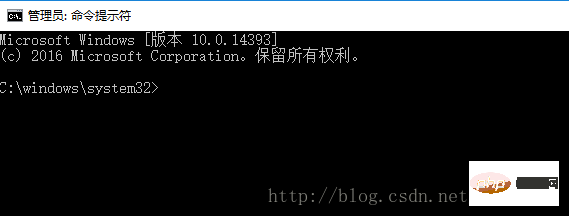
2. Run docker swarm init to enable swarm mode, so that the current The machine becomes the swarm manager, and then docker swarm join is run on the other machines, allowing them to join the swarm as workers.
3. Start Hyper-V Manager
Click Start→Windows Management Tools→Hyper-V Manager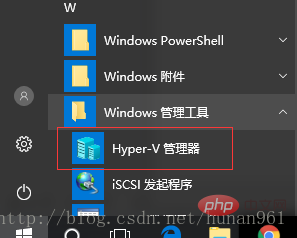
4. Click Virtual Switch Manager## in the right menu 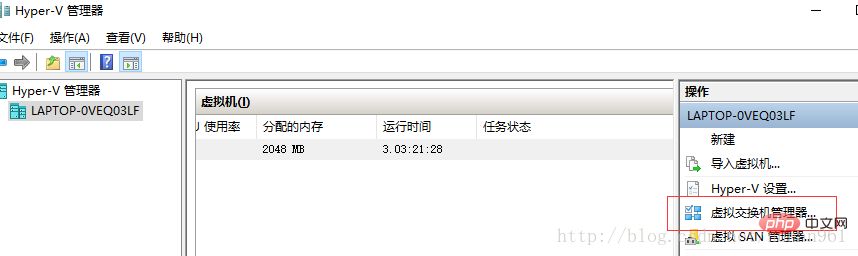 # 5. Click Create a virtual switch of type External Network, give it the name myswitch, and check the box Share your host's active network adapter
 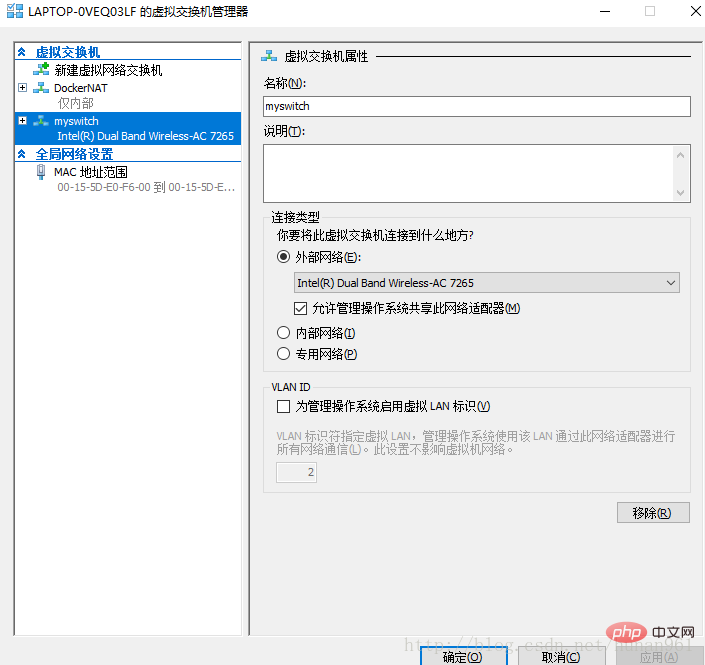 6. Use Node The management tool creates several virtual machines docker-machine:
docker-machine create -d hyperv –hyperv-virtual-switch “myswitch” myvm1
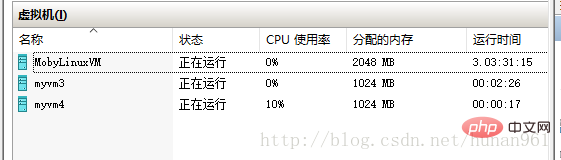
docker-machine create -d hyperv –hyperv-virtual-switch “myswitch” myvm2  I have already created them before, so I will create two more now: myvm3 and myvm4
docker-machine create -d hyperv –hyperv-virtual-switch “myswitch” myvm3
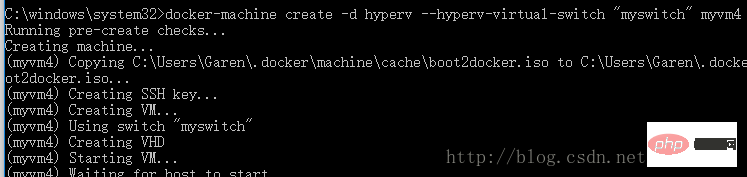
docker-machine create -d hyperv –hyperv-virtual-switch “myswitch” myvm4 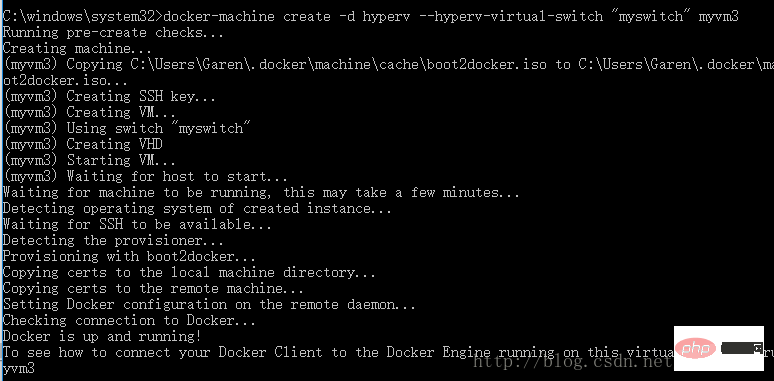
 7. Now two virtual machines are created, respectively Named myvm3 and myvm4. Use the command
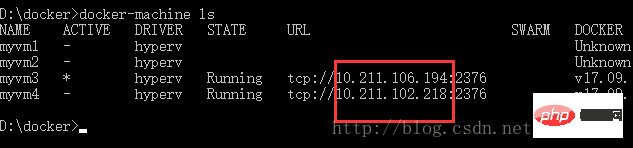
docker-machine ls to list the machines and get their IP addresses. 
初始化群并添加节点
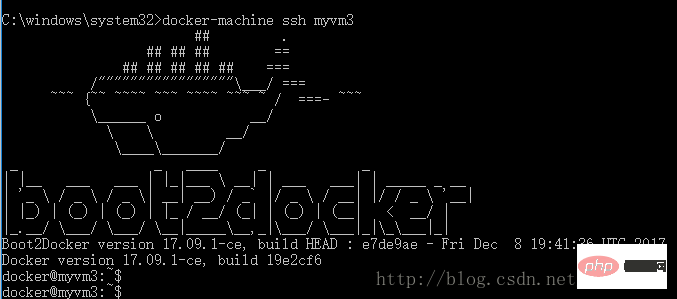
先使用命令docker-machine ssh myvm3
然后让myvm3 成为一个管理员:docker swarm init
注意红框中的内容,这是后面的myvm4 加入集群要执行的命令
运行命令:docker node ls
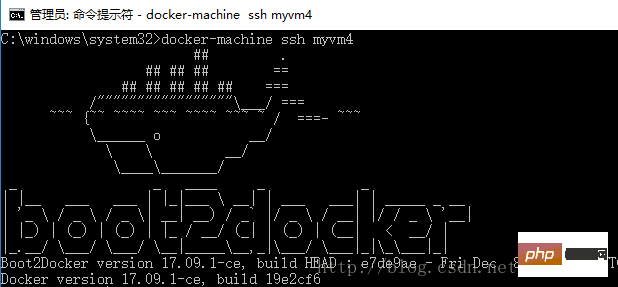
可以看到myvm3 已经成为管理员了以管理员身份再运行一个cmd.exe.然后运行命令:docker-machine ssh myvm4
然后再运行命令:(这就是上一页中图片里红框中的内容,下面的token是我这里的,正常运行到这里的时候是去myvm3的docker swarm init命令中把红框框位置里的命令复制粘贴过来执行)


docker swarm join --token SWMTKN-1-0csyw4yz6uxob90h0b8ejoimimrgisiuy9t2ugm8c1mxfvxf99-7q7w5jw1mrjk1jlri2bcgqmu8 10.211.106.194:2377

然后再切换到myvm3 的cmd.exe中执行命令:docker node ls 
可以看到,我们已经创建了一个简单的集群。、
附离开群命令:docker swarm leave
在集群上部署应用程序
docker-machine为swarm管理器配置一个shell
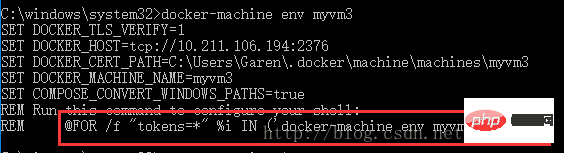
运行命令:docker-machine env myvm3
注意最后一行的内容
我这里是@FOR /f "tokens=*" %i IN ('docker-machine env myvm3') DO @%i
复制粘贴运行它
再运行docker-machine ls以验证它myvm3 是否为活动机器在swarm管理器上部署应用程序
以部署我们之前docker-compose.yml服务为例
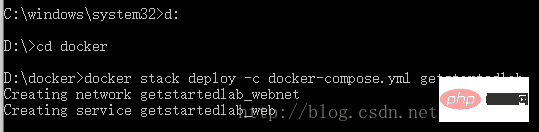
首先在这个以管理员身份打开的cmd中进入到docker-compose.yml文件的所在的目录中去,我的因为在D/docker中,如果不过来,那么执行命令:
docker stack deploy -c docker-compose.yml getstartedlab会出现:
进入目录后执行上面那条命令:
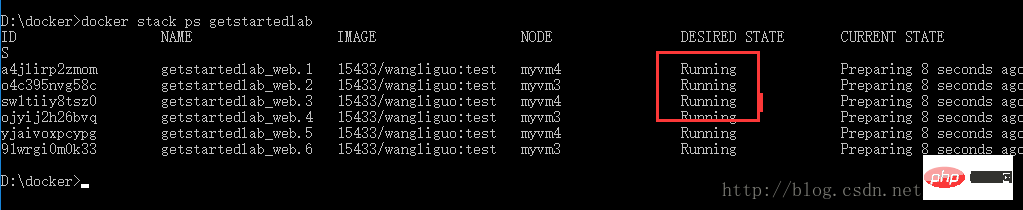
再执行命令docker stack ps getstartedlab 查看服务详情:
如果发现state存在shutdown的情况(也有可能出现你的图片上的实例数量大于你在服务文件中定义的数量的情况,这都是我爬过的坑,现在我这里定义的是6,图片上也是6,),那应该是你在之前服务哪一章运行过命令:
docker stack deploy -c docker-compose.yml getstartedlab 而没有把getstartedlab移除掉
这时应该执行命令:docker stack rm getstartedlab 把getstartedlab移除掉
Ps:我是d,c盘都执行了这个命令,因为之前运行docker stack deploy -c docker-compose.yml getstartedlab命令是在d盘的时候
然后重新运行:docker stack deploy -c docker-compose.yml getstartedlab 和
docker stack ps getstartedlab 就好了浏览器访问集群的网址:
如图红框框所示,浏览器上访问其中的任何一个,然后刷新,将看到6个可能的容器ID,它们都是随机循环的,展示了负载平衡- 其他的一些命令:


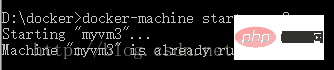
比如说如果修改了docker-compose.yml文件后,执行命令:
docker stack deploy -c docker-compose.yml getstartedlab
再次运行以部署这些更改即可
比如说前面提到的移除应用程序:docker stack rm getstartedlab
离开群:docker swarm leave –force
重新启动已停止的虚拟机,执行:
docker-machine start <machine-name></machine-name>
Recommended learning: "docker video tutorial"
The above is the detailed content of Installation and use of docker in Win10 (detailed explanation with pictures and text). For more information, please follow other related articles on the PHP Chinese website!

Hot AI Tools

Undresser.AI Undress
AI-powered app for creating realistic nude photos

AI Clothes Remover
Online AI tool for removing clothes from photos.

Undress AI Tool
Undress images for free

Clothoff.io
AI clothes remover

Video Face Swap
Swap faces in any video effortlessly with our completely free AI face swap tool!

Hot Article
Hot Tools

Notepad++7.3.1
Easy-to-use and free code editor

SublimeText3 Chinese version
Chinese version, very easy to use

Zend Studio 13.0.1
Powerful PHP integrated development environment

Dreamweaver CS6
Visual web development tools

SublimeText3 Mac version
God-level code editing software (SublimeText3)
Hot Topics
 1386
1386
 52
52

 How to update the image of docker
Apr 15, 2025 pm 12:03 PM
How to update the image of docker
Apr 15, 2025 pm 12:03 PM
The steps to update a Docker image are as follows: Pull the latest image tag New image Delete the old image for a specific tag (optional) Restart the container (if needed)
 How to use docker desktop
Apr 15, 2025 am 11:45 AM
How to use docker desktop
Apr 15, 2025 am 11:45 AM
How to use Docker Desktop? Docker Desktop is a tool for running Docker containers on local machines. The steps to use include: 1. Install Docker Desktop; 2. Start Docker Desktop; 3. Create Docker image (using Dockerfile); 4. Build Docker image (using docker build); 5. Run Docker container (using docker run).
 How to create a mirror in docker
Apr 15, 2025 am 11:27 AM
How to create a mirror in docker
Apr 15, 2025 am 11:27 AM
Steps to create a Docker image: Write a Dockerfile that contains the build instructions. Build the image in the terminal, using the docker build command. Tag the image and assign names and tags using the docker tag command.
 What to do if the docker image fails
Apr 15, 2025 am 11:21 AM
What to do if the docker image fails
Apr 15, 2025 am 11:21 AM
Troubleshooting steps for failed Docker image build: Check Dockerfile syntax and dependency version. Check if the build context contains the required source code and dependencies. View the build log for error details. Use the --target option to build a hierarchical phase to identify failure points. Make sure to use the latest version of Docker engine. Build the image with --t [image-name]:debug mode to debug the problem. Check disk space and make sure it is sufficient. Disable SELinux to prevent interference with the build process. Ask community platforms for help, provide Dockerfiles and build log descriptions for more specific suggestions.
 How to save docker image
Apr 15, 2025 am 11:54 AM
How to save docker image
Apr 15, 2025 am 11:54 AM
To save the image in Docker, you can use the docker commit command to create a new image, containing the current state of the specified container, syntax: docker commit [Options] Container ID Image name. To save the image to the repository, you can use the docker push command, syntax: docker push image name [: tag]. To import saved images, you can use the docker pull command, syntax: docker pull image name [: tag].
 How to exit the container by docker
Apr 15, 2025 pm 12:15 PM
How to exit the container by docker
Apr 15, 2025 pm 12:15 PM
Four ways to exit Docker container: Use Ctrl D in the container terminal Enter exit command in the container terminal Use docker stop <container_name> Command Use docker kill <container_name> command in the host terminal (force exit)
 How to copy files in docker to outside
Apr 15, 2025 pm 12:12 PM
How to copy files in docker to outside
Apr 15, 2025 pm 12:12 PM
Methods for copying files to external hosts in Docker: Use the docker cp command: Execute docker cp [Options] <Container Path> <Host Path>. Using data volumes: Create a directory on the host, and use the -v parameter to mount the directory into the container when creating the container to achieve bidirectional file synchronization.
 How to check the name of the docker container
Apr 15, 2025 pm 12:21 PM
How to check the name of the docker container
Apr 15, 2025 pm 12:21 PM
You can query the Docker container name by following the steps: List all containers (docker ps). Filter the container list (using the grep command). Gets the container name (located in the "NAMES" column).
