 Web Front-end
 JS Tutorial
 Teach you step by step how to install and configure pm2 to realize automatic deployment of node projects
Teach you step by step how to install and configure pm2 to realize automatic deployment of node projects
How does
pm2 automatically deploy nodejs projects? The following article will introduce to you how to install and configure pm2, and implement automatic deployment of node projects. I hope it will be helpful to you!

1. Introduction to pm2
pm2 (process manager) is a process management tool that maintains a process list and can be used to manage your node process is responsible for all running processes and checks the status of the node process. It also supports performance monitoring, load balancing and other functions.
1.1. Benefits of using node programs managed by pm2
Monitor file changes and automatically restart the program
-
Support performance monitoring
Load balancing
Automatic restart after program crash
Server restart Automatically restart at startup
Automated deployment project
2. PM2 installation and use
2.1.Global Installation
npm install pm2 -g
2.2. Common commands
Start a node program
pm2 start start.js
Copy after login

Start the process and specify the application program name
pm2 start app.js --name application1
Copy after loginCluster mode startup
    // -i 表示 number-instances 实例数量
    // max 表示 PM2将自动检测可用CPU的数量 可以自己指定数量
    pm2 start start.js -i max
Copy after login

Add process monitoring
// 在文件改变的时候会重新启动程序
pm2 start app.js --name start --watch
Copy after login

List All processes
    pm2 list
    pm2 ls // 简写
Copy after loginDelete processes from the process list
    // pm2 delete [appname] | id
    pm2 delete app  // 指定进程名删除
    pm2 delete 0    // 指定进程id删除
Copy after loginDelete all processes from the process list
pm2 delete all
Copy after login-
View the specific situation of a process
pm2 describe app
Copy after login

- ##View the resource consumption of a process
pm2 monit
Copy after login

- Restart the process
    pm2 restart app // 重启指定名称的进程
    pm2 restart all // 重启所有进程
Copy after login - View the process log
    pm2 logs app    // 查看该名称进程的日志
    pm2 logs all    // 查看所有进程的日志
Copy after login - Set pm2 to start automatically at boot
pm2 startup centos
pm2 save
npm install pm2 -g
3.1 Create a new deploy.yaml file in the project root directory# deploy.yaml
apps:
- script: ./start.js # 入口文件
name: 'app' # 程序名称
env: # 环境变量
COMMON_VARIABLE: true
env_production:
NODE_ENV: production
deploy: # 部署脚本
production: # 生产环境
user: lentoo # 服务器的用户名
host: 192.168.2.166 # 服务器的ip地址
port: 22 # ssh端口
ref: origin/master # 要拉取的git分支
ssh_options: StrictHostKeyChecking=no # SSH 公钥检查
repo: https://github.com/**.git # 远程仓库地址
path: /home # 拉取到服务器某个目录下
pre-deploy: git fetch --all # 部署前执行
post-deploy: npm install && pm2 reload deploy.yaml --env production # 部署后执行
env:
NODE_ENV: productionCopy after login
# deploy.yaml
apps:
  - script: ./start.js       # 入口文件
    name: 'app'              # 程序名称
    env:                     # 环境变量
      COMMON_VARIABLE: true
    env_production:
      NODE_ENV: production

deploy:                     # 部署脚本
  production:               # 生产环境
    user: lentoo            # 服务器的用户名
    host: 192.168.2.166     # 服务器的ip地址
    port: 22                # ssh端口
    ref: origin/master      # 要拉取的git分支
    ssh_options: StrictHostKeyChecking=no # SSH 公钥检查
    repo: https://github.com/**.git # 远程仓库地址
    path: /home              # 拉取到服务器某个目录下
    pre-deploy: git fetch --all # 部署前执行
    post-deploy: npm install &&  pm2 reload deploy.yaml --env production # 部署后执行
    env:
NODE_ENV: production3.2 Configure git SSH password-free authentication
- Generate rsa public key and private key in the server, currently it is performed under
centos7
- The prerequisite server must install git. If it is not installed, install git first. If it is already installed, skip it.
yum –y install git
Copy after login - Generate the secret keyIn ~/.ssh There are two files, id_rsa and id_rsa.pub, in the directory. The id_rsa.pub file stores the public key.
ssh-keygen -t rsa -C "xxx@xxx.com"
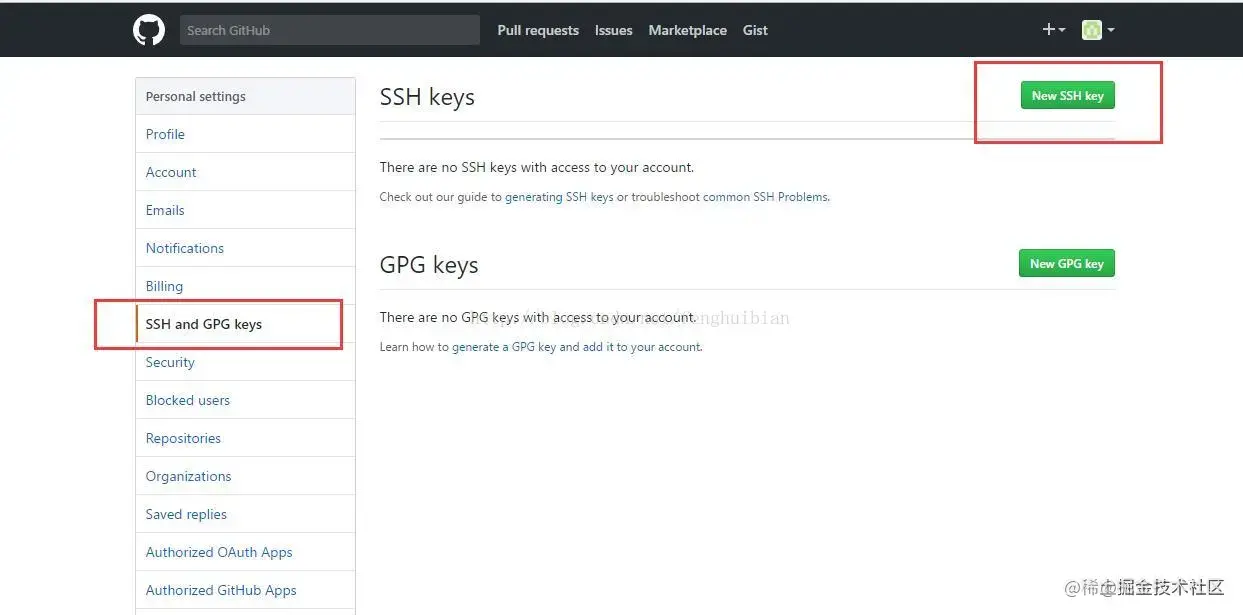
Copy after login - Log in to GitHub, click the avatar on the upper right, select settings, click Add SSH key, and copy the contents of id_rsa.pub into it.

Submit the local code to the remote before each deployment git warehouse
- First deployment
pm2 deploy deploy.yaml production setup
Copy after loginCopy after loginAfter the deployment is completed, you can log in to the server to check whether the project has been pulled from git in the configured directory
- Deploy again
pm2 deploy deploy.yaml production update
Copy after login
such as vue- The cli project is automatically deployed to the server, and the npm run build command is automatically executed. The generated dist directory is assigned to the static file directory of nginx.
4. Possible pitfalls
- Deployment failure occurs when the command line program of vscode under the window system and powershell execute the deployment command
-
pm2 deploy deploy.yaml production setup
Copy after loginCopy after login Solution: Use the git command line to execute
 For more node-related knowledge, please visit:
nodejs tutorialThe above is the detailed content of Teach you step by step how to install and configure pm2 to realize automatic deployment of node projects. For more information, please follow other related articles on the PHP Chinese website!

Hot AI Tools

Undresser.AI Undress
AI-powered app for creating realistic nude photos

AI Clothes Remover
Online AI tool for removing clothes from photos.

Undress AI Tool
Undress images for free

Clothoff.io
AI clothes remover

AI Hentai Generator
Generate AI Hentai for free.

Hot Article

Hot Tools

Notepad++7.3.1
Easy-to-use and free code editor

SublimeText3 Chinese version
Chinese version, very easy to use

Zend Studio 13.0.1
Powerful PHP integrated development environment

Dreamweaver CS6
Visual web development tools

SublimeText3 Mac version
God-level code editing software (SublimeText3)

Hot Topics
 How to delete node in nvm
Dec 29, 2022 am 10:07 AM
How to delete node with nvm: 1. Download "nvm-setup.zip" and install it on the C drive; 2. Configure environment variables and check the version number through the "nvm -v" command; 3. Use the "nvm install" command Install node; 4. Delete the installed node through the "nvm uninstall" command.
 How to use express to handle file upload in node project
Mar 28, 2023 pm 07:28 PM
How to handle file upload? The following article will introduce to you how to use express to handle file uploads in the node project. I hope it will be helpful to you!
 How to do Docker mirroring of Node service? Detailed explanation of extreme optimization
Oct 19, 2022 pm 07:38 PM
During this period, I was developing a HTML dynamic service that is common to all categories of Tencent documents. In order to facilitate the generation and deployment of access to various categories, and to follow the trend of cloud migration, I considered using Docker to fix service content and manage product versions in a unified manner. . This article will share the optimization experience I accumulated in the process of serving Docker for your reference.
 An in-depth analysis of Node's process management tool 'pm2”
Apr 03, 2023 pm 06:02 PM
This article will share with you Node's process management tool "pm2", and talk about why pm2 is needed, how to install and use pm2, I hope it will be helpful to everyone!
 Pi Node Teaching: What is a Pi Node? How to install and set up Pi Node?
Mar 05, 2025 pm 05:57 PM
Detailed explanation and installation guide for PiNetwork nodes This article will introduce the PiNetwork ecosystem in detail - Pi nodes, a key role in the PiNetwork ecosystem, and provide complete steps for installation and configuration. After the launch of the PiNetwork blockchain test network, Pi nodes have become an important part of many pioneers actively participating in the testing, preparing for the upcoming main network release. If you don’t know PiNetwork yet, please refer to what is Picoin? What is the price for listing? Pi usage, mining and security analysis. What is PiNetwork? The PiNetwork project started in 2019 and owns its exclusive cryptocurrency Pi Coin. The project aims to create a one that everyone can participate
 Let's talk about how to use pkg to package Node.js projects into executable files.
Dec 02, 2022 pm 09:06 PM
How to package nodejs executable file with pkg? The following article will introduce to you how to use pkg to package a Node project into an executable file. I hope it will be helpful to you!
 Token-based authentication with Angular and Node
Sep 01, 2023 pm 02:01 PM
Authentication is one of the most important parts of any web application. This tutorial discusses token-based authentication systems and how they differ from traditional login systems. By the end of this tutorial, you will see a fully working demo written in Angular and Node.js. Traditional Authentication Systems Before moving on to token-based authentication systems, let’s take a look at traditional authentication systems. The user provides their username and password in the login form and clicks Login. After making the request, authenticate the user on the backend by querying the database. If the request is valid, a session is created using the user information obtained from the database, and the session information is returned in the response header so that the session ID is stored in the browser. Provides access to applications subject to
 How to configure and install node.js in IDEA? Brief analysis of methods
Dec 21, 2022 pm 08:28 PM
How to run node in IDEA? The following article will introduce to you how to configure, install and run node.js in IDEA. I hope it will be helpful to you!


 Solution: Use the git command line to execute

