Detailed introduction to vuex in vue (detailed explanation and examples)
This article brings you knowledge about vuex in vue. Vuex is a state management model specially developed for Vue.js applications. I hope it will be helpful to everyone.

Concept
Vuex is a state management pattern developed specifically for Vue.js applications. It uses centralized storage to manage the state of all components of the application, and uses corresponding rules to ensure that the state changes in a predictable way.
Installation
- Use script tag in HTML to introduce
<script src="vue.js"></script>
<script src="vuex.js"></script>
- Use npm to download and install in Vue project (Node environment needs to be installed)
// 下载
npm install vuex --save

// 安装
import Vue from 'vue'
import Vuex from 'vuex'

Vue.use(Vuex)
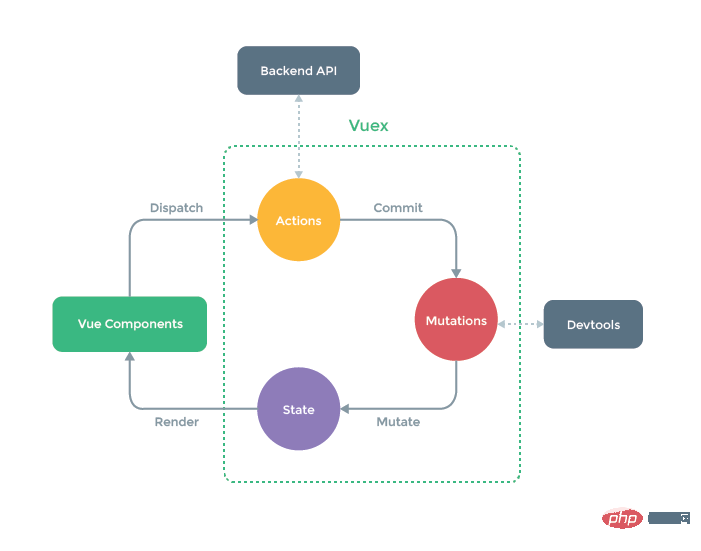
Vuex icon

Vuex is different from a simple global object in the following two points:
Vuex’s state storage is reactive. When a Vue component reads state from the store, if the state in the store changes, the corresponding component will be efficiently updated accordingly.
The state in the store cannot be changed directly. The only way to change the state in the store is to explicitly commit a mutation. This allows us to easily track every state change, allowing us to implement some tools to help us better understand our application.
Store
The core of every Vuex application is the store (warehouse). A "store" is basically a container that contains most of the state in your application.
State
Data source that drives the application and is used to save common data for all components.
Getter
Getter can be understood as a computed property of the store. The return value of getters will be cached according to its dependencies, and only occurs when its dependency value occurs. It will be recalculated only if it changes.
Mutation
The mutation object stores the callback function that changes the data. The function name is officially called type. The first parameter is state, and the second parameter is payload. , that is, customized parameters. mutation must be a synchronous function. The method in the mutations object needs to use store.commit to call
Action
Action commits a mutation rather than directly changing the state. action can contain any asynchronous operation. Methods in the actions object need to be called using store.dispatch.
The Action function accepts a context object with the same methods and properties as the store instance, so you can call context.commit to submit a mutation, or obtain state and getters through context.state and context.getters.
Module
Due to the use of a single state tree, all the states of the application will be concentrated into a relatively large object. When an application becomes very complex, store objects have the potential to become quite bloated. In order to solve the above problems, Vuex allows us to split the store into modules. Each module has its own state, mutations, actions, getters, and even nested submodules—split in the same way from top to bottom.
Use of vuex in HTML
<body><p id="app">
    <input type="button" value="+" @click="add">
    {{this.$store.state.count}}
    <input type="button" value="-" @click="reduce">
    {{this.$store.getters.synchro}}
    <input type="button" value="改变为10" @click="changeNum"></p><script src="vue.js"></script><script src="vuex.js"></script><script>
    var store = new Vuex.Store({
        state: {
            count: 0
        },
        getters: {
            synchro(state) {
                return state.count            }
        },
        mutations: {
            increment(state) {
                state.count++
            },
            inreduce(state) {
                state.count--
            },
            inchange(state, num) {
                state.count = num            }
        },
        actions: {
            change(context, num) {
                context.commit('inchange', num)
            }
        }
    })

    new Vue({
        el: '#app',
        store,
        methods: {
            add() {
                this.$store.commit('increment')
            },
            reduce() {
                this.$store.commit('inreduce')
            },
            changeNum() {
                this.$store.dispatch('change', 10)
            }
        }
})</script></body>Use of vuex in Vue project (two types)
- Write vuex in the main.js file
import Vue from 'vue'import App from './App'import router from './router'import Vuex from 'vuex'// 全局状态管理Vue.use(Vuex)Vue.config.productionTip = falsevar store = new Vuex.Store({
  state: {
    num: 0
  },
  mutations: {
    changeNum(state, num){
      state.num += num    }
  }})new Vue({
  el: '#app',
  store,
  router,
  components: { App },
template: '<App/>'})Call
<template>
	<p>
		<input type="button" value="改变count的值" @click="change">
    	{{this.$store.state.count}}
	<p></template><script>export default {
	name: '',
	data () {
    	return {
		}
    },
    methods: {
		change() {
			this.$store.commit('changeNum', 10)
		}
}}</script>- in the component to separate vuex
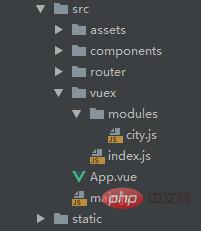
Create a vuex directory in the src directory, create a new modules directory and index.js file Place it in the vuex directory
Introduce the vuex directory in the main.js file
import Vue from 'vue'import App from './App'import router from './router'import store from './vuex'Vue.config.productionTip = false/* eslint-disable no-new */new Vue({
  el: '#app',
  store,
  router,
  components: { App },
template: '<App/>'})Write the following code in index.js
import Vue from 'vue'import Vuex from 'vuex'Vue.use(Vuex)let modules = {}const requireAllModules = require.context("./", true, /\.js$/)requireAllModules.keys().forEach(key => {
  let module = requireAllModules(key).default
  if (module && module.name && module.namespaced) {
    modules[module.name] = module  }})export default new Vuex.Store({
  modules: modules,
strict: process.env.NODE_ENV !== "production"})In Create a new city.js file in the modules directory with the following code:
export default {
  name: "city",
  namespaced: true,
  state: {
    cityName: '',
    cityCode: ''
  },
  getters: {
    getState(state) {
      return state    },
    getCityCode(state) {
      return state.cityCode    }
  },
  mutations: {
    changeCity(state, cityName) {
      state.cityName = cityName    }
}}Set the value in the component
<template>
	<p>
		<ul>
          <li v-for="item in city" @click="handChangeCity(item.name)"></li>
        </ul>
	</p></template><script>import { mapMutations } from 'vuex'   // 引入vuexexport default {
	name: "city",
	data() {
		return {
			city: [
				{ id: 1, name: '北京' }
				{ id: 2, name: '上海' }
				{ id: 3, name: '广州' }
				{ id: 4, name: '深圳' }
				{ id: 5, name: '厦门' }
			]
		}
	},
	methods: {
		// 修改
		...mapMutations({
			changeCity: "city/changeCity"
		}),
		// 第一种写法
		handChangeCity(cityName) {
			this.changeCity(cityName)
		}
		// 第二种写法  不需要使用 ...mapMutations
		handChangeCity(cityName) {
			this.$store.commit('city/changeCity', cityName);
		}
}}</script>Use it in another component
<template>
	<p>
		<p>{{getState.cityName}}</p>
		<p>{{getCityCode}}</p>
	</p></template><script>import { mapGetters} from 'vuex'   // 引入vuexexport default {
	data() {
		return {
		}
	},
	computed: {
	    // 第一种使用方法
	    ...mapGetters({
	    	getState: "city/getState"
	    })
	    // 第二种使用方法
	    ...mapGetters('city', ['getState', 'getCityCode'])
}}</script>The above is the detailed content of Detailed introduction to vuex in vue (detailed explanation and examples). For more information, please follow other related articles on the PHP Chinese website!

Hot AI Tools

Undresser.AI Undress
AI-powered app for creating realistic nude photos

AI Clothes Remover
Online AI tool for removing clothes from photos.

Undress AI Tool
Undress images for free

Clothoff.io
AI clothes remover

AI Hentai Generator
Generate AI Hentai for free.

Hot Article

Hot Tools

Notepad++7.3.1
Easy-to-use and free code editor

SublimeText3 Chinese version
Chinese version, very easy to use

Zend Studio 13.0.1
Powerful PHP integrated development environment

Dreamweaver CS6
Visual web development tools

SublimeText3 Mac version
God-level code editing software (SublimeText3)

Hot Topics
 1378
1378
 52
52
 Best practices for using Vuex to manage global state in Vue2.x
Jun 09, 2023 pm 04:07 PM
Vue2.x is one of the most popular front-end frameworks currently, which provides Vuex as a solution for managing global state. Using Vuex can make state management clearer and easier to maintain. The best practices of Vuex will be introduced below to help developers better use Vuex and improve code quality. 1. Use modular organization state. Vuex uses a single state tree to manage all the states of the application, extracting the state from the components, making state management clearer and easier to understand. In applications with a lot of state, modules must be used
![How to solve the problem 'Error: [vuex] do not mutate vuex store state outside mutation handlers.' when using vuex in a Vue application?](https://img.php.cn/upload/article/000/000/164/168760467048976.jpg?x-oss-process=image/resize,m_fill,h_207,w_330) How to solve the problem 'Error: [vuex] do not mutate vuex store state outside mutation handlers.' when using vuex in a Vue application?
Jun 24, 2023 pm 07:04 PM
How to solve the problem 'Error: [vuex] do not mutate vuex store state outside mutation handlers.' when using vuex in a Vue application?
Jun 24, 2023 pm 07:04 PM
In Vue applications, using vuex is a common state management method. However, when using vuex, we may sometimes encounter such an error message: "Error:[vuex]donotmutatevuexstorestateoutsidemutationhandlers." What does this error message mean? Why does this error message appear? How to fix this error? This article will cover this issue in detail. The error message contains
 How to use Vuex in Vue3
May 14, 2023 pm 08:28 PM
What does Vuex do? Vue official: State management tool What is state management? State that needs to be shared among multiple components, and it is responsive, one change, all changes. For example, some globally used status information: user login status, user name, geographical location information, items in the shopping cart, etc. At this time, we need such a tool for global status management, and Vuex is such a tool. Single-page state management View–>Actions—>State view layer (view) triggers an action (action) to change the state (state) and responds back to the view layer (view) vuex (Vue3.
![How to solve the problem 'Error: [vuex] unknown action type: xxx' when using vuex in a Vue application?](https://img.php.cn/upload/article/000/887/227/168766615217161.jpg?x-oss-process=image/resize,m_fill,h_207,w_330) How to solve the problem 'Error: [vuex] unknown action type: xxx' when using vuex in a Vue application?
Jun 25, 2023 pm 12:09 PM
How to solve the problem 'Error: [vuex] unknown action type: xxx' when using vuex in a Vue application?
Jun 25, 2023 pm 12:09 PM
In Vue.js projects, vuex is a very useful state management tool. It helps us share state among multiple components and provides a reliable way to manage state changes. But when using vuex, sometimes you will encounter the error "Error:[vuex]unknownactiontype:xxx". This article will explain the cause and solution of this error. 1. Cause of the error When using vuex, we need to define some actions and mu
 Learn more about the implementation principles of vuex
Mar 20, 2023 pm 06:14 PM
When asked in an interview about the implementation principle of vuex, how should you answer? The following article will give you an in-depth understanding of the implementation principle of vuex. I hope it will be helpful to you!
 How to solve the problem 'TypeError: Cannot read property 'xxx' of undefined' when using vuex in Vue application?
Aug 18, 2023 pm 09:24 PM
Using Vuex in Vue applications is a very common operation. However, occasionally when using Vuex, you will encounter the error message "TypeError: Cannotreadproperty'xxx'ofundefined". This error message means that the undefined property "xxx" cannot be read, resulting in a program error. The reason for this problem is actually very obvious. It is because when calling a certain attribute of Vuex, this attribute is not correctly set.
 How to use vuex in vue3+vite
Jun 03, 2023 am 09:10 AM
Specific steps: 1. Install vuex (vue3 recommended 4.0+) pnpmivuex-S2, configure the global configuration of importstorefrom'@/store'//hx-app in main.js constapp=createApp(App)app.use(store) 3. Create new related folders and files. Here, configure multiple js inside different vuex. Use vuex modules to place different pages and files, and then use a getters.jsindex.js core file. Import.meta.glob is used here. , instead of
 How to use vuex for component communication in Vue?
Jul 19, 2023 pm 06:16 PM
How to use vuex for component communication in Vue? Vue is a popular JavaScript framework that adopts a component-based development model, allowing us to build complex applications more easily. In the component development process of Vue, we often encounter situations that require communication between different components. Vuex is the state management tool officially recommended by Vue. It provides a centralized storage manager and solves the problem of communication between components. This article will introduce how to use Vuex for component communication in Vue


