Foreword: Finally, here comes a quality article, which I personally feel is very good, "Practical Login Jump between jfinal and bootstrap". The specific content includes the modal box that pops up when you click on the login button, validate after clicking the login confirmation button, jfinal's validate, jfinal's session management, ajax request and return information processing, and intelligent jumps between pages.
You can refer to the jquery weebox summary for the pop-up modal box and jquery validate. Is the pop-up window not displayed in the center? , jquery validate series of articles for getting started.
Start with jfinal’s validate
Of course you can refer to the help documentation provided by jfinal. Of course I must also refer to the official documentation. Of course, everyone must have all kinds of problems when using this open source technology. So based on my actual experience As a result, I think it is necessary to repeat it again.
1. Specify the route in config
me.add("/login", MembersController.class, "/pages/login");2. Write the controller class
public class MembersController extends BaseController {
  @Before(MembersValidator.class)
  @ActionKey("/login")
  public void login() {

    // 获取用户名
    String name = getPara("username");
    // 获取密码
    String password = getPara("password");

    Members mem = Members.me.getMemByNamePasswd(name, CipherUtils.generatePassword(password));

    if (mem != null) {
      // 保存session
      getSession().setAttribute("username", name);

      // 最后登录ip
      mem.set("lastip", getRequest().getRemoteHost());
      mem.set("lastvisit", DateUtils.getCurrentTime());

      mem.update();

      ajaxDoneSuccess("登录成功!");
    } else {
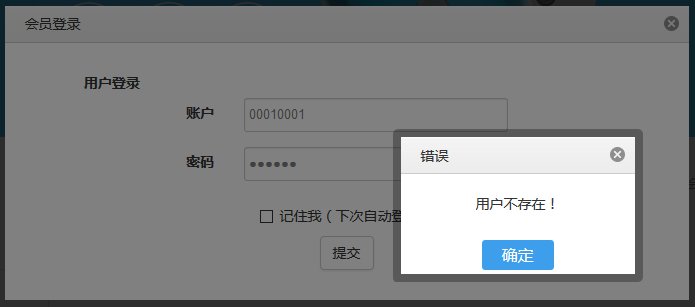
      ajaxDoneError("用户不存在!");
    }

    // 跳转到前台发起请求的路径
    renderJson();

  }
}
Note:
Use before binding validate
Use actionkey to bind the front-end request action name
Use getSession().setAttribute to operate the session, and the front end will introduce how to use it later
Encapsulate ajaxDone series methods for data format binding, the front end will be introduced later
Use the renderJson method to output the result data returned by the ajax request in json format
Next you need to take a look at the baseController I encapsulated
3.BaseController
package com.hc.jf.controller;
import com.jfinal.core.Controller;
public class BaseController extends Controller {
  protected void ajaxDone(int statusCode, String message) {
    setAttr("statusCode", statusCode);
    setAttr("message", message);
    // 跳转路径
    String forwardUrl = getPara("forwardUrl");
    if (forwardUrl == null || forwardUrl.equals("")) {
      forwardUrl = getRequest().getRequestURL().toString();
    }
    setAttr("forwardUrl", forwardUrl);
    setAttr("callbackType", getPara("callbackType"));
  }
  protected void ajaxDoneSuccess(String message) {
    ajaxDone(200, message);
  }
  protected void ajaxDoneInfo(String message) {
    ajaxDone(201, message);
  }
  protected void ajaxDoneSuccess(String message, String forwarUrl) {
    ajaxDone(200, message);
  }
  protected void ajaxDoneError(String message) {
    ajaxDone(300, message);
  }
  protected void ajaxDoneError(String message, String forwarUrl) {
    ajaxDone(300, message);
  }
}
Note:
Encapsulate success, error, and info level information respectively
Four attributes, statusCode, message, forwardUrl, and callbackType, have been added.
The above two attributes also correspond to the front end, which will be introduced later.
4.MembersValidator
package com.hc.jf.validator;

import com.hc.jf.entity.Members;
import com.jfinal.core.Controller;
import com.jfinal.validate.Validator;

public class MembersValidator extends Validator {

  @Override
  protected void validate(Controller controller) {
    validateRequiredString("username", "usernameMsg", "请输入用户名!");
    validateRequiredString("password", "passwordMsg", "请输入密码!");
  }

  @Override
  protected void handleError(Controller controller) {
    controller.keepModel(Members.class);
    controller.render("login.jsp");
  }

}Note:
This validate is really useless, because the front end has already used jquery validate for checking. However, please note that if you do not use jquery or for network security, etc., it is not bad to have this.
Okay, I actually don’t want to join this validate, but I think it’s okay. I haven’t thought of its use yet, but I feel that it is still useful.
jfinal session management
Actually, when it comes to this, it is no longer the session of jfinal, but actually the front end.
<c:choose>
<c:when test="${sessionScope.username!=null}">
    <span>
      <a href="javascript:void(0);" id="mycenter" >
        ${sessionScope.username}<s class="icon_arrow icon_arrow_down"></s>
      </a>
      <i class="line"></i>
      <a href="/logout" title="退出" id="user_login_out" style="padding: 0 6px;">退出</a>
    </span>
    </c:when>
  <c:otherwise>
    <span>
      <a title="登录" href="javascript:show_pop_login();" id="show_pop_login">登录</a>
    </span>
  </c:otherwise>
</c:choose>
Note:
${sessionScope.username} is used here to obtain session data. This is just a very simple application.
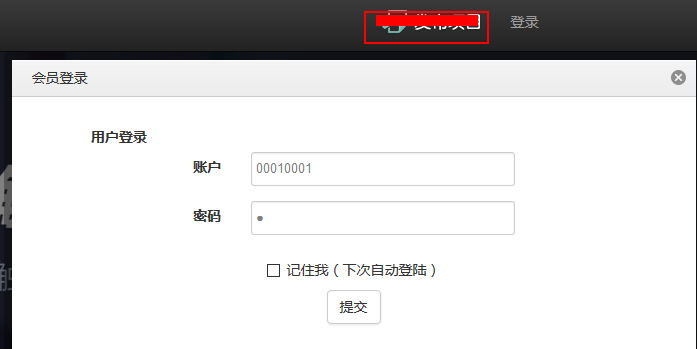
There seems to be nothing to say in 1, but the important thing is that after you pop up the login box, you need to go back to the corresponding jump page and then display the login information. Well, I don’t think it is explained clearly, so the previous one Take a picture!

For the sake of commercial confidentiality, I can only screenshot this picture here, haha.
Just like many Internet websites, if you are a visitor, you can also open many pages to view relevant information. For example, you can open 1.html and 2.html, but on both pages, you can click the login button to pop up the login box. . So the question is, how do you ensure that when you open and log in from 1.html, you still jump to 1.html, and when you open and log in from 2.html, you still jump to 2.html.
Okay, let’s stop talking about this first. Let’s move on to the next chapter.
Ajax request and return information processing
1. Pop up login window
/**
 * 弹出登录框
 */
function show_pop_login() {
  $.weeboxs.open(common.ctx + "/pages/login/login.jsp", {
    boxid : 'pop_user_login',
    contentType : 'ajax',
    showButton : false,
    showCancel : false,
    showOk : false,
    title : '会员登录',
    width : 700,
    type : 'wee'
  });
}
This is a pop-up login box. As for weebox, you can view the jquery weebox summary.
Note:
This may be opened from 1.html, or it may be a login box opened from 2.html page.
2. Then let’s take a look at the login form
<form class="pop_login_form" action="${ctx}/login?callbackType=closeCurrent" method="post" onsubmit="return validateCallback(this, dialogAjaxDone);">
<div class="row ">
<div class="row">
<label class="col-md-4" style="margin-top: 10px;" for="name">用户登录</label>
</div>
<div class="form-group">
<div class="row">
<div class="col-md-2 col-md-offset-2 tr th">
<label for="name">账户</label>
</div>
<div class="col-md-5">
<input type="text" class="form-control required" id="username" name="username" placeholder="请输入会员编号"
autocomplete="off">
</div>
</div>
</div>
<div class="form-group">
<div class="row">
<div class="col-md-2 col-md-offset-2 tr th">
<label for="name">密码</label>
</div>
<div class="col-md-5">
<input type="password" class="form-control required" id="password" name="password" placeholder="请输入登陆密码">
</div>
</div>
</div>
<div class="row">
<div class="checkbox">
<label> <input type="checkbox"> 记住我(下次自动登陆)
</label>
</div>
</div>
<div class="row">
<button type="submit" style="margin-bottom: 10px;" class="btn btn-default">提交</button>
</div>
</div>
</form>Note:
You need to pay attention to action=”${ctx}/login?callbackType=closeCurrent”
Follow onsubmit="return validateCallback(this, dialogAjaxDone);"
Okay, let’s take a look at the login interface first.

A very beautiful login box, too beautiful to look like a powerful one! whee.
Then the key part comes, please continue to pay attention to the next section. I also put the ajax request in the code of the next section to avoid duplication.
Smart jump between pages
1. Submit a request
/**
 * 普通ajax表单提交
 *
 * @param {Object}
 *      form
 * @param {Object}
 *      callback
 * @param {String}
 *      confirmMsg 提示确认信息
 */
function validateCallback(form, callback, confirmMsg) {
  var $form = $(form);
  if (!$form.valid()) {
    return false;
  }
  var _submitFn = function() {
    var forwardUrl = window.location.href;
    var formUrl = $form.attr("action");
    if (formUrl.indexOf("?") != -1) {
      formUrl += "&forwardUrl=" + forwardUrl;
    } else {
      formUrl += "?forwardUrl=" + forwardUrl;
    }
    $.ajax({
      type : form.method || 'POST',
      url : formUrl,
      data : $form.serializeArray(),
      dataType : "json",
      cache : false,
      success : callback || YUNM.ajaxDone,
      error : YUNM.ajaxError
    });
  }
  if (confirmMsg) {
    alertMsg.confirm(confirmMsg, {
      okCall : _submitFn
    });
  } else {
    _submitFn();
  }
  return false;
}好吧,看到这,你也许会说我剽窃了DWZ的灵感,OK,既然zhanghuihua同学开源了,有必要我们就好好的利用是吧。
注意:
你看到了forwardUrl的相关代码,没错,这个关键的字段就是来传递发起请求的页面路径,比如说1.html,2.html。
然后,ajax执行成功后,也就是登陆成功后,我们要执行callback方法,也就是dialogAjaxDone方法,那么你需要继续看下去。
2.回调函数
/**
 * dialog上的表单提交回调函数 服务器转回forwardUrl,可以重新载入指定的页面.
 * statusCode=YUNM.statusCode.ok表示操作成功, 自动关闭当前dialog
 */
function dialogAjaxDone(json) {
  YUNM.ajaxDone(json);
  if (json[YUNM.keys.statusCode] == YUNM.statusCode.ok || json[YUNM.keys.statusCode] == YUNM.statusCode.info) {
    if ("closeCurrent" == json.callbackType) {
      close_pop();
    }
    // 如果指定了后调转页面,进行调转
    if (json.forwardUrl) {
      location.href = json.forwardUrl;
    }
  }
}

  ajaxDone : function(json) {
    if (json[YUNM.keys.statusCode] == YUNM.statusCode.error) {
      if (json[YUNM.keys.message])
        $.showErr(json[YUNM.keys.message]);
      ;
    } else if (json[YUNM.keys.statusCode] == YUNM.statusCode.timeout) {
      alertMsg.error(json[YUNM.keys.message]);
    }
},注意:
第二串代码就是出于错误消息,诸如“用户不存在的”,还有timeout。
第一串代码就是回调函数,其作用就是成功后关闭弹出框,然后再跳转到对应页面。

结语:OK,这样一篇文章希望能够给热爱jfinal和bootstrap的同学带来灵感!


