How to understand CSS preprocessors, postprocessors and selectors
This article brings you relevant knowledge about preprocessors, postprocessors and selectors in CSS. I hope it will be helpful to you.

css preprocessor
css preprocessor: Use a specialized programming language to add some programming to CSS feature, using CSS as a target to generate files, and then developers only need to use this language for coding work.
Problems with css:
The syntax is not powerful enough. For example, it cannot be nested, which leads to the need to write many repeated selectors in modular development;
There is no variable and reasonable style reuse mechanism, so logically related attribute values must be repeatedly output in the form of literals, making it difficult to maintain.
Therefore, the preprocessor is needed to provide the style layer reuse mechanism missing in CSS, reduce redundant code, and improve the maintainability of style code.
The three current mainstream processors are Less, Sass and Stylus
Comparison of Sass, LESS and Stylus
Installation
1.Sass installation
First install ruby. It is recommended to install it to the C drive. During the installation process, select "Add Ruby executables to your PATH"
After ruby is installed successfully, start Ruby's Command control panel, enter the command
gem install sass
and press Enter, Sass will be installed automatically
2. Less installation
is divided into Two types: client-side and server-side installation.
a. Client
You only need to download a Javascript script file "less.js" on the official website, and then add the following code to the HTML where we need to introduce the LESS source file:
<link rel="stylesheet/less" type="text/css" href="文件路径/styles.less">
<script src="文件路径/less.js" type="text/javascript"></script>
b. Server
Use node's package manager (npm) to install LESS. After successful installation, you can compile the LESS file in the Node environment.
First install node. After the installation is successful, start the command control panel of node and enter the command
$ npm install less
After pressing Enter, less will be installed automatically
3.Stylus installation
The installation of Stylus is very similar to the installation of LESS on the server side. Install Node first. Enter the command in Node's Command control panel:
$ npm install stylus
After pressing Enter, stylus will be installed automatically
Sass, LESS and Stylus will be converted into css files
1.sass
First create a Sass file in the project, in this example name it "style.scss", and place it in the corresponding project style
Start Ruby Command control panel, find the Sass file that needs to be translated
Enter the following command in the corresponding directory:
sass style.scss style.css
sass --watch style.scss:style.css
will generate an automatic "style.css" file and automatically update the corresponding CSS style files
2.Less(understanding)
are translated through their own commands in the installed Node JS environment.
$ lessc style.less
The above command will pass the compiled CSS to stdout, you can save it to a file:
$ lessc style.less > style.css
3.Stylus (understand)
Stylus has Executable, so Stylus can convert itself into CSS. Stylus can read output from "stdin" to "stdout", so Stylus can translate source files like this:
$ stylus –compress <some.styl> some.css
Stylus also like Sass, accepts translation of both single files and entire directories. For example, a directory named "css" will compile and output a ".css" file in the same directory.
$ stylus css
The following command will output to "./public/stylesheets":
$ stylus css –out public/stylesheets
You can also translate multiple files at the same time:
$ stylus one.styl two.styl
If your browser is installed Firebug, then you can use the FireStylus extension.
$ stylus –firebug <path>
Variable processing
Less: variable processing method-lazy loading, All calculations of Less variables are based on the last defined value of this variable.
Less
@size: 10px;.box { width: @size; } @size: 20px;
.ball { width: @size; }Output:
.box { width: 20px; } .ball { width: 20px; }Stylus
size = 10px
.box
  width: sizesize = 20px
.ball
  width: size
Output:
.box { width: 10px;}.ball { width: 20px;}Sass’s variable processing method is the same as Stylus’s, variables The value output is calculated based on the most recent previous definition. This actually represents two concepts: Less is more inclined to be declarative and close to CSS, and the calculation process weakens the calling timing; while Sass and Stylus are more inclined to imperative.
If you introduce a third-party style library into Less, you can change the style by reconfiguring the variables
Advantages: stylus and sass will be less susceptible to variable name conflicts with multiple third-party libraries influence, because a variable cannot affect the output style before defining it
css post-processor
Reference link
css post-processor processes css and Finally, a css preprocessor is generated, which is a css preprocessor in a broad sense
Examples: css compression tool (clean-css), Autoprefixer (based on browser support data on Can I Use, automatically processed Compatibility issues)
Autoprefixer:
Standard css:
.container {display: flex;}.item {flex: 1;}After compatibility processing
.container {
display: -webkit-box;
display: -webkit-flex;
display: -ms-flexbox;
display: flex;
}
.item {
-webkit-box-flex: 1;
-webkit-flex: 1;
-ms-flex: 1;
flex: 1;
}Advantages: Use Css syntax, easy Modularize, close to the future standard of Css
Disadvantages: limited logical processing capabilities
Framework examples
PostCss:是一个基于JS插件的转换样式的工具。PostCSS插件可以像预处理器,它们可以优化和Autoprefix代码;可以添加未来语法;可以添加变量和逻辑;可以提供完整的网格系统;可以提供编码的快捷方式等等
优点:
- 多样化的功能插件,创建了一个生态的插件系统
- 根据你需要的特性进行模块化
- 快速编译
- 创建自己的插件,且具可访问性
- 可以像普通的CSS一样使用它
- 不依赖于任何预处理器就具备创建一个库的能力
- 可以与许多流行工具构建无缝部署
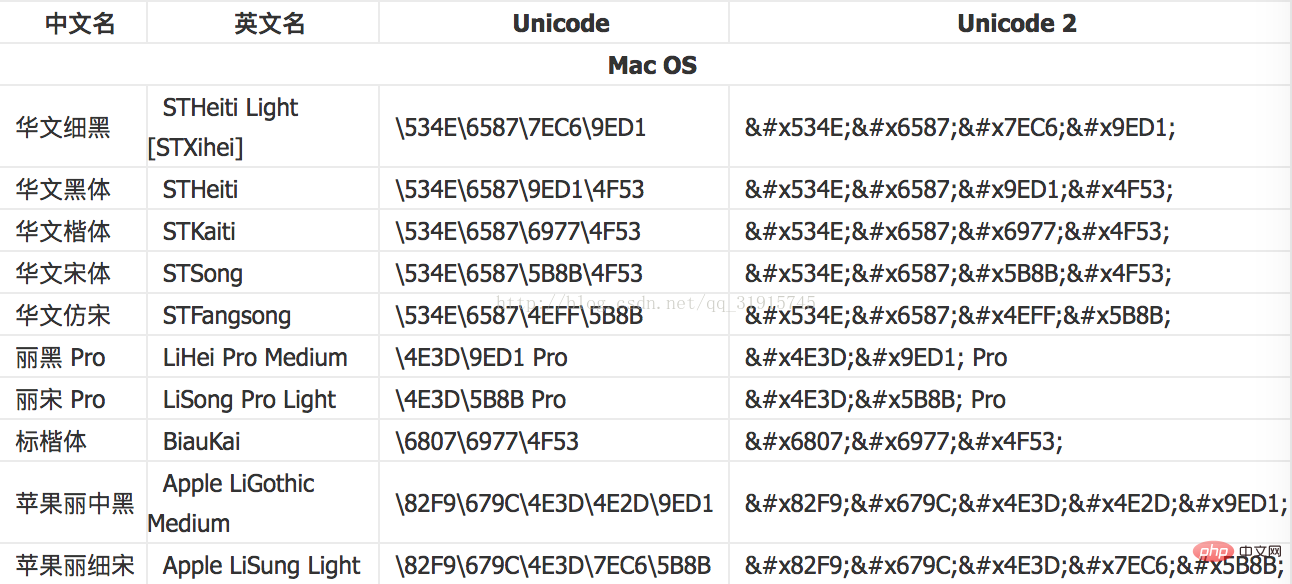
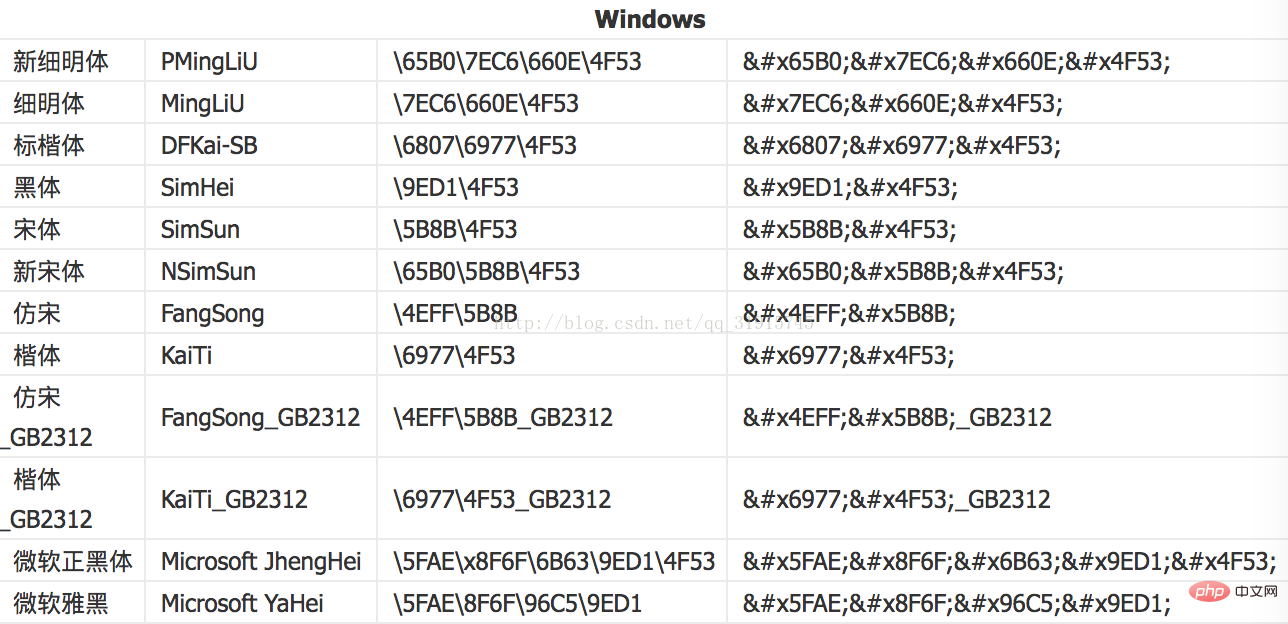
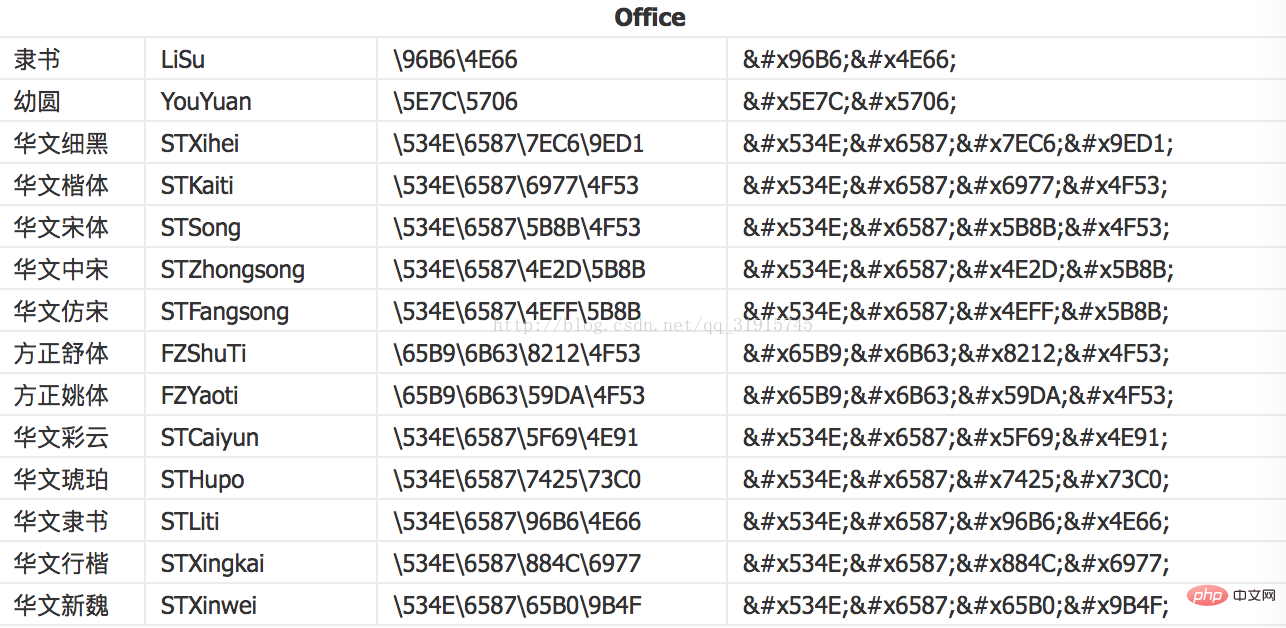
font-family
font-family用来规定元素的字体系列。
font-family 可以把多个字体名称作为一个“回退”系统来保存。如果浏览器不支持第一个字体,则会尝试下一个。也就是说,font-family 属性的值是用于某个元素的字体族名称或/及类族名称的一个优先表。浏览器会使用它可识别的第一个值。
font-family 定义的原则:
- 通常会先进行英文字体的声明,选择最优的英文字体,这样不会影响到中文字体的选择,中文字体声明则紧随其次。
- 兼顾多操作系统,不同系统下的字体表示:


- 当使用一些非常新的字体时,要考虑向下兼容,兼顾到一些极旧的操作系统,可以使用字体族系列 serif 和sans-serif 结尾。为低级系统提供fallback方案
css选择器
参考链接
选择器
分类:基础选择器、组合选择器、属性选择器、伪类选择器和伪元素等
基础选择器:
id选择器(#footer),匹配所有id属性等于footer的元素。
类选择器(.info),匹配所有class属性中包含info的元素。
通用选择器(*),匹配任何元素。
标签选择器(E),匹配所有使用E标签的元素。
同级元素选择器(E~F ),匹配任何在E元素之后的同级F元素(CSS3)。
属性选择器:(E表示元素,attr表示属性,val表示属性的值。)
 E[attr]选择器,匹配所有具有attr属性的E元素,不考虑它的值。
 E[attr=val]匹配所有attr属性值为val的E元素。
 E[attr~=val]匹配具有attr属性且属性值用空格分隔的字符列表。
 E[attr|=val]匹配具有attr属性且属性值为用连接符(-)分隔的字符串,并以val开头的E元素。
 E[attr^="val"],属性attr的值以"val"开头的元素(CSS3)。
 E[attr$=“val”],属性attr的值以"val"结尾的元素(CSS3)。
 E[attr*="val"],属性attr的值包含"val"字符串的元素(CSS3)。
组合选择器
  多元素选择器(E, F),同时匹配多有E元素或F元素。
  后代选择器(E F),匹配所有属于E元素后代的F元素,E和F之间用空格分隔。
  子元素选择器(E > F), 匹配所有E元素的子元素F。
  相邻选择器(E + F),匹配所有紧随E元素之后的同级元素F。
伪类选择器:
   E:link, 匹配所有未被点击的链接.
   E:visited, 匹配所有已被点击的链接。
   E:active, 匹配鼠标已经将其按下,还没释放的E元素。
   E:hover, 匹配鼠标悬停其上的E元素。
   E:focus, 匹配获得当前焦点的E元素。
结构性伪类:E:nth-child(n), 匹配其父元素的第n个子元素,第一个编号为1。
!important属性
1、用于解决IE对某些CSS规范有偏差的情况.
比如在IE中的效果总是和其他的浏览器如firefox,opera等相差2px,导致页面布局有错位, 这是因为IE对盒之间距离的解释的bug造成的,针对这种情况我们就可以利用!important来帮助解决。
.myclass{ margin-left:20px!important; margin-left:40px;}只有当同时出现两个同名的样式时,才可以这样用,此时IE浏览器是识别的
2、如果有定义了一个样式A,比如font-size,你不打算让以后也叫样式A的覆盖掉这个font-size,也可以用 !important . 而如果新样式也用了!important 则还是会强制覆盖掉
.A{ font-size:12px !important;}.A{ font-size:14px;   //不会生效
}.A{ font-size:14px !important; //生效
}优先级
!important >id选择器>class、属性、伪类选择器>标签选择器
权值越大优先级越高,权值相同,后定义的优先级较高,
浏览器查找元素是从右到左查找的,好处是为了快速过滤掉一些无关紧要的样式规则和元素
例如:p#pBox p span.red{color:red;},浏览器的查找顺序如下:先查找html中所有class=’red’的span元素,找到后,再查找其父辈元素中是否有p元素,再判断p的父元素中是否有id为pBox的p元素,如果都存在则匹配上。
属性继承
CSS属性继承:外层元素的样式,会被内层元素进行继承。多个外层元素的样式,最终都会“叠加”到内层元素上。
不可继承的:display、margin、border、padding、background、height、min-height、max-height、width、min-width、max-width、overflow、position、left、right、top、bottom、z-index、float、clear、table-layout、vertical-align、page-break-after、page-bread-before和unicode-bidi。
CSS文本属性都会被继承的:
color、 font-size、font-family、font-style、 font-weight
text-align、text-decoration、text-indent、letter-spacing、line-height
提示:中的CSS属性,会被所有的子元素继承。
优先级就近原则,同权重的情况下样式定义最近者为标准,载入样式以最后载入的定位为准
ID选择器和Class选择器的区别
ID选择器:每个元素只能有一个ID,每个页面只能有一个元素使用该ID
class选择器:多个元素可以共用相同类,一个元素可以有多个类
Sprite Picture Principle
Principle: Combine small icons into one large picture, and set the background-image to the public css of the element as the composite picture, so that each element will be based on the The composite image is the background, and the page only loads one composite image, and then fine-tune the background-position of each element individually. Combine multiple requests into one.
background-position
Set the starting position of the background image.
The background-position attribute sets the position of the background original image (defined by background-image), which means that the prerequisite for using this attribute is that the background original image background-image must be set.
Attribute value of background-position:
- Direction value: x-axis direction: left | right | center; y-axis direction: top| bottom | center
- Use percentages to set attribute values, and determine the starting position of the image by taking the length and width of its own container minus the length and width of the image multiplied by the percentage.
- Value: X-axis direction: x px; Y-axis direction: x px
(Learning video sharing: css video tutorial)
The above is the detailed content of How to understand CSS preprocessors, postprocessors and selectors. For more information, please follow other related articles on the PHP Chinese website!

Hot AI Tools

Undresser.AI Undress
AI-powered app for creating realistic nude photos

AI Clothes Remover
Online AI tool for removing clothes from photos.

Undress AI Tool
Undress images for free

Clothoff.io
AI clothes remover

AI Hentai Generator
Generate AI Hentai for free.

Hot Article

Hot Tools

Notepad++7.3.1
Easy-to-use and free code editor

SublimeText3 Chinese version
Chinese version, very easy to use

Zend Studio 13.0.1
Powerful PHP integrated development environment

Dreamweaver CS6
Visual web development tools

SublimeText3 Mac version
God-level code editing software (SublimeText3)

Hot Topics
 1386
1386
 52
52
 How to use bootstrap in vue
Apr 07, 2025 pm 11:33 PM
Using Bootstrap in Vue.js is divided into five steps: Install Bootstrap. Import Bootstrap in main.js. Use the Bootstrap component directly in the template. Optional: Custom style. Optional: Use plug-ins.
 The Roles of HTML, CSS, and JavaScript: Core Responsibilities
Apr 08, 2025 pm 07:05 PM
HTML defines the web structure, CSS is responsible for style and layout, and JavaScript gives dynamic interaction. The three perform their duties in web development and jointly build a colorful website.
 How to write split lines on bootstrap
Apr 07, 2025 pm 03:12 PM
There are two ways to create a Bootstrap split line: using the tag, which creates a horizontal split line. Use the CSS border property to create custom style split lines.
 Understanding HTML, CSS, and JavaScript: A Beginner's Guide
Apr 12, 2025 am 12:02 AM
WebdevelopmentreliesonHTML,CSS,andJavaScript:1)HTMLstructurescontent,2)CSSstylesit,and3)JavaScriptaddsinteractivity,formingthebasisofmodernwebexperiences.
 How to resize bootstrap
Apr 07, 2025 pm 03:18 PM
To adjust the size of elements in Bootstrap, you can use the dimension class, which includes: adjusting width: .col-, .w-, .mw-adjust height: .h-, .min-h-, .max-h-
 How to insert pictures on bootstrap
Apr 07, 2025 pm 03:30 PM
There are several ways to insert images in Bootstrap: insert images directly, using the HTML img tag. With the Bootstrap image component, you can provide responsive images and more styles. Set the image size, use the img-fluid class to make the image adaptable. Set the border, using the img-bordered class. Set the rounded corners and use the img-rounded class. Set the shadow, use the shadow class. Resize and position the image, using CSS style. Using the background image, use the background-image CSS property.
 How to set up the framework for bootstrap
Apr 07, 2025 pm 03:27 PM
To set up the Bootstrap framework, you need to follow these steps: 1. Reference the Bootstrap file via CDN; 2. Download and host the file on your own server; 3. Include the Bootstrap file in HTML; 4. Compile Sass/Less as needed; 5. Import a custom file (optional). Once setup is complete, you can use Bootstrap's grid systems, components, and styles to create responsive websites and applications.
 How to use bootstrap button
Apr 07, 2025 pm 03:09 PM
How to use the Bootstrap button? Introduce Bootstrap CSS to create button elements and add Bootstrap button class to add button text


