How to achieve 3D naked eye effect in mini program carousel? The following article will introduce to you the implementation method to add color to the Spring Festival atmosphere. I hope it will be helpful to everyone!

Among the many functional modules of an APP, the home page carousel plays an important role. It is the entrance to distribute key information. I remembered an article I read a few months ago - " Implementation of naked-eye 3D effect in Ziruke APP". The article mentioned that the following naked-eye 3D banner carousel effect was implemented on the Android app:

Inspired by this article, I decided to "follow the example" and try to simulate a 3D naked-eye effect carousel full of Spring Festival atmosphere on the mini program.
Carefully observe the dynamic renderings implemented above. It can be seen that the banner picture is not a conventional picture, but uses a picture to divide the content. It is displayed in a layer-by-layer manner (as mentioned in the article mentioned above, the background layer, foreground and middle ground are superimposed and presented. You can go to the above to understand first), and then monitor the direction sensor of the mobile phone and adjust the display according to the direction. The foreground and background move, creating a visual depth of field effect.
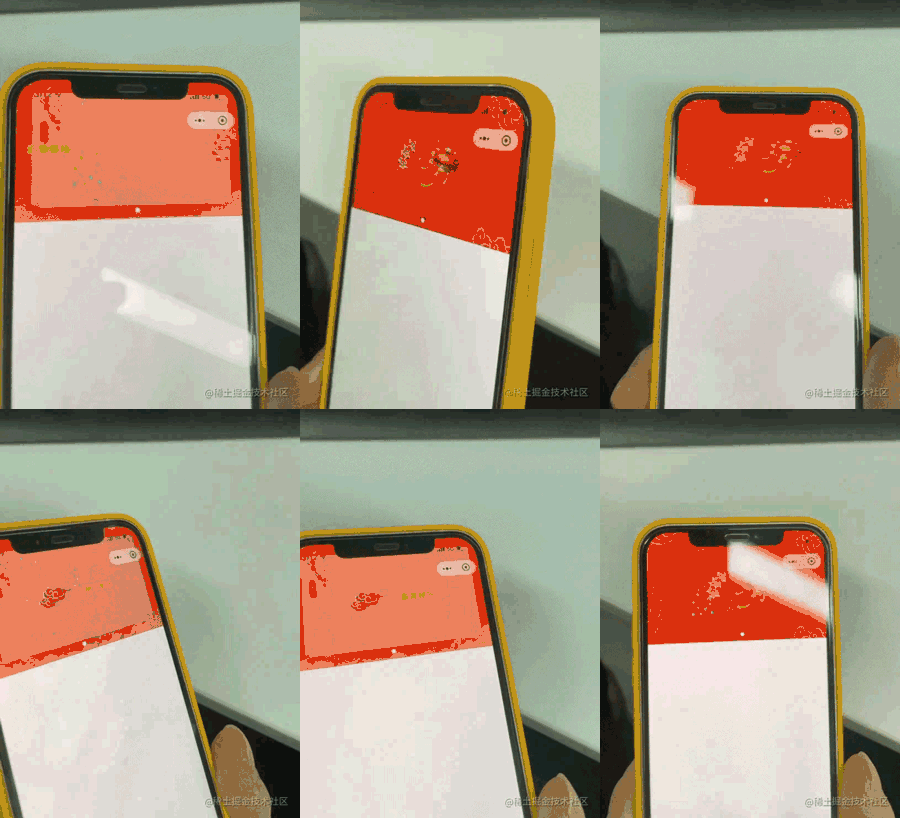
What’s interesting is that if you are using an iPhone, I believe you should be able to find that in the homepage state, as the phone rotates in different directions, the background image will move slightly in the opposite direction, which can also give people a sense of A similar depth of field effect. (The effect is as shown below)

After introducing the principle, let’s start the actual combat.
Looking through the mini program documentation, we need to use two APIs: wx.startDeviceMotionListening and wx.onDeviceMotionChange. What we need to focus on here is the content returned by the wx.onDeviceMotionChange API. According to the documentation, the API returns the following three values:

If you are exposed to this for the first time API, I believe you are confused after reading the documentation. Next, I will use the Chrome browser debugging tool to help you fully understand what these three values mean.
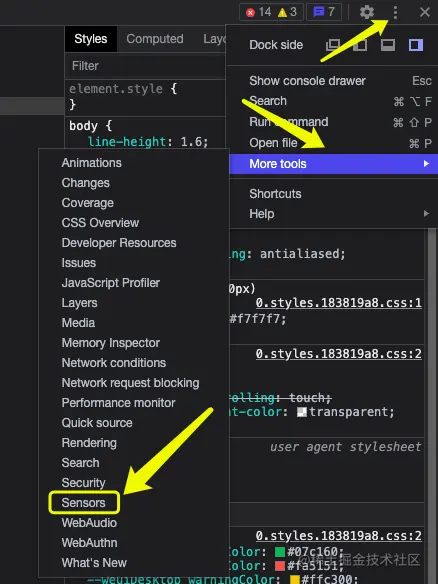
Open the browser developer tools and follow the steps below to turn on sensor debugging:

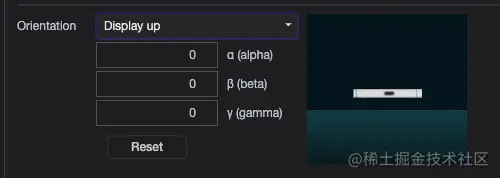
After opening it, look here:

Eh? Isn't this the same thing? Yes, the three values shown here exactly correspond to the API return value. It can be seen that in the case of alpha=0, beta=90, gamma=0, it means that the phone is standing vertically on a plane. We can click on the option or directly modify the value in the input box, and we can intuitively see the corresponding value. changes, the flip state of the mobile phone changes, for example, when the mobile phone is placed flat on the table, the three parameter values are as follows:

With the above real-time simulation tools, the next picture will be Easy to understand:

wxml:
<view class="swiper-box">
<image wx:for="{{background}}" class="swiper-bg {{animationStart || current === index ? 'fadeIn' : 'fadeOut'}} "></image>
<swiper indicator-dots="{{true}}" indicator-active-color="#fff" interval="{{3000}}" autoplay="{{true}}" circular="{{true}}" bindchange="handleChange" bindtransition="handleTransition" bindanimationfinish="handleFinish">
<block wx:for="{{background}}" wx:key="*this">
<swiper-item>
<view class="swiper-item-content" >
<image class="icon" src="../../images/cloud.png" style="width: 90px; height: 90px;transform: translate3d({{x}}px, {{y}}px, {{z}}px);" wx:if="{{index === 0}}"></image>
<image class="icon" src="../../images/firecrackers.png" style="width: 90px; height: 90px;transform: translate3d({{x}}px, {{y}}px, {{z}}px);" wx:else></image>
<text class="text" wx:if="{{index === 0}}">新年快乐</text>
<text class="text" wx:else>大吉大利</text>
</view>
</swiper-item>
</block>
</swiper>
</view>Note here that since swiper can only nest the swiper-item component, you need to The background image is placed at the same level as the swiper and displayed in a positioning manner
js:
// index.js
// 获取应用实例
const app = getApp()

Page({
  data: {
    background: ['https://cloud-minapp-39237.cloud.ifanrusercontent.com/1n6jtVIbbJ3rnAv7.jpg', 'https://cloud-minapp-39237.cloud.ifanrusercontent.com/1n6mBOvOutOFQ3E8.png',],
    x: 0,
    y: 0,
    z: 0,
    animationFinish: true, // 动画是否执行完成
    animationStart: false, // 是否开始执行动画
    current: 0,
  },
  // 动画开始执行
  handleTransition(e) {
    if (this.data.animationFinish) {
      this.setData({
        animationFinish: false,
        animationStart: true,
      })
    }
  },
  // 动画执行结束
  handleFinish() {
    this.setData({
      animationFinish: true,
      animationStart: false,
    })
  },
  // current值变化
  handleChange(e) {
    this.setData({
      current: e.detail.current,
    })
  },
  onLoad() {

    const that = this;
    // 监听方向变化
    wx.startDeviceMotionListening({
      success() {
        wx.onDeviceMotionChange(function (res) {
          const {
            alpha, // 0-360
            beta, // -180-180
            gamma // -90- 90
          } = res

          const disX = gamma / 90 * 20
          const disY = beta / 90 * 12
          let z = 0
          if (disX > 0 || disY > 0) {
            z = 20
          } else {
            z = -20
          }
          that.setData({
            x: disX,
            y: disY,
            z
          })
        })
      }
    })
  }
})The code to be explained here is
const disY = beta / 90 * 12
Normally when we use the mobile phone, the screen is facing up , so just take half the relative value.
After calculating the offset x, y, the page changes the offset distance of the element through transform: translate3d().

The effect here seems not to be particularly obvious, for two reasons:
其实借助该方向API,我们还可以作为触发动画的触发器。例如在手机翻转到一定角度值时,我们可以播放烟花效果
npm i lottie-miniprogram
安装完之后记得在微信开发者工具中点击构建npm包
wxml:
<canvas id="canvas" type="2d" style="max-width:90%"></canvas>
js:
  onLoad() {
    // 初始化lottie动画
    wx.createSelectorQuery().select('#canvas').node(res => {
      const canvas = res.node
      const context = canvas.getContext('2d')
      lottie.setup(canvas)
      lottieInstance = lottie.loadAnimation({
        path: 'https://assets10.lottiefiles.com/packages/lf20_1qfekvox.json',
        autoplay: true,
        loop: false,
        rendererSettings:{
          context
        }
      })
    }).exec()
}然后在wx.onDeviceMotionChange中调用
lottieInstance.play()
处理触发即可
完整代码
https://github.com/pengjinlong/cases/tree/main/spring-article
本文转载自:https://juejin.cn/post/7051490823497580574
作者:码克吐温
【相关学习推荐:小程序开发教程】
The above is the detailed content of Walk you step by step on how to achieve the 3D naked-eye carousel effect in the mini program. For more information, please follow other related articles on the PHP Chinese website!